Recipe Ingredients
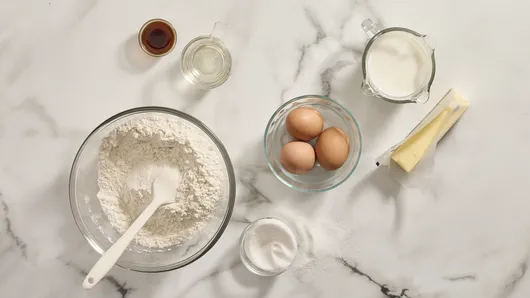
Here’s what you’ll need to make vanilla layer cake.
Flour: All-purpose flour has just the right amount of protein to offer structure to the cake, allowing it to rise tall without collapsing, while still being soft and tender.
Leavening: Baking powder and baking soda work together to lift the cake and aid in creating the fluffy texture.
Salt: For this recipe, I used a kosher salt with larger crystals. If you are using a brand of kosher salt with smaller crystals, reduce the amount to 3/4 teaspoon. For finer salts like table salt, use 1/4 to 1/2 teaspoon,
Butter and Oil: Used in combination, butter and oil make for a rich and buttery-tasting cake that remains moist for days.
Whole Milk: Milk gives the cake moisture, and the lactic acid in the milk aids in tenderness.
Eggs and Sugar: Whipping together the eggs and sugar creates the airy base for this cake.
Vanilla: Giving the cake its signature flavor and fragrance, using real vanilla extract is key. You can also use vanilla bean paste if you like the visual vanilla bean specks throughout your cake.
How to Make Vanilla Layer Cake
1. Make the Vanilla Cake Batter
This batter starts by beating eggs and sugar together until they are foamy and light. There's no need to worry about forming soft or firm peaks– you're just looking to get a little volume and dissolve most of the sugar into the eggs. Then alternately add the dry and wet ingredients until you have a smooth batter.
2. Bake the Vanilla Cake Layers
Divide the batter between your pans as evenly as you can for even cake layers. If you have a good eye, you can just go for it, but if you want to be more meticulous, you can weigh the cake batter and divide evenly between the two pans.
3. Cool the Vanilla Layer Cake
Be sure to cool the cake layers completely before frosting. Adding buttercream to a cake that is even slightly warm can cause all sorts of sliding and structural issues and just cause unnecessary stress.
Note: If you want to make the cake ahead, this is a good time to wrap the layers well in plastic and/or foil and freeze for up to one month.
4. Make the Vanilla Buttercream
This is a classic American-style buttercream using butter whipped with powdered sugar and sometimes a little milk. This version uses heavy cream and a higher ratio of butter to powdered sugar than many recipes, for a super creamy, fluffy, and spreadable frosting.
Note: A single batch of this buttercream will frost and fill this cake nicely without overwhelming the actual cake. If you want to decorate the cake with piping or just like a higher ratio of frosting to cake, the recipe is easily doubled.
5. Assemble the Vanilla Layer Cake
This cake can be assembled as soon as it has completely cooled. You can also wrap the unfrosted layers in plastic and refrigerate until chilled (or freeze) and assemble with cold cake layers. This makes frosting and decorating a little easier, as the frosting will firm up to hold the layers together as you decorate.
6. Decorate the Vanilla Layer Cake
This cake needs nothing more than a shower of Betty Crocker™ sprinkles to feel special. Check out all the options.
How to Store Vanilla Layer Cake
Refrigerator
You can store portions of leftover vanilla layer cake at room temperature up to two days. Wrap or cover well so the cut edges don’t dry out.
Freezer
Wrap portions of vanilla layer cake in a double layer of plastic wrap (or a layer of plastic wrap and foil). Freeze for up to 1 month. Thaw portions of cake still wrapped to keep them moist and enjoy at room temperature for the best texture.
How to Serve Vanilla Layer Cake
This cake has the best texture and flavor when served at room temperature. The frosting is soft and creamy, while the cake is tender and moist. You can serve cake layers as is or with seasonal berries, or go for the classic cake and ice cream pairing.
Frequently Asked Questions
What type of vanilla should I use for vanilla layer cake?
Vanilla is anything but basic, and the real stuff can come with a high price tag. You can find pure vanilla extract in supermarkets, along with imitation, as well as blends. Blends offer real vanilla flavor at a lower cost by blending pure vanilla extract with other flavorings. Imitation vanilla is great for that classic “birthday cake” taste. Then, there's vanilla bean paste, which combines beans and extract in a syrupy paste. Ultimately, choose a vanilla that fits your taste and budget.
(function() {
document.addEventListener('DOMContentLoaded', function() {
var componentMetadata = JSON.parse('\x7b\x22componentName\x22\x3a\x22RecipeFAQ_2ee1ece6-a33c-4f37-aafb-6377bfa48ff1\x22,\x22deferOptions\x22\x3a\x7b\x22deferComponent\x22\x3afalse,\x22deferType\x22\x3a\x22None\x22,\x22deferId\x22\x3a\x22r5919c0ccc8a1403a913cc678064fda86\x22,\x22deferredContainerId\x22\x3a\x22\x2fmain\x2frdpFAQ\x22,\x22deferredContainerView\x22\x3anull\x7d,\x22viewName\x22\x3a\x22RecipeFAQ\x22\x7d');
var configuration = {"title":"Vanilla Layer Cake","introduction":"\u003cp\u003eEvery baker needs a classic vanilla layer cake in their recipe box, one with a creamy frosting that’s just begging for sprinkles. The perfect vanilla layer cake should be fragrant with vanilla and great flavor. It should also have enough structure to stack and layer, while also remaining moist and light. This from-scratch version, featuring Gold Medal™ All Purpose Flour, ticks all the boxes and is as easy as it is delicious. Melted butter saves those of us who always forget to soften the butter and, in combination with a little oil, makes for a moist cake with a velvety crumb that is great for stacking while remaining tender.\u0026nbsp;\u003c/p\u003e","servingSize":"1 Slice","image":{"small":{"media":"(min-width: 0px)","src":"https://mojo.generalmills.com/api/public/content/C6bu82ZLTcmZ3DVJc0gggQ_webp_base.webp?v=2d49ca94\u0026t=e724eca7b3c24a8aaa6e089ed9e611fd"},"medium":{"media":"(min-width: 500px)","src":"https://mojo.generalmills.com/api/public/content/C6bu82ZLTcmZ3DVJc0gggQ_webp_base.webp?v=2d49ca94\u0026t=191ddcab8d1c415fa10fa00a14351227"},"large":{"media":"(min-width: 767px)","src":"https://mojo.generalmills.com/api/public/content/C6bu82ZLTcmZ3DVJc0gggQ_webp_base.webp?v=2d49ca94\u0026t=191ddcab8d1c415fa10fa00a14351227"},"alt":"Vanilla Layer Cake"},"contributor":{"label":"By","name":"Cindy Rahe","displayDate":{"label":"Updated","date":"Aug 12, 2025"}},"ingredientGroups":[{"name":"Cake","ingredients":[{"quantity":"2 1/4","description":"cups Gold Medal™ All Purpose Flour"},{"quantity":"1 1/2","description":"teaspoons baking powder"},{"quantity":"1","description":"teaspoon baking soda"},{"quantity":"1","description":"teaspoon kosher salt (reduce to 1/2 teaspoon if using table or fine salt)"},{"quantity":"1/2","description":"cup unsalted butter"},{"quantity":"1","description":"cup whole milk"},{"quantity":"1/4","description":"cup vegetable oil"},{"quantity":"3","description":"large eggs"},{"quantity":"1 1/4","description":"cups granulated sugar"},{"quantity":"4","description":"teaspoons vanilla"}]},{"name":"Buttercream Frosting","ingredients":[{"quantity":"1","description":"cup unsalted butter, softened"},{"quantity":"2 1/2","description":"cups powdered sugar"},{"quantity":"1/4","description":"cup heavy whipping cream"},{"quantity":"1","description":"tablespoon vanilla"},{"quantity":"","description":"Pinch of salt"}]},{"name":"Decoration","ingredients":[{"quantity":"","description":"Betty Crocker™ Sprinkles (optional but encouraged)"}]}],"steps":[{"description":"\u003cp\u003eHeat the oven to 350°F. Spray 2 (8- or 9-inch) round cake pans with baking spray with flour (or grease them generously).\u003c/p\u003e"},{"description":"\u003cp\u003eWhisk the flour, baking powder, baking soda, and salt together in a bowl and set aside.\u003c/p\u003e"},{"description":"\u003cp\u003eMelt the 1/2 cup butter in a small saucepan over low heat. Add the milk and heat until warm. Stir in the oil. (Alternately use a glass measuring cup and melt the butter with the milk in the microwave, then stir in the oil.)\u0026nbsp;\u003c/p\u003e","stepShotImageUrl":"//mojo.generalmills.com/api/public/content/NkiUAB5XR9ihCwGfvq8kSQ_webp_base.webp?v=98620a0e\u0026t=51a43a57af4046789e5a7f20567b1195"},{"description":"\u003cp\u003eIn a large mixing bowl, beat the eggs, granulated sugar, and vanilla with a whisk, electric hand mixer, or stand mixer fitted with the whisk attachment for 1 to 2 minutes, or until the sugar has begun to dissolve and the mixture has gained some volume, is foamy, and uniformly pale yellow. Scrape down the sides of the bowl with a silicone spatula.\u003c/p\u003e","stepShotImageUrl":"//mojo.generalmills.com/api/public/content/7FpOunsbTB2zUMDohUQ-eg_webp_base.webp?v=8632354e\u0026t=51a43a57af4046789e5a7f20567b1195"},{"description":"\u003cp\u003eAlternately add the flour mixture and warm milk mixture to the beaten eggs in a few additions, beginning and ending with the flour mixture. Make sure to mix well and scrape down the bowl between each addition.\u0026nbsp;\u003c/p\u003e","stepShotImageUrl":"//mojo.generalmills.com/api/public/content/dH-N7iNRQ5mTQ9k7v8CtoQ_webp_base.webp?v=d5f15a73\u0026t=51a43a57af4046789e5a7f20567b1195"},{"description":"\u003cp\u003eDivide the batter evenly between the prepared pans, gently tapping each pan to release any large bubbles from the batter.\u0026nbsp;\u003c/p\u003e","stepShotImageUrl":"//mojo.generalmills.com/api/public/content/jT-dXn-GQjiOOPHg7z-VzQ_webp_base.webp?v=30c1909e\u0026t=51a43a57af4046789e5a7f20567b1195"},{"description":"\u003cp\u003eBake the cakes on the center rack of the oven for 28 to 30 minutes or until the tops are gently puffed, golden, and spring back when lightly touched.\u0026nbsp;\u003c/p\u003e"},{"description":"\u003cp\u003eRemove from the oven and cool in the pans for at least 15 minutes before turning out onto a cooling rack. Cool completely before filling and frosting.\u003c/p\u003e"},{"description":"\u003cp\u003eWhen you are ready to assemble the cake, add the 1 cup softened butter to a large mixing bowl (or a stand mixer fitted with the paddle attachment) and beat until creamy.\u003c/p\u003e"},{"description":"\u003cp\u003eAdd the powdered sugar in 2 to 3 additions, beating well and scraping down the bowl between each addition. Beat for 30 seconds to combine.\u003c/p\u003e"},{"description":"\u003cp\u003eWhile still mixing, gradually add the heavy whipping cream, pausing to scrape down the bowl once all the cream has been added.\u003c/p\u003e"},{"description":"\u003cp\u003eAdd the vanilla and salt. Continue to beat until the buttercream is creamy and fluffy, about 2 minutes.\u003c/p\u003e"},{"description":"\u003cp\u003eTo assemble the cake, spread a dollop of frosting onto a serving plate or cake board. Place one of the cake layers on top. Spread 1/3 of the buttercream on top of the cake in an even layer before placing the other cake layer on top.\u003c/p\u003e"},{"description":"\u003cp\u003eUsing an offset spatula or the smooth side of a butter knife, smooth the buttercream between the two layers, adding more buttercream to patch any holes.\u0026nbsp;\u003c/p\u003e"},{"description":"\u003cp\u003eCover the entire cake with the remaining frosting, using an offset spatula to smooth and swirl however you like. Or coat the cake in a very thin layer of buttercream to create a “crumb coat” (a frosting layer to trap any stray crumbs), and refrigerate until the surface has chilled, before frosting and decorating with sprinkles as desired.\u0026nbsp;\u003c/p\u003e"}],"tips":[{"title":"","description":"\u003cp\u003eMake the buttercream just before you plan to assemble and decorate the cake.\u003c/p\u003e","category":"Method Note","tipShots":[]},{"title":"","description":"\u003cp\u003eTo create a band of sprinkles around the bottom of the cake, place about 1 to 2 tablespoons of sprinkles in your hand. Carefully press sprinkles into the side of the cake, repeating as necessary to work your way around the cake. Use a pastry brush to remove any extra sprinkles from the cake platter.\u003c/p\u003e","category":"Techniques","tipShots":[]}],"kitchenTips":[{"title":"","description":"\u003cp\u003eMake the buttercream just before you plan to assemble and decorate the cake.\u003c/p\u003e","category":"Method Note","tipShots":[]},{"title":"","description":"\u003cp\u003eTo create a band of sprinkles around the bottom of the cake, place about 1 to 2 tablespoons of sprinkles in your hand. Carefully press sprinkles into the side of the cake, repeating as necessary to work your way around the cake. Use a pastry brush to remove any extra sprinkles from the cake platter.\u003c/p\u003e","category":"Techniques","tipShots":[]}],"additionalContent":[{"title":"Recipe Ingredients","description":"\u003cp\u003eHere’s what you’ll need to make vanilla layer cake.\u003c/p\u003e\u003cp\u003e\u003cstrong\u003eFlour: \u003c/strong\u003eAll-purpose flour\u003cstrong\u003e \u003c/strong\u003ehas just the right amount of protein to offer structure to the cake, allowing it to rise tall without collapsing, while still being soft and tender.\u0026nbsp;\u003c/p\u003e\u003cp\u003e\u003cstrong\u003eLeavening: \u003c/strong\u003eBaking powder and baking soda work together to lift the cake and aid in creating the fluffy texture.\u0026nbsp;\u003c/p\u003e\u003cp\u003e\u003cstrong\u003eSalt: \u003c/strong\u003eFor this recipe, I used a kosher salt with larger crystals. If you are using a brand of kosher salt with smaller crystals, reduce the amount to 3/4 teaspoon. For finer salts like table salt, use 1/4 to 1/2\u0026nbsp; teaspoon,\u0026nbsp;\u003c/p\u003e\u003cp\u003e\u003cstrong\u003eButter and Oil:\u003c/strong\u003e Used in combination, butter and oil make for a rich and buttery-tasting cake that remains moist for days.\u0026nbsp;\u003c/p\u003e\u003cp\u003e\u003cstrong\u003eWhole Milk: \u003c/strong\u003eMilk gives the cake moisture, and the lactic acid in the milk aids in tenderness.\u0026nbsp;\u003c/p\u003e\u003cp\u003e\u003cstrong\u003eEggs and Sugar:\u003c/strong\u003e Whipping together the eggs and sugar creates the airy base for this cake.\u0026nbsp;\u003c/p\u003e\u003cp\u003e\u003cstrong\u003eVanilla:\u003c/strong\u003e Giving the cake its signature flavor and fragrance, using real vanilla extract is key. You can also use vanilla bean paste if you like the visual vanilla bean specks throughout your cake.\u003c/p\u003e","category":"SEO Content_1","tipShots":[{"name":"ExtraTextTypeImageMediumUrl","sortOrder":1,"url":"//mojo.generalmills.com/api/public/content/1pYlIegBSDOCHI0zQxQtxQ_webp_base.webp?v=d9c9d123\u0026t=51a43a57af4046789e5a7f20567b1195"}]},{"title":"How to Make Vanilla Layer Cake","description":"\u003ch3\u003e\u003cstrong\u003e1. Make the Vanilla Cake Batter\u003c/strong\u003e\u003c/h3\u003e\u003cp\u003eThis batter starts by beating eggs and sugar together until they are foamy and light. There\u0027s no need to worry about forming soft or firm peaks– you\u0027re just looking to get a little volume and dissolve most of the sugar into the eggs. Then alternately add the dry and wet ingredients until you have a smooth batter.\u003c/p\u003e\u003ch3\u003e\u003cstrong\u003e2. Bake the Vanilla Cake Layers\u003c/strong\u003e\u003c/h3\u003e\u003cp\u003eDivide the batter between your pans as evenly as you can for even cake layers. If you have a good eye, you can just go for it, but if you want to be more meticulous, you can weigh the cake batter and divide evenly between the two pans. \u0026nbsp;\u003c/p\u003e\u003ch3\u003e\u003cstrong\u003e3. Cool the Vanilla Layer Cake\u003c/strong\u003e\u0026nbsp;\u003c/h3\u003e\u003cp\u003eBe sure to cool the cake layers completely before frosting. Adding buttercream to a cake that is even slightly warm can cause all sorts of sliding and structural issues and just cause unnecessary stress.\u0026nbsp;\u003cbr\u003e\u003cstrong\u003eNote:\u003c/strong\u003e If you want to make the cake ahead, this is a good time to wrap the layers well in plastic and/or foil and freeze for up to one month.\u003c/p\u003e\u003ch3\u003e\u003cstrong\u003e4. Make the Vanilla Buttercream\u003c/strong\u003e\u003c/h3\u003e\u003cp\u003eThis is a classic American-style buttercream using butter whipped with powdered sugar and sometimes a little milk. This version uses heavy cream and a higher ratio of butter to powdered sugar than many recipes, for a super creamy, fluffy, and spreadable frosting.\u0026nbsp;\u003cbr\u003e\u003cstrong\u003eNote:\u003c/strong\u003e A single batch of this buttercream will frost and fill this cake nicely without overwhelming the actual cake. If you want to decorate the cake with piping or just like a higher ratio of frosting to cake, the recipe is easily doubled.\u003c/p\u003e\u003ch3\u003e\u003cstrong\u003e5. Assemble the Vanilla Layer Cake\u003c/strong\u003e\u0026nbsp;\u003c/h3\u003e\u003cp\u003eThis cake can be assembled as soon as it has completely cooled. You can also wrap the unfrosted layers in plastic and refrigerate until chilled (or freeze) and assemble with cold cake layers. This makes frosting and decorating a little easier, as the frosting will firm up to hold the layers together as you decorate.\u003c/p\u003e\u003ch3\u003e\u003cstrong\u003e6. Decorate the Vanilla Layer Cake\u003c/strong\u003e\u003c/h3\u003e\u003cp\u003eThis cake needs nothing more than a shower of \u003ca href=\u0022https://www.bettycrocker.com/products/dessert-decorating-products/sprinkles\u0022\u003eBetty Crocker\u003cstrong\u003e™\u003c/strong\u003e sprinkles\u003c/a\u003e to feel special. Check out all the options.\u003c/p\u003e","category":"SEO Content_2","tipShots":[]},{"title":"How to Store Vanilla Layer Cake","description":"\u003ch3\u003e\u003cstrong\u003eRefrigerator\u003c/strong\u003e\u003c/h3\u003e\u003cp\u003eYou can store portions of leftover vanilla layer cake at room temperature up to two days. Wrap or cover well so the cut edges don’t dry out.\u003c/p\u003e\u003ch3\u003e\u003cstrong\u003eFreezer\u003c/strong\u003e\u003c/h3\u003e\u003cp\u003eWrap portions of vanilla layer cake in a double layer of plastic wrap (or a layer of plastic wrap and foil). Freeze for up to 1 month. Thaw portions of cake still wrapped to keep them moist and enjoy at room temperature for the best texture.\u0026nbsp;\u003c/p\u003e","category":"SEO Content_3","tipShots":[]},{"title":"How to Serve Vanilla Layer Cake","description":"\u003cp\u003eThis cake has the best texture and flavor when served at room temperature. The frosting is soft and creamy, while the cake is tender and moist. You can serve cake layers as is or with seasonal berries, or go for the classic cake and ice cream pairing.\u003c/p\u003e","category":"SEO Content_4","tipShots":[]}],"faq":[{"title":"What type of vanilla should I use for vanilla layer cake?","description":"\u003cp\u003eVanilla is anything but basic, and the real stuff can come with a high price tag. You can find pure vanilla extract in supermarkets, along with imitation, as well as blends. Blends offer real vanilla flavor at a lower cost by blending pure vanilla extract with other flavorings. Imitation vanilla is great for that classic “birthday cake” taste. Then, there\u0027s vanilla bean paste, which combines beans and extract in a syrupy paste. Ultimately, choose a vanilla that fits your taste and budget.\u003c/p\u003e","category":"FAQ_1","tipShots":[]}],"tipCategories":[{"categoryName":"Method Note","heading":"","cssClass":"recipePartMethodNote","expandOnInit":false,"expandText":"More +","collapseText":"Less -","expandEventName":"","collapseEventName":"","image":"","tips":[{"title":"","description":"\u003cp\u003eMake the buttercream just before you plan to assemble and decorate the cake.\u003c/p\u003e","category":"Method Note","tipShots":[]}],"isExpandable":false}],"nutritionInfo":{"configuration":{"showAsTable":false,"noNutritionInformationAvailableMessage":"Nutrition Facts are not available for this recipe","poweredByText":"\u003cp\u003eNutrition information for this recipe is estimated using a leading nutrition calculation application, but is an estimate only. Actual nutrition values will vary based on the exact ingredients or brands you may use.\u003c/p\u003e\n\u003ca href=\u0022http://developer.edamam.com\u0022\u003ePowered By \u003cimg src=\u0022-/media/05422024943D4056883B09BBC2576F20.ashx\u0022 alt=\u0022Edamam\u0022 /\u003e\u003c/a\u003e","nutritionChartTitle":"Nutrition Facts","nutritionInformationLabel":"Nutrition","servingSizeText":"Serving Size:","dailyValuesDisclaimer":"*Percent Daily Values are based on a 2,000 calorie diet.","percentDailyValueText":"% Daily Value","percentDailyValueFooterTitleText":"% Daily Value*:","exchangeInformationTitleText":"Exchanges:","nutritionFactsExpandText":"More Nutrition","nutritionFactsCollapseText":"Less Nutrition"},"servingSize":"1 Slice","exchangeInfo":"Free","showPoweredBy":false,"showRecipeTotalTime":true,"showRecipePrepTime":true,"showCarbohydrateChoices":false},"trademarks":[],"labels":{"ingredientsHeader":"Ingredients","stepsHeader":"Instructions","stepsImageHideText":"Hide Images","stepsImageShowText":"Show Images","stepNumberText":"Step","faqHeader":"Frequently Asked Questions","tipsHeader":"Recipe Tips","tipItemHeadingFormat":"tip {0}","postedBy":"By","copyright":"© {yyyy} ®/TM General Mills All Rights Reserved","showDrawerText":"Show ","hideDrawerText":"Hide","expandDescriptionText":"More +","collapseDescriptionText":"Less -","ariaLiveLabelFormat":"Showing {0} through {1} of {2}","scrollLeftButtonLabel":"Scroll Left","scrollRightButtonLabel":"Scroll Right","includeScrollIndicator":true},"primaryAttributes":[{"label":"Prep Time","values":[{"text":"35","label":"min"}]},{"label":"Total","values":[{"text":"2","label":"hr"},{"text":"20","label":"min"}]},{"label":"Servings","values":[{"text":"12"}]},{"label":"Ingredients","values":[{"text":"16"}]}],"secondaryAttributes":[],"badges":[{"badgeType":2,"badgeText":"Gold Medal Flour","label":"Make With","imageUrl":"/-/media/GMI/Core-Sites/BC/Images/Shared/RecipeParts/make-with/Package_GoldMedalv3.png?sc_lang=en","metaDataTags":["9223a3ed-9c14-580f-b9e7-f31f0ba02c9e"],"showMemberInfo":false,"matchedMetadataId":"9223a3ed-9c14-580f-b9e7-f31f0ba02c9e"}],"backgroundImageUrl":"/-/media/GMI/Core-Sites/BC/Images/Shared/RecipeParts/img-bc-rdp-heroDotPattern.png?sc_lang=en","breadcrumbs":{"links":[{"url":"/","label":"Home"},{"url":"/recipes","label":"Recipes"},{"url":"/recipes/dishes/cake-recipes/layer-cake","label":"Layer Cake Recipes"}],"currentPageName":"Vanilla Layer Cake"}};
var moduleName = 'recipeFaq';
var isVueModule = true;
GeneralMills.PandoSites.RegisterControlInstance(moduleName, configuration, componentMetadata, isVueModule)
});
})();


![]()
![]()
![]()
![]()


