(function() {
document.addEventListener('DOMContentLoaded', function() {
var componentMetadata = JSON.parse('\x7b\x22componentName\x22\x3a\x22ActionToolbar_59e5fa31-dc57-46ea-93d1-265650a760f0\x22,\x22deferOptions\x22\x3a\x7b\x22deferComponent\x22\x3atrue,\x22deferType\x22\x3a\x22OnDemand\x22,\x22deferId\x22\x3a\x22r0f79df1637dc4a3cb67711015a1004f1\x22,\x22deferredContainerId\x22\x3a\x22\x2ffloatingActionToolbar\x2ffloatingActionToolbar_interop\x22,\x22deferredContainerView\x22\x3a\x22InteropDeferWrapper\x22\x7d,\x22viewName\x22\x3a\x22ActionToolbar\x22\x7d');
var configuration = {"contentId":"b4bcd145-5b1a-4586-b812-cc98b45c33c9","toolbarSettings":{"id":"59e5fa31-dc57-46ea-93d1-265650a760f0","regAction":"FAVORITE","eSourceCode":11275,"namePassedToEvents":"ArticleStandardLongFormToolbar","buttons":[{"addFavoriteErrorMessage":"Sorry, something went wrong. Please save again.","removeFavoriteErrorMessage":"Error occurred while removing from favorites","regAction":"FAVORITE","eSourceCode":11275,"isCurrentUserAnonymous":false,"isFavoriteItem":false,"id":"16a29701-2b75-4d9a-aa9c-860376da50d7","allowedForAnonymousUsers":false,"type":"Favorite","displayName":"Save","namePassedToEvents":"Favorite","cssClassName":"atButtonFavorite","privacyOptOutMessage":"\u003cdiv class=\u0027privacyMessage\u0027\u003e\n\u003ch3\u003eThis feature is not available with your current cookie settings.\u003c/h3\u003e\n\u003cp\u003eYou can \u003ca href=\u0027#\u0027 data-show-preference-center=\u00271\u0027\u003eupdate your privacy settings\u003c/a\u003e to enable this content. Please enable “Functional Cookies” to use this feature.\u003c/p\u003e\n\u003c/div\u003e","showPrivacyOptOutMessage":false},{"providerName":"pinterest","providerNamePassedToEvents":"Pinterest","shareUrlFormat":"//pinterest.com/pin/create/link/?url={0}","id":"c18cf08e-e436-4cd0-a180-1bafb15369a6","allowedForAnonymousUsers":true,"type":"Social","displayName":"Pinterest","namePassedToEvents":"Pinterest","cssClassName":"atButtonPinterest","privacyOptOutMessage":"\u003cdiv class=\u0027privacyMessage\u0027\u003e\n\u003ch3\u003eThis feature is not available with your current cookie settings.\u003c/h3\u003e\n\u003cp\u003eYou can \u003ca href=\u0027#\u0027 data-show-preference-center=\u00271\u0027\u003eupdate your privacy settings\u003c/a\u003e to enable this content. Please enable “Functional Cookies” to use this feature.\u003c/p\u003e\n\u003c/div\u003e","showPrivacyOptOutMessage":false},{"templateId":"13bdd311-4300-4fb8-9d78-9cbaf98f5578","dialogHeading":"Email Article","emailCode":"BC_ContentEmail","dialogSettings":{"cancelButtonText":"Cancel","copyToSenderLabel":"Send a Copy to Myself","emailAddressesLabel":"* Email Address(es)","emailInstructionText":"Separate email addresses with commas","fromText":"From:","privacyPolicyText":"\u003cp\u003e\u0026copy;2024 General Mills, Inc. All Rights Reserved. This information will only be used to send an email to your friend(s) and will not be saved. Please read our \u003ca rel=\u0022noopener noreferrer\u0022 rel=\u0022noopener noreferrer\u0022 href=\u0022http://www.generalmills.com/company/privacy-policies/privacy-policy-us\u0022 target=\u0022_blank\u0022 shape=\u0022rect\u0022\u003ePrivacy Policy\u003c/a\u003e.\u003c/p\u003e","requiredFieldText":"* Required","sendButtonText":"Send","senderEmailAddressLabel":"* Your Email Address","senderFirstNameLabel":"* Your First Name","sendToText":"Send To:"},"id":"be9422a3-85a8-4c31-86f5-e171255bb89d","allowedForAnonymousUsers":true,"type":"Email","displayName":"Email","namePassedToEvents":"Email","cssClassName":"atButtonEmail","privacyOptOutMessage":"\u003cdiv class=\u0027privacyMessage\u0027\u003e\n\u003ch3\u003eThis feature is not available with your current cookie settings.\u003c/h3\u003e\n\u003cp\u003eYou can \u003ca href=\u0027#\u0027 data-show-preference-center=\u00271\u0027\u003eupdate your privacy settings\u003c/a\u003e to enable this content. Please enable “Functional Cookies” to use this feature.\u003c/p\u003e\n\u003c/div\u003e","showPrivacyOptOutMessage":false},{"providerName":"facebook","providerNamePassedToEvents":"Facebook","shareUrlFormat":"//facebook.com/sharer/sharer.php?u={0}","id":"6c3f442d-6ffe-460f-8360-b02b122d326c","allowedForAnonymousUsers":true,"type":"Social","displayName":"Facebook","namePassedToEvents":"Facebook","cssClassName":"atButtonFacebook","privacyOptOutMessage":"\u003cdiv class=\u0027privacyMessage\u0027\u003e\n\u003ch3\u003eThis feature is not available with your current cookie settings.\u003c/h3\u003e\n\u003cp\u003eYou can \u003ca href=\u0027#\u0027 data-show-preference-center=\u00271\u0027\u003eupdate your privacy settings\u003c/a\u003e to enable this content. Please enable “Functional Cookies” to use this feature.\u003c/p\u003e\n\u003c/div\u003e","showPrivacyOptOutMessage":false},{"layoutParameter":"p%3d1","id":"de022929-4416-4bc9-ab3c-ae5711d562bf","allowedForAnonymousUsers":true,"type":"Print","displayName":"Print","namePassedToEvents":"Print","cssClassName":"atButtonPrint","privacyOptOutMessage":"\u003cdiv class=\u0027privacyMessage\u0027\u003e\n\u003ch3\u003eThis feature is not available with your current cookie settings.\u003c/h3\u003e\n\u003cp\u003eYou can \u003ca href=\u0027#\u0027 data-show-preference-center=\u00271\u0027\u003eupdate your privacy settings\u003c/a\u003e to enable this content. Please enable “Functional Cookies” to use this feature.\u003c/p\u003e\n\u003c/div\u003e","showPrivacyOptOutMessage":false}],"isSticky":true},"userSettings":{"isCurrentUserAnonymous":true,"isFavoriteItem":false},"pageAttributes":{"url":"https%3a%2f%2fwww.bettycrocker.com%2fhow-to%2ftipslibrary%2fcooking-tips%2fhow-to-cook-a-turkey%3fnicam4%3dsocialmedia%26nichn4%3dpinterest%26niseg4%3dbettycrocker%26nicreatid4%3dpost%26crlt.pid%3dcamp.zqwupg3yvvxs","contentId":"b4bcd145-5b1a-4586-b812-cc98b45c33c9"},"recaptchaPublicKey":"6LfU_icUAAAAALSqSjRg5hqZwbPr1b8k-_80a_S_"};
var moduleName = 'actionToolbar';
var isVueModule = true;
GeneralMills.PandoSites.RegisterControlInstance(moduleName, configuration, componentMetadata, isVueModule)
});
})();
Getting Started: Gather Your Tools
Once you have your turkey, it’s all about having the right equipment, especially if you’re just learning how to prepare and cook a turkey. We’ve got you covered with the following list:
- A roasting pan with handles for easy lifting in and out of the oven
- An ovenproof or instant-read meat thermometer
- Aluminum foil to help keep your turkey warm while it rests after roasting
- A sharp knife for carving (your best chef’s knife will do)
- A cutting board, ideally with a groove for catching all the juices
- A V-rack or other rack to lift the bird above the drippings
- A basting brush
- Cotton string for trussing
How to Prepare a Turkey
No matter if you plan to roast, slow cook, deep fry or grill your turkey, you’ll want to follow three basic prep steps: thaw the turkey, remove the giblets and season the turkey. We’ll dive into each step below.
Thaw the Turkey
Thawing your turkey in the fridge is usually the easiest and most efficient—make sure you plan ahead and have plenty of fridge space. It takes about 24 hours for every four to five pounds of turkey weight, meaning a 20-lb turkey can take up to five days to thaw in the refrigerator. Keep in mind that brining adds two days, so your prep could begin up to seven days before the holiday meal. For more details about turkey thawing and a chart to help you figure out how much time your turkey will take, check out our article on How to Buy a Turkey.
Remove the Giblets
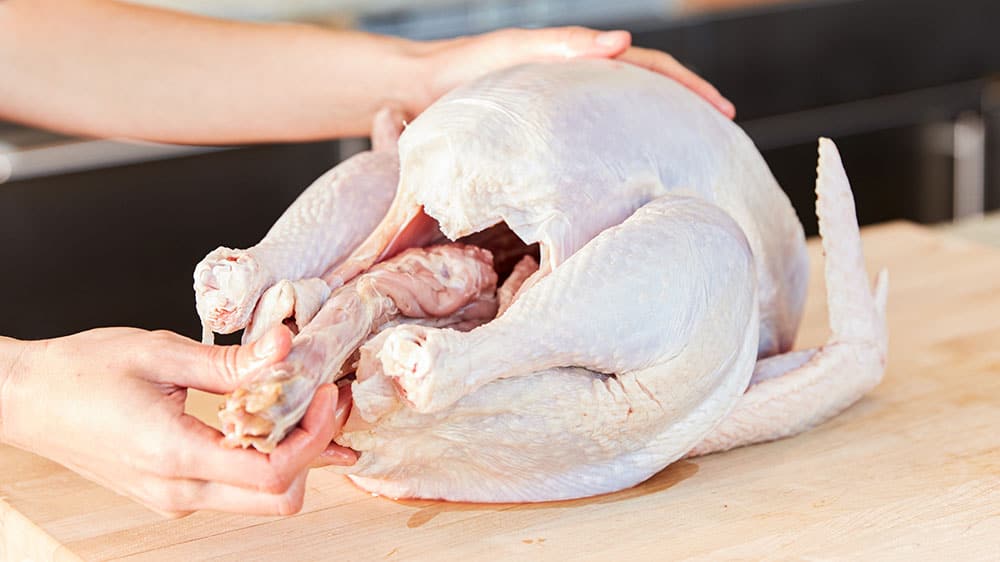
Inside the cavity of your bird, you will find the giblets—the neck and internal organs, including the heart, liver and gizzard. Often they’ll be packaged up in a little bag. It’s important to remove the giblets before cooking your turkey but you don’t have to waste them. Their flavor can be used to enrich gravy, stock or even stuffing. Check out these recipes to learn more: Giblets Gravy and Use-it-Up Turkey Stock.
Season the Turkey
While there are several ways of seasoning a turkey before cooking, our favorite method is wet brining—it’s the simplest way to infuse the turkey with flavor and keep the meat tender. Keep in mind, you must plan in advance to brine your turkey—get all the details in our How to Brine a Turkey article. If you don’t have time to brine, don’t fret, just rub your turkey all over with salt and pepper before cooking.
How to Cook a Turkey
Whether you’re first learning how to cook a turkey or you’re a seasoned pro, roasting is an easy way to get delicious results. After wet brining your turkey, follow Betty’s fail-safe recipe below. (Want to use those tasty turkey drippings for gravy? Betty has a fool-proof recipe for that too!)
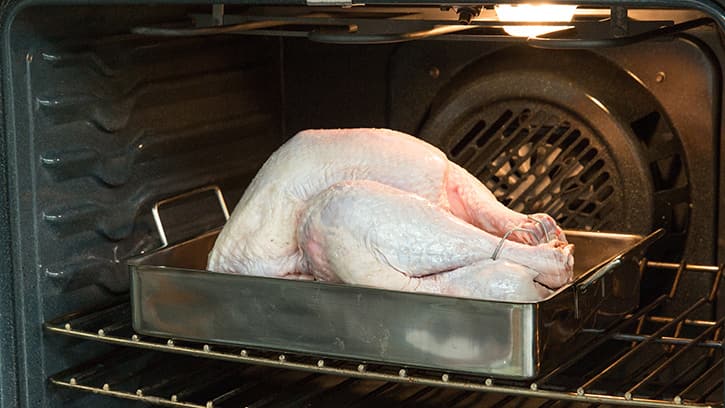
- Heat oven to 325°F. Remove turkey from brine; discard brine. Thoroughly rinse turkey under cool running water, gently rubbing outside and inside of turkey to release salt. Pat skin and both interior cavities dry with paper towels.
- Fasten neck skin to back of turkey with skewer. Fold wings across back of turkey so tips are touching. Toss onion, carrot, celery and thyme with 1 tablespoon of the melted butter; place in turkey cavity.
- Place turkey, breast side down, on rack in large shallow roasting pan. Brush entire back side of turkey with 1 tablespoon melted butter. Turn turkey over. Brush entire breast side of turkey with remaining 1 tablespoon melted butter. Insert ovenproof meat thermometer so tip is in thickest part of inside thigh and does not touch bone. (Do not add water or cover turkey.)
- For an unstuffed 14 to 18 lb. whole bird, roast uncovered 3 hours 30 minutes to 4 hours, brushing twice with pan drippings during last 30 minutes of roasting.
- Turkey is done when thermometer reads 165°F and drumsticks move easily when lifted or twisted. If a meat thermometer is not used, begin testing for doneness after about 3 hours. When turkey is done, place on warm platter and cover with aluminum foil to keep warm. Let stand about 15 minutes for easiest carving.
How to Carve a Turkey
Anyone can master carving a turkey without any special equipment. All you need is your best chef’s knife, the one you use all the time—no fancy carving fork and knife necessary. A cutting board with a moat, or groove for catching liquids, running around its edge, can help contain the mess. Our article How to Carve a Turkey Like a Pro has all the details you need and If you’re just learning how to carve a turkey, follow these key tips:
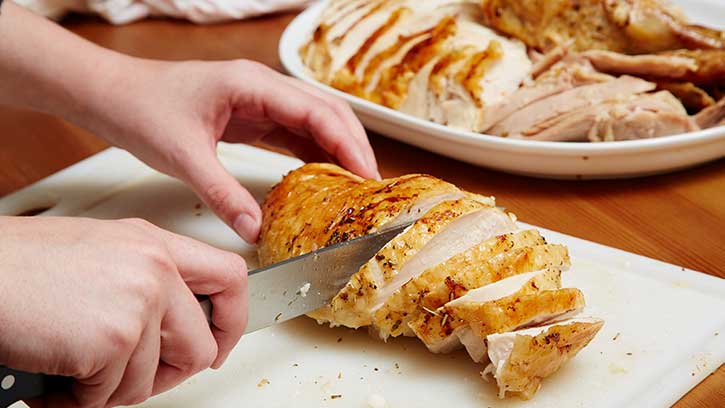
- Remember to let it rest! If you carve right away, the juices will run out, leaving your turkey drier than if you had waited. It also helps make carving easier.
- Don’t carve your turkey at the table! That hot, juicy bird will make a mess of your tablecloth and put undue pressure on you, the one wielding the knife.
So there you have it, now you know how to prepare and cook a turkey—from the thawing to the carving! Whether this year is your first or fortieth time hosting, Betty’s here to help every step of the way. If you have more questions, be sure to leave a note below.
(function() {
document.addEventListener('DOMContentLoaded', function() {
var componentMetadata = JSON.parse('\x7b\x22componentName\x22\x3a\x22NewsletterCTA_b9911a56-3a0d-4b1c-8521-df6c10ce048a\x22,\x22deferOptions\x22\x3a\x7b\x22deferComponent\x22\x3atrue,\x22deferType\x22\x3a\x22OnDemand\x22,\x22deferId\x22\x3a\x22r957c9215e9e14cf1b9aa40c8626d7fb2\x22,\x22deferredContainerId\x22\x3a\x22\x2fprimaryColumn\x2finteropInlineNewsletterCta\x22,\x22deferredContainerView\x22\x3a\x22InteropDeferWrapper\x22\x7d,\x22viewName\x22\x3a\x22NewsletterCTA\x22\x7d');
var configuration = {"unsubscribedNewsletters":[{"listId":"1e34a555-89d1-45f0-8f07-b3ae6b01c03c","thumbnailImageUrl":"/-/media/GMI/Core-Sites/BC/Images/Shared/myaccount/newsletters/BC_Thumb157x157.png?sc_lang=en","previewUrl":"https://morpheus3.idpk.net/email_sends/9111/preview","name":"Betty\u0027s Email","isPromo":false}],"settings":{"anonymousCopy":"Get a free gift from Betty and Shutterfly! ","anonymousDescriptionCopy":"\u003cp\u003eBetty emails are full of recipes and tips that turn weeknights and holidays into celebrations. Sign up today and get a free customizable 8x8 picture book from Betty and Shutterfly\u0026mdash;hurry, this offer is only for a limited time!\u003c/p\u003e\n\u003cp style=\u0022font-size: 11px;\u0022\u003e\u003cstrong\u003e*Offer expires February 28, 2025 (11:59 P.M. PT).\u003c/strong\u003e Offer valid for new subscribers only. Offer is good for one free 20-standard page 8x8 hardcover photo book through\n\u003ca rel=\u0022noopener noreferrer\u0022 href=\u0022https://nam02.safelinks.protection.outlook.com/?url=http%3A%2F%2Fshutterfly.com%2F\u0026amp;data=05%7C02%7CSudha.Narayan%40genmills.com%7C27083def59514567311c08dce3e4cacd%7C0c33cce8883c4ba5b61534a6e2b8ff38%7C0%7C0%7C638635819019851366%7CUnknown%7CTWFpbGZsb3d8eyJWIjoiMC4wLjAwMDAiLCJQIjoiV2luMzIiLCJBTiI6Ik1haWwiLCJXVCI6Mn0%3D%7C0%7C%7C%7C\u0026amp;sdata=7RfkAwnZJWr8jB4ATYzEgoWor%2BLVYO6tGGojt59XMtQ%3D\u0026amp;reserved=0\u0022 target=\u0022_blank\u0022\u003eshutterfly.com\u003c/a\u003e\nor the Shutterfly app. Shipping \u0026amp; Handling apply. Valid for United States only - \u003ca href=\u0022/shutterfly-terms-2024\u0022\u003evisit here for full terms and conditions\u003c/a\u003e. \u003c/p\u003e","anonymousThankYouCopy":"\u003cp\u003eThanks! Your first email is on its way.\u003c/p\u003e\n","anonymousThankYouDescriptionCopy":"\u003cp\u003eYour Shutterfly redemption code will be sent within 48 hours. Now’s a great time to create an account on BettyCrocker.com so you can save your favorite recipes, get first dibs on special offers, hear the latest Betty news, and more. Join for free today!\u003c/p\u003e","anonymousButtonText":"Sign up now","anonymousEmailInvalidErrorText":"Please enter a valid email address.","anonymousSubscribeErrorText":"We encountered an error while signing you up. Please try again.","anonymousEmailAddressPlaceholderText":"Enter your email address","anonymousEmailAddressLabel":"Email Address","anonymousLegalCopy":"By signing up, you accept our\u0026nbsp;\u003ca rel=\u0022noopener noreferrer\u0022 href=\u0022https://www.generalmills.com/privacy-security/us-english-privacy-policy\u0022 target=\u0022_blank\u0022\u003e\u003cspan style=\u0022text-decoration: underline;\u0022\u003ePrivacy Policy\u003c/span\u003e\u003c/a\u003e\u0026nbsp;and agree that your information may be used across our\u0026nbsp;\u003ca rel=\u0022noopener noreferrer\u0022 href=\u0022https://www.generalmills.com/food-we-make/brands\u0022 target=\u0022_blank\u0022\u003e\u003cspan style=\u0022text-decoration: underline;\u0022\u003efamily of brands\u003c/span\u003e.\u003c/a\u003e","requiredFieldText":"","backgroundColor":"#E60000","accentColor":"","registrationUrl":"/register/reg-fp?RegAction=SUBSCRIBERUPGRADE\u0026esrc=11275\u0026returnUrl=%2fhow-to%2ftipslibrary%2fcooking-tips%2fhow-to-cook-a-turkey%3fnicam4%3dsocialmedia%26nichn4%3dpinterest%26niseg4%3dbettycrocker%26nicreatid4%3dpost%26crlt.pid%3dcamp.zqwupg3yvvxs","registrationLinkText":"Join free!","enableExpandedFields":false,"hideForSessionCookieExpiration":0,"ctaType":"StandardAnonymous","location":"Inline","userState":"Anonymous","sourceCodeOverride":0}};
var moduleName = 'newsletterCta';
var isVueModule = true;
GeneralMills.PandoSites.RegisterControlInstance(moduleName, configuration, componentMetadata, isVueModule)
});
})();
(function() {
document.addEventListener('DOMContentLoaded', function() {
var componentMetadata = JSON.parse('\x7b\x22componentName\x22\x3a\x22ConsumerGeneratedContent_b4bcd145-5b1a-4586-b812-cc98b45c33c9\x22,\x22deferOptions\x22\x3a\x7b\x22deferComponent\x22\x3atrue,\x22deferType\x22\x3a\x22OnDemand\x22,\x22deferId\x22\x3a\x22r36610597cd73409eb933f0c13df8f0c7\x22,\x22deferredContainerId\x22\x3a\x22\x2fratingReview\x2finteropRatingReview\x22,\x22deferredContainerView\x22\x3a\x22InteropDeferWrapper\x22\x7d,\x22viewName\x22\x3a\x22ConsumerGeneratedContent\x22\x7d');
var configuration = {"loaderScript":"https://apps.bazaarvoice.com/deployments/bettycrocker/main_site/production/en_US/bv.js","type":"QuestionAndAnswer","language":"en","includeRatings":false};
var moduleName = 'consumerGeneratedContent';
var isVueModule = true;
GeneralMills.PandoSites.RegisterControlInstance(moduleName, configuration, componentMetadata, isVueModule)
});
})();