(function() {
document.addEventListener('DOMContentLoaded', function() {
var componentMetadata = JSON.parse('\x7b\x22componentName\x22\x3a\x22Breadcrumb_acea4130-ccef-4a81-8b32-642c1b180446\x22,\x22deferOptions\x22\x3a\x7b\x22deferComponent\x22\x3afalse,\x22deferType\x22\x3a\x22None\x22,\x22deferId\x22\x3a\x22rb69fd036de914a55a460722bd4bf9ff8\x22,\x22deferredContainerId\x22\x3a\x22\x2fcommonBreadcrumb\x22,\x22deferredContainerView\x22\x3anull\x7d,\x22viewName\x22\x3a\x22Breadcrumb\x22\x7d');
var configuration = {"links":[{"url":"/","label":"Home"},{"url":"/how-to","label":"How-To"},{"url":"/how-to/how-to-decorate-a-cake","label":"It’s the Perfect Time to Try These 5 Surprisingly Easy Cake Decorating Techniques"}]};
var moduleName = 'breadcrumb';
var isVueModule = true;
GeneralMills.PandoSites.RegisterControlInstance(moduleName, configuration, componentMetadata, isVueModule)
});
})();
(function() {
document.addEventListener('DOMContentLoaded', function() {
var componentMetadata = JSON.parse('\x7b\x22componentName\x22\x3a\x22ActionToolbar_59e5fa31-dc57-46ea-93d1-265650a760f0\x22,\x22deferOptions\x22\x3a\x7b\x22deferComponent\x22\x3atrue,\x22deferType\x22\x3a\x22OnDemand\x22,\x22deferId\x22\x3a\x22r2336a6826d7e46df89a9f1ea63557816\x22,\x22deferredContainerId\x22\x3a\x22\x2ffloatingActionToolbar\x2ffloatingActionToolbar_interop\x22,\x22deferredContainerView\x22\x3a\x22InteropDeferWrapper\x22\x7d,\x22viewName\x22\x3a\x22ActionToolbar\x22\x7d');
var configuration = {"contentId":"acea4130-ccef-4a81-8b32-642c1b180446","toolbarSettings":{"id":"59e5fa31-dc57-46ea-93d1-265650a760f0","regAction":"FAVORITE","eSourceCode":11275,"namePassedToEvents":"ArticleStandardLongFormToolbar","buttons":[{"addFavoriteErrorMessage":"Sorry, something went wrong. Please save again.","removeFavoriteErrorMessage":"Error occurred while removing from favorites","regAction":"FAVORITE","eSourceCode":11275,"isCurrentUserAnonymous":false,"isFavoriteItem":false,"id":"16a29701-2b75-4d9a-aa9c-860376da50d7","allowedForAnonymousUsers":false,"type":"Favorite","displayName":"Save","toggleDisplayName":"Saved","namePassedToEvents":"Favorite","cssClassName":"atButtonFavorite","privacyOptOutMessage":"\u003cdiv class=\u0027privacyMessage\u0027\u003e\n\u003ch3\u003eThis feature is not available with your current cookie settings.\u003c/h3\u003e\n\u003cp\u003eYou can \u003ca href=\u0027#\u0027 data-show-preference-center=\u00271\u0027\u003eupdate your privacy settings\u003c/a\u003e to enable this content. Please enable “Functional Cookies” to use this feature.\u003c/p\u003e\n\u003c/div\u003e","showPrivacyOptOutMessage":false},{"providerName":"pinterest","providerNamePassedToEvents":"Pinterest","shareUrlFormat":"//pinterest.com/pin/create/link/?url={0}","id":"c18cf08e-e436-4cd0-a180-1bafb15369a6","allowedForAnonymousUsers":true,"type":"Social","displayName":"Pinterest","toggleDisplayName":"","namePassedToEvents":"Pinterest","cssClassName":"atButtonPinterest","privacyOptOutMessage":"\u003cdiv class=\u0027privacyMessage\u0027\u003e\n\u003ch3\u003eThis feature is not available with your current cookie settings.\u003c/h3\u003e\n\u003cp\u003eYou can \u003ca href=\u0027#\u0027 data-show-preference-center=\u00271\u0027\u003eupdate your privacy settings\u003c/a\u003e to enable this content. Please enable “Functional Cookies” to use this feature.\u003c/p\u003e\n\u003c/div\u003e","showPrivacyOptOutMessage":false},{"templateId":"13bdd311-4300-4fb8-9d78-9cbaf98f5578","dialogHeading":"Email Article","emailCode":"BC_ContentEmail","dialogSettings":{"cancelButtonText":"Cancel","copyToSenderLabel":"Send a Copy to Myself","emailAddressesLabel":"* Email Address(es)","emailInstructionText":"Separate email addresses with commas","fromText":"From:","privacyPolicyText":"\u003cp\u003e\u0026copy;2026 General Mills, Inc. All Rights Reserved. This information will only be used to send an email to your friend(s) and will not be saved. Please read our \u003ca rel=\u0022noopener noreferrer\u0022 rel=\u0022noopener noreferrer\u0022 href=\u0022http://www.generalmills.com/company/privacy-policies/privacy-policy-us\u0022 target=\u0022_blank\u0022 shape=\u0022rect\u0022\u003ePrivacy Policy\u003c/a\u003e.\u003c/p\u003e","requiredFieldText":"* Required","sendButtonText":"Send","senderEmailAddressLabel":"* Your Email Address","senderFirstNameLabel":"* Your First Name","sendToText":"Send To:"},"id":"be9422a3-85a8-4c31-86f5-e171255bb89d","allowedForAnonymousUsers":true,"type":"Email","displayName":"Email","toggleDisplayName":"","namePassedToEvents":"Email","cssClassName":"atButtonEmail","privacyOptOutMessage":"\u003cdiv class=\u0027privacyMessage\u0027\u003e\n\u003ch3\u003eThis feature is not available with your current cookie settings.\u003c/h3\u003e\n\u003cp\u003eYou can \u003ca href=\u0027#\u0027 data-show-preference-center=\u00271\u0027\u003eupdate your privacy settings\u003c/a\u003e to enable this content. Please enable “Functional Cookies” to use this feature.\u003c/p\u003e\n\u003c/div\u003e","showPrivacyOptOutMessage":false},{"providerName":"facebook","providerNamePassedToEvents":"Facebook","shareUrlFormat":"//facebook.com/sharer/sharer.php?u={0}","id":"6c3f442d-6ffe-460f-8360-b02b122d326c","allowedForAnonymousUsers":true,"type":"Social","displayName":"Facebook","toggleDisplayName":"","namePassedToEvents":"Facebook","cssClassName":"atButtonFacebook","privacyOptOutMessage":"\u003cdiv class=\u0027privacyMessage\u0027\u003e\n\u003ch3\u003eThis feature is not available with your current cookie settings.\u003c/h3\u003e\n\u003cp\u003eYou can \u003ca href=\u0027#\u0027 data-show-preference-center=\u00271\u0027\u003eupdate your privacy settings\u003c/a\u003e to enable this content. Please enable “Functional Cookies” to use this feature.\u003c/p\u003e\n\u003c/div\u003e","showPrivacyOptOutMessage":false},{"layoutParameter":"p%3d1","id":"de022929-4416-4bc9-ab3c-ae5711d562bf","allowedForAnonymousUsers":true,"type":"Print","displayName":"Print","toggleDisplayName":"","namePassedToEvents":"Print","cssClassName":"atButtonPrint","privacyOptOutMessage":"\u003cdiv class=\u0027privacyMessage\u0027\u003e\n\u003ch3\u003eThis feature is not available with your current cookie settings.\u003c/h3\u003e\n\u003cp\u003eYou can \u003ca href=\u0027#\u0027 data-show-preference-center=\u00271\u0027\u003eupdate your privacy settings\u003c/a\u003e to enable this content. Please enable “Functional Cookies” to use this feature.\u003c/p\u003e\n\u003c/div\u003e","showPrivacyOptOutMessage":false}],"isSticky":true},"userSettings":{"isCurrentUserAnonymous":true,"isFavoriteItem":false,"isAnonymousUserWithFavorites":false},"pageAttributes":{"url":"https%3a%2f%2fwww.bettycrocker.com%2fhow-to%2fhow-to-decorate-a-cake","contentId":"acea4130-ccef-4a81-8b32-642c1b180446"},"recaptchaPublicKey":"6LfU_icUAAAAALSqSjRg5hqZwbPr1b8k-_80a_S_"};
var moduleName = 'actionToolbar';
var isVueModule = true;
GeneralMills.PandoSites.RegisterControlInstance(moduleName, configuration, componentMetadata, isVueModule)
});
})();
If you’ve ever found yourself stopped midscroll, mesmerized by a video of someone oh-so-casually piping perfect frosting roses onto the top of a cake or blending three colors to create an ombre effect—you might have gotten the impression that cake decorating is for experts only. In fact, nothing could be further from the truth! We’re going to show you how to decorate a cake—from tools and prep to step-by-step instructions. By the time you finish reading this article, you’ll be prepared to decorate a cake any bakery would be proud to put in their display case. With one (or more) of these five beautiful and beginner-friendly cake decorating techniques, wow-worthy results are guaranteed!
Gather Your Cake Decorating Tools
If you’ve ever found yourself stopped midscroll, mesmerized by a video of someone oh-so-casually piping perfect frosting roses onto the top of a cake or blending three colors to create an ombre effect—you might have gotten the impression that cake decorating is for experts only. In fact, nothing could be further from the truth! We’re going to show you how to decorate a cake—from tools and prep to step-by-step instructions. By the time you finish reading this article, you’ll be prepared to decorate a cake any bakery would be proud to put in their display case. With one (or more) of these five beautiful and beginner-friendly cake decorating techniques, wow-worthy results are guaranteed!
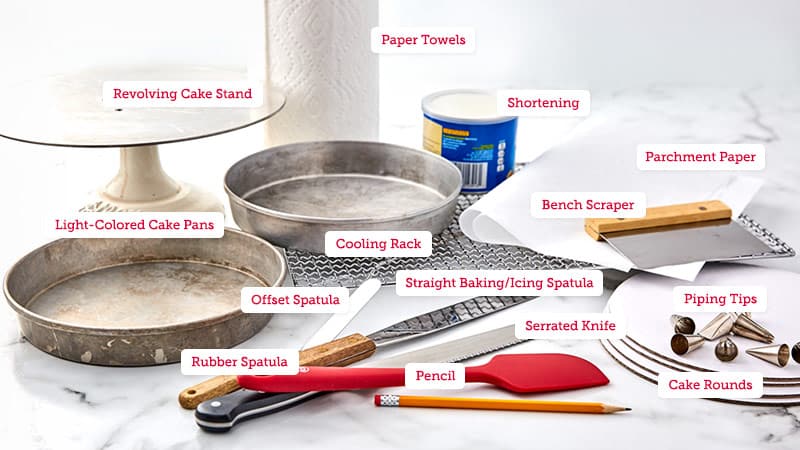
When decorating a cake, some tools make a world of difference—an offset spatula, for example—while others are simply nice to have. We’ll walk you through each tool from both categories, so you can decide for yourself.

Need-to-have tools:
- Light-colored cake pan(s): To reflect heat and keep cakes from overbaking.
- Cooling rack: To help cakes cool quickly and evenly.
- Parchment paper and pencil: To line your pan’s bottom, so the cake comes out clean.
- Offset spatula: Allows you to frost without your hand getting in the way.
- Rubber spatula: To scrape the frosting out of the bowl and so much more.
- Straight baking/icing spatula: To smooth frosting cleanly and efficiently.
- Waxed paper: To keep your serving plate clean.
- Piping bag and tips: To pipe your cake with beautiful decorations.
- Shortening and paper towels: To help you grease your pan properly.
Nice-to-have tools:
- Revolving cake stand: Allows you to decorate more easily. You’ll be able to smooth the sides as the stand turns.
- Bench scraper: Can be used in a similar manner to a straight baking/icing spatula to smooth frosting.
- Cardboard cake rounds: Placed underneath your cake, these make moving it easier.
Now, let’s move on to the prep steps that’ll make decorating a breeze.
7 Steps to Take Before Decorating Your Cake
Cake decorating is easier—and the results are better—if you’ve prepared your cake well. That starts at the very beginning, with the pan you bake it in. Here are the seven steps you should take to make everything go smoothly:
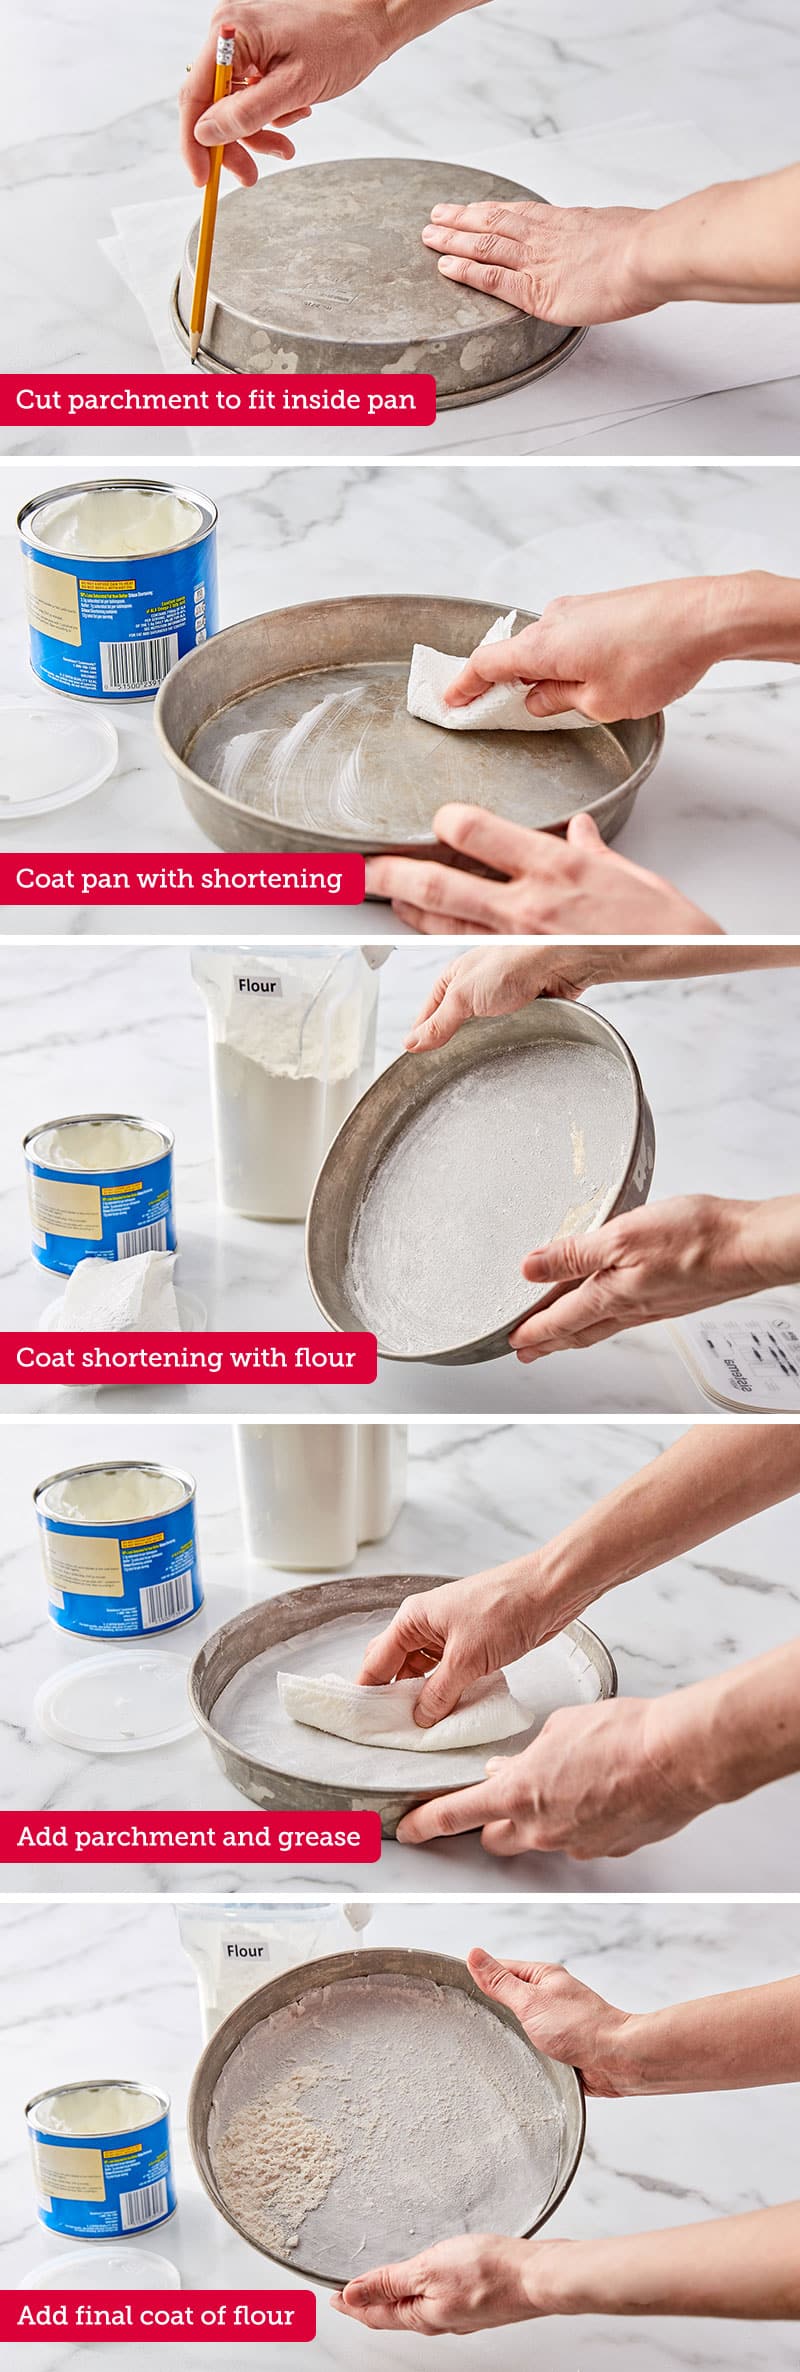
1. Pick the right pan and prep it well:
A shiny or light-colored pan (i.e. not dark nonstick) will turn out a light and tender cake. Grease it well and the cake will come out intact, which will make it easier to frost (there’ll be no holes to fill in!). Here’s the foolproof way to do it:

2. Make sure cake layers turn out flat:
Flat layers stack nicely. Here’s how to ensure yours turn out neat and tidy:
- Before baking: Fill each pan with the same amount of batter and rap the pan against the countertop to spread the batter evenly.
- After baking, cooling, and removing the cake from the pan: If your cake developed a domed shape on top, slice it to create a level surface. Bend down so that you’re looking at the cake at eye level as you work and use a serrated knife in a gentle sawing motion to remove the domed portion.
- When stacking layers: Place cakes with the top (formerly domed side) facing down.
3. Measure for even layers:
For layer cakes that call for slicing cakes in half, allow cake to cool and use a ruler for accuracy. Measure halfway up cake’s side and mark that point with a toothpick. Continue measuring and marking all around the cake. Using a long serrated knife, begin cutting the cake in half using the toothpicks as your guide.
4. Brush off crumbs:
This quick and easy step will help your frosting stick better. Once your cake has cooled, use your hand to brush off any loose crumbs sticking to the cake. Brush off top, bottoms and sides, then set cake on a clean surface.
5. Prepare your serving plate:
The last thing you want to do is move your cake after decorating, so it’s best to frost on your cake stand, cake plate or whatever serving dish you plan to use. To keep your serving surface clean, cut four strips of waxed paper and place around edge of plate. This paper border will catch any drips or smears. After you’re done decorating, you can slide the pieces out from under the cake, and you’ll have a spic-and-span surface.
6. Add a crumb coat:
A crumb coat is a thin first layer of frosting that seals in the crumbs. After your cake has cooled, apply the layer of frosting without worry that crumbs are getting mixed into it. Allow the crumb coat to set and those crumbs will be trapped in the first layer of frosting, so they don’t mix into your final decorative layer.
7. Choose your look:
Will you frost your cake with flawlessly smooth sides and sharp edges or cover it with an entire garden scene of piped rosettes, leaves and grass? Think it through and collect the tools you’ll need. Then, we’ll show you how to bring your design to life.
With these prep steps out of the way, you’ve set yourself up for successful decorating. Ready to begin?
How to Decorate Your Cake: 5 Looks We Love
Now the real fun begins. We’ll take you through five simple but beautiful decorating techniques that we love: smooth sides and sharp edges, decorated sides, drips, piping and ombre.
How to Frost a Cake With Smooth Sides & Sharp Edges
Everyone will think your cake was bakery bought when you serve up a beauty with smooth sides and sharp edges. The key to pulling it off is applying a crumb coat so your final layer of frosting looks flawless.
Ingredient needed: The frosting of your choice.
Tools needed: An offset spatula is essential to achieving this look, and a rubber spatula helps with some of the less precise work. A cake turntable and a cardboard cake round are nice to have, but not essential.
Before you begin: Apply your crumb coat and allow it to set.
How to:
1. Spoon or scrape frosting into the center of the cake’s top. Then use your offset spatula to begin spreading from the center. Once the top is covered with a sufficient layer of frosting, use your offset spatula to smooth off the top.
2. Begin applying frosting to the sides of the cake. Be generous and don’t worry about being overly precise. Your objective is to make sure there’s enough frosting on the sides to cover them.
3. Once you’ve covered the sides, take your offset spatula and hold it vertically against the cake. Begin scraping lightly to smooth frosting creating an even layer. You may need to stop and wipe off your spatula as you go. If you have a revolving cake stand, keep the hand holding the spatula in one place and spin the stand.
How to Decorate the Sides of Your Cake
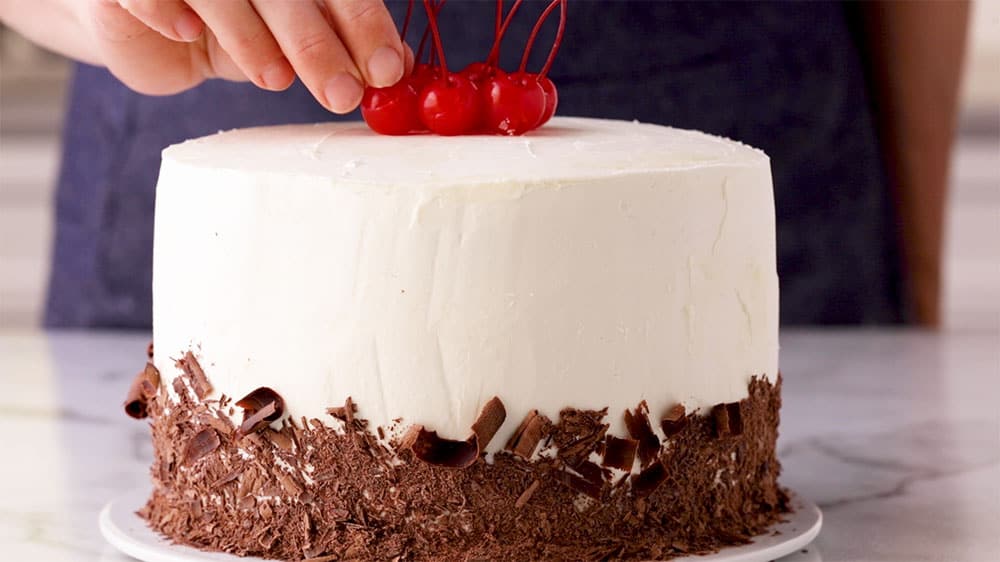
A sweet (or salty) ring—or skirt—of decorations can really make your cake pop. The key to pulling off this technique is working while your frosting is still fresh, so the decorations stick.

Ingredients needed: The decorations of your choice. Among our favorites are chopped peanuts, pretzels and chocolate shavings; we used ½ cup of the latter for this 8-inch cake.
Tools needed: Waxed paper to line your plate and keep it clean, plus tools to prepare your decorations. Depending on which decorations you’re using, you might need a vegetable peeler to make chocolate curls, a knife for chopping nuts or a rolling pin and plastic resealable bag for crushing pretzels. A revolving cake stand makes applying the decorations a little more seamless but it’s not essential.
Before you begin: Prepare your toppings and frost the cake as desired. The smooth sides and sharp edges technique above looks beautiful when decorated.
How to:
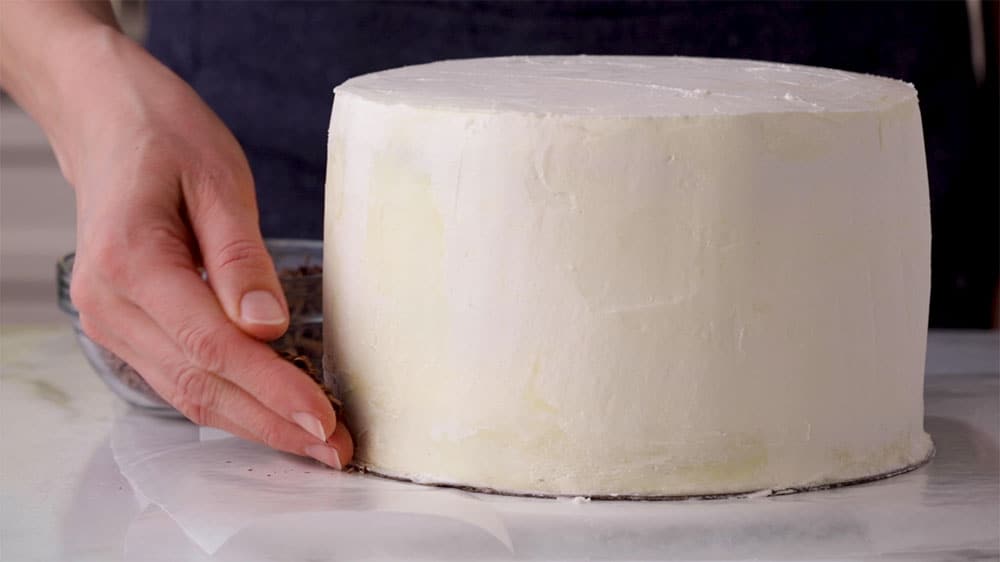
1. Prepare your serving plate: You won’t want to move your cake after taking such care decorating. Line the plate with four strips of waxed paper, then set the cake on top. The paper will catch excess toppings and can be easily pulled away without disturbing the work you’ve done.
2. Immediately after frosting: Begin pressing the toppings into the sides of the cake. The easiest way to do this is by cupping your hand so the toppings are held in your fingertips and can be easily pressed into the side of the cake.

3. Continue all the way around the cake. We think decorations look pretty when concentrated on the lower third of the cake but it’s your cake, so you decide!
4. To finish, gently pull the waxed paper strips out from under the cake for a neat and tidy presentation.
How to Decorate You Cake with Drips
For an elegant look and indulgent taste, drips are the way to go. The trick is to get the temperature of your topping just right, so it flows nicely. You’ll also want to apply your drips just before serving for the prettiest look.
Ingredients needed: The topping of your choice. We recommend starting with jarred caramel sauce, because it flows nicely at room temperature. We used 1/3 cup for this 8-inch cake.
Tools needed: A spoon, a liquid measuring cup and a straight icing/baking spatula.
Before you begin: Frost your cake as desired and allow the frosting to set. Smooth sides and sharp edges look beautiful under drips.
How to:
1. Prepare your topping: Pour into a liquid measuring cup. The spout will give you more control.
2. Try a test drip: Spoon a bit of topping onto the edge of the cake. If you like the way it flows, it’s ready to go. If not, give it a stir and try again. If it’s still not ready, microwave for a few seconds but remember you want to avoid warming it too much or it will melt your frosting.
3. Add topping: Begin pouring the topping into the center of the cake. Allow it to spread for a few seconds. Then, use your straight spatula to gently coax the topping toward the edges of the cake, where it will drip down the sides at its own pace. Try to use as few strokes as possible to keep the top of the cake smooth and pretty. If using caramel sauce, we love to finish the cake with a sprinkle of flaky sea salt.
A note about toppings: Chocolate ganache also makes a gorgeous topping. However, it’s especially important to take the testing step when using ganache, because you’re aiming for a goldilocks-zone temperature (not too hot, not too cool, just right). It needs to be warm enough to flow well but not so warm that it melts the frosting. So, after making the ganache: stir, let stand and test. Want to give this a try with step-by-step instructions? We recommend the glossy ganache-covered Coconut-Macaroon Chocolate Layer Cake.
How to Decorate a Cake with Piping
Impressive piping is something you can master—we promise! We’ll start with five simple piping techniques. The key to success with all of these is to avoid overfilling your piping bag. With a bag that’s only half full, you’ll have more control.
Ingredient needed: The frosting of your choice. We used Betty Crocker™ Rich & Creamy vanilla, tinted in different shades.
Tools needed: A pint glass, a rubber spatula, piping bag and piping tips are all essential. We’ll discuss the following piping tips: grass (multi-opening), medium or large star, leaf and large round.
Before you begin: Apply a first, smooth layer of frosting, as desired.
How to:
1. Fill your piping bag. Insert the piping tip into the bag opening, then stand the bag up inside a pint glass and fold the sides of the bag over the rim of the glass. Use your rubber spatula to fill the bag with frosting until it’s half full. Twist the top to close.
2. Pipe! Hold one hand at the top of the bag. Use the other hand to guide the tip as needed. Apply pressure from the top. Stop applying pressure when you want to finish the shape. Practice on a piece of waxed paper before you begin. Most of the time, you’ll be holding your bag at either a 90-degree or 45-degree angle to the cake.
- To pipe a rosette: Use a medium or large star tip. Pipe a tight circle starting with the inside and working out. Stop applying pressure before you lift the tip but keep guiding the frosting. This will help the tail end of the rosette lay down, rather than stick up. Once the shape is complete, lift the bag.
- To pipe a leaf: Use a leaf tip. Apply a short burst of pressure, then stop. Move your tip in a line to complete the shape.
- To pipe grass: Use a grass tip or multi-opening tip. Apply a short burst of pressure to keep the grass from getting too long. Release pressure and then lift up to finish a clump. Pipe grass clumps close together.
- To pipe stars or star flowers: Use a medium or large star tip. Hold the bag up straight. Apply pressure, stop and lift up to finish each shape.
- To pipe a dot: Use a large round tip. With your top hand, apply more pressure to create a large dot and less pressure to create a small dot. Stop applying pressure and lift up tip to finish.
Here’s how to pipe an entire garden on top of your layer cake!
How to Give Your Cake an Ombre Fade
This magical look is so much easier than you might imagine. The only trick is to (again) avoid overfilling your piping bag. If you’re using plastic piping bags, it’s helpful to prepare bags before you begin, so you don’t have to pause.
Ingredients needed: Frosting and food coloring.
Tools needed: A piping bag and an offset spatula are needed. Use a large round tip or just use the bag without a tip. A cake turntable and a cardboard cake round are both helpful but not required.
Before you begin: Apply your crumb coat and allow it to set.
How to:
1. Start by tinting your frosting. You’ll want three colors and you’ll need more of the lightest color as it will be used to cover the top as well the part of the sides. If you want some tinting inspiration, check out How to Color Frosting Like a Pro or play around with a pastel color palette.
2. With your frosting tinted and your crumb coat set, you’re ready to begin. Fit a piping bag with a large round tip (or skip the tip, it’s not absolutely necessary) and fill with the darkest colored frosting. Pipe a band along the side of the cake, starting at the bottom. Then, pipe another band on top of that first one—you’re aiming to cover the bottom third of the cake.
3. With the darkest color added, it’s time to move onto the next, lighter color. Clean your piping bag and fill with the new color (or switch to a new bag, if you’re using a plastic piping bags). Begin by piping directly above the darkest color. Pipe another line to fill the middle third of the cake.
4. Now it’s time to move on to the lightest color. Clean the piping bag or switch to a new disposable bag and fill it with the new color. Pipe along the sides to fill in the top third. Then, move on to the top of the cake. Starting in the center, pipe the frosting in a spiral until the entire top is covered.
5. Now it’s time to smooth the sides. Holding your offset spatula vertically against the side of the cake, press lightly to smooth the piped bands. Work your way around the cake—a cake turntable is really helpful here, but if you don’t have one, just rotate your plate as you work.
6. Clean your spatula when too much frosting gets built up. To do this, scrape excess frosting onto the rim of a glass, dip your spatula in water and wipe it with a towel. Keep working around the cake until the sides are smooth. You might end up with a ridge of excess frosting at the top of your cake; simply scrape that onto the top.
7. Smooth out the top by holding your clean offset spatula horizontally against the top. Press lightly, until the entire top is smooth.
8. If needed, run your spatula along the edge between the sides and top of the cake.
Whether you choose to master all five of these techniques or just one, we hope you find that cake decorating is fun, satisfying and a guaranteed way to make everyone who shares in your masterpiece feel special.
(function() {
document.addEventListener('DOMContentLoaded', function() {
var componentMetadata = JSON.parse('\x7b\x22componentName\x22\x3a\x22NewsletterCTA_b9911a56-3a0d-4b1c-8521-df6c10ce048a\x22,\x22deferOptions\x22\x3a\x7b\x22deferComponent\x22\x3atrue,\x22deferType\x22\x3a\x22OnDemand\x22,\x22deferId\x22\x3a\x22rf56042c1f2ef424f9eebdb6b4fdd1665\x22,\x22deferredContainerId\x22\x3a\x22\x2fprimaryColumn\x2finteropInlineNewsletterCta\x22,\x22deferredContainerView\x22\x3a\x22InteropDeferWrapper\x22\x7d,\x22viewName\x22\x3a\x22NewsletterCTA\x22\x7d');
var configuration = {"unsubscribedNewsletters":[{"listId":"1e34a555-89d1-45f0-8f07-b3ae6b01c03c","thumbnailImageUrl":"/-/media/GMI/Core-Sites/BC/Images/Shared/myaccount/newsletters/BC_Thumb157x157.png?sc_lang=en","previewUrl":"https://morpheus3.idpk.net/email_sends/9111/preview","name":"Betty\u0027s Email","isPromo":false}],"settings":{"anonymousCopy":" Baking happiness, one recipe at a time!","anonymousDescriptionCopy":"Access thousands of tested recipes, perfect for everyday meals and special celebrations. Made with love, from our kitchens to yours.","anonymousThankYouCopy":"\u003cp\u003eThanks! Your first email is on its way.\u003c/p\u003e\n","anonymousThankYouDescriptionCopy":"\u003cp\u003e\u003cspan\u003eNow that you\u0026rsquo;re signed up, create an account on BettyCrocker.com to save your favorite recipes, learn more about special promotions and get inspired through Betty\u0026rsquo;s expert tips.\u003c/span\u003e\u003c/p\u003e","anonymousButtonText":"Sign Me Up for Emails","anonymousEmailInvalidErrorText":"Please enter a valid email address.","anonymousSubscribeErrorText":"We encountered an error while signing you up. Please try again.","anonymousEmailAddressPlaceholderText":"Enter your email address","anonymousEmailAddressLabel":"Email Address","anonymousLegalCopy":"By signing up, you accept our\u0026nbsp;\u003ca rel=\u0022noopener noreferrer\u0022 href=\u0022https://www.generalmills.com/privacy-security/us-english-privacy-policy\u0022 target=\u0022_blank\u0022\u003e\u003cspan style=\u0022text-decoration: underline;\u0022\u003ePrivacy Policy\u003c/span\u003e\u003c/a\u003e\u0026nbsp;and agree that your information may be used across our\u0026nbsp;\u003ca rel=\u0022noopener noreferrer\u0022 href=\u0022https://www.generalmills.com/food-we-make/brands\u0022 target=\u0022_blank\u0022\u003e\u003cspan style=\u0022text-decoration: underline;\u0022\u003efamily of brands\u003c/span\u003e.\u003c/a\u003e","requiredFieldText":"","backgroundColor":"#E60000","accentColor":"","registrationUrl":"/user-profile/register?RegAction=SUBSCRIBERUPGRADE\u0026esrc=11275\u0026returnUrl=%2fhow-to%2fhow-to-decorate-a-cake","registrationLinkText":"Join free!","enableExpandedFields":false,"hideForSessionCookieExpiration":0,"ctaType":"StandardAnonymous","location":"Inline","userState":"Anonymous","sourceCodeOverride":0}};
var moduleName = 'newsletterCta';
var isVueModule = true;
GeneralMills.PandoSites.RegisterControlInstance(moduleName, configuration, componentMetadata, isVueModule)
});
})();