(function() {
document.addEventListener('DOMContentLoaded', function() {
var componentMetadata = JSON.parse('\x7b\x22componentName\x22\x3a\x22RatingAndReviewCounts_2ee1ece6-a33c-4f37-aafb-6377bfa48ff1\x22,\x22deferOptions\x22\x3a\x7b\x22deferComponent\x22\x3afalse,\x22deferType\x22\x3a\x22None\x22,\x22deferId\x22\x3a\x22r0211c1d93247461eac50aa5552f8b0a4\x22,\x22deferredContainerId\x22\x3a\x22\x2fmain\x2frdpRatingAndReview\x22,\x22deferredContainerView\x22\x3anull\x7d,\x22viewName\x22\x3a\x22RatingAndReviewCounts\x22\x7d');
var configuration = {};
var moduleName = 'ratingAndReviewCounts';
var isVueModule = false;
GeneralMills.PandoSites.RegisterControlInstance(moduleName, configuration, componentMetadata, isVueModule)
});
})();
Save Recipe
(function() {
document.addEventListener('DOMContentLoaded', function() {
var componentMetadata = JSON.parse('\x7b\x22componentName\x22\x3a\x22ActionToolbar_e353ad1f-a2d8-46f6-a5eb-5aba3a9fbd9a\x22,\x22deferOptions\x22\x3a\x7b\x22deferComponent\x22\x3afalse,\x22deferType\x22\x3a\x22None\x22,\x22deferId\x22\x3a\x22rad88aa04534048e48950d0ba3f77c420\x22,\x22deferredContainerId\x22\x3a\x22\x2fmain\x2finlineActionToolbarMobile\x22,\x22deferredContainerView\x22\x3anull\x7d,\x22viewName\x22\x3a\x22ActionToolbar\x22\x7d');
var configuration = {"contentId":"2ddf716f-5e60-4846-8939-1c4a0d279ed3","toolbarSettings":{"id":"e353ad1f-a2d8-46f6-a5eb-5aba3a9fbd9a","registrationUrl":"/GMI/CoreSites/BC/Home/register/reg-fp","regAction":"FAVORITE","eSourceCode":11275,"namePassedToEvents":"RDPToolbarBODY","buttons":[{"addFavoriteErrorMessage":"Sorry, something went wrong. Please save again.","removeFavoriteErrorMessage":"Error occurred while removing from favorites","registrationUrl":"/GMI/CoreSites/BC/Home/register/reg-fp","regAction":"FAVORITE","eSourceCode":11275,"isCurrentUserAnonymous":false,"isFavoriteItem":false,"id":"f5ddc195-aa9e-440f-be1d-07e99b16dbe9","allowedForAnonymousUsers":false,"type":"Favorite","displayName":"Save Recipe","namePassedToEvents":"Favorite","cssClassName":"atButtonFavorite","privacyOptOutMessage":"\u003cdiv class=\u0027privacyMessage\u0027\u003e\n\u003ch3\u003eThis feature is not available with your current cookie settings.\u003c/h3\u003e\n\u003cp\u003eYou can \u003ca href=\u0027#\u0027 data-show-preference-center=\u00271\u0027\u003eupdate your privacy settings\u003c/a\u003e to enable this content. Please enable “Functional Cookies” to use this feature.\u003c/p\u003e\n\u003c/div\u003e","showPrivacyOptOutMessage":false},{"providerName":"pinterest","providerNamePassedToEvents":"Pinterest","shareUrlFormat":"//pinterest.com/pin/create/link/?url={0}","id":"46ba2df6-f449-4b7e-a14a-0b020defbb8d","allowedForAnonymousUsers":true,"type":"Social","displayName":"Pinterest","namePassedToEvents":"Pinterest","cssClassName":"atButtonPinterest","privacyOptOutMessage":"\u003cdiv class=\u0027privacyMessage\u0027\u003e\n\u003ch3\u003eThis feature is not available with your current cookie settings.\u003c/h3\u003e\n\u003cp\u003eYou can \u003ca href=\u0027#\u0027 data-show-preference-center=\u00271\u0027\u003eupdate your privacy settings\u003c/a\u003e to enable this content. Please enable “Functional Cookies” to use this feature.\u003c/p\u003e\n\u003c/div\u003e","showPrivacyOptOutMessage":false},{"providerName":"facebook","providerNamePassedToEvents":"Facebook","shareUrlFormat":"//facebook.com/sharer/sharer.php?u={0}","id":"ee62c9eb-d882-456e-be13-a0591e588000","allowedForAnonymousUsers":true,"type":"Social","displayName":"Facebook","namePassedToEvents":"Facebook","cssClassName":"atButtonFacebook","privacyOptOutMessage":"\u003cdiv class=\u0027privacyMessage\u0027\u003e\n\u003ch3\u003eThis feature is not available with your current cookie settings.\u003c/h3\u003e\n\u003cp\u003eYou can \u003ca href=\u0027#\u0027 data-show-preference-center=\u00271\u0027\u003eupdate your privacy settings\u003c/a\u003e to enable this content. Please enable “Functional Cookies” to use this feature.\u003c/p\u003e\n\u003c/div\u003e","showPrivacyOptOutMessage":false},{"templateId":"bf50810b-3823-4a07-a4a0-2e63d516cc3e","dialogHeading":"Email Recipe","emailCode":"BC_ContentEmail","dialogSettings":{"cancelButtonText":"Cancel","copyToSenderLabel":"Send a Copy to Myself","emailAddressesLabel":"* Email Address(es)","emailInstructionText":"Separate email addresses with commas","fromText":"From:","privacyPolicyText":"\u003cp\u003e\u0026copy;2024 General Mills, Inc. All Rights Reserved. This information will only be used to send an email to your friend(s) and will not be saved. Please read our \u003ca rel=\u0022noopener noreferrer\u0022 rel=\u0022noopener noreferrer\u0022 href=\u0022http://www.generalmills.com/company/privacy-policies/privacy-policy-us\u0022 target=\u0022_blank\u0022 shape=\u0022rect\u0022\u003ePrivacy Policy\u003c/a\u003e.\u003c/p\u003e","requiredFieldText":"* Required","sendButtonText":"Send","senderEmailAddressLabel":"* Your Email Address","senderFirstNameLabel":"* Your First Name","sendToText":"Send To:"},"id":"99e5ade9-dd8f-4ed7-8c5b-7e7779309eea","allowedForAnonymousUsers":true,"type":"Email","displayName":"Email","namePassedToEvents":"Email","cssClassName":"atButtonEmail","privacyOptOutMessage":"\u003cdiv class=\u0027privacyMessage\u0027\u003e\n\u003ch3\u003eThis feature is not available with your current cookie settings.\u003c/h3\u003e\n\u003cp\u003eYou can \u003ca href=\u0027#\u0027 data-show-preference-center=\u00271\u0027\u003eupdate your privacy settings\u003c/a\u003e to enable this content. Please enable “Functional Cookies” to use this feature.\u003c/p\u003e\n\u003c/div\u003e","showPrivacyOptOutMessage":false}],"isSticky":false},"userSettings":{"isCurrentUserAnonymous":true,"isFavoriteItem":false},"pageAttributes":{"url":"https%3a%2f%2fwww.bettycrocker.com%2frecipes%2fjolly-santa-claus-cake%2f2ddf716f-5e60-4846-8939-1c4a0d279ed3","contentId":"2ddf716f-5e60-4846-8939-1c4a0d279ed3"},"recaptchaPublicKey":"6LfU_icUAAAAALSqSjRg5hqZwbPr1b8k-_80a_S_"};
var moduleName = 'actionToolbar';
var isVueModule = true;
GeneralMills.PandoSites.RegisterControlInstance(moduleName, configuration, componentMetadata, isVueModule)
});
})();
(function() {
document.addEventListener('DOMContentLoaded', function() {
var componentMetadata = JSON.parse('\x7b\x22componentName\x22\x3a\x22VideoOverlay_2ee1ece6-a33c-4f37-aafb-6377bfa48ff1\x22,\x22deferOptions\x22\x3a\x7b\x22deferComponent\x22\x3afalse,\x22deferType\x22\x3a\x22None\x22,\x22deferId\x22\x3a\x22re5f9805e676946888cb24bd030abfe17\x22,\x22deferredContainerId\x22\x3a\x22\x2fmain\x2frdpImage\x22,\x22deferredContainerView\x22\x3anull\x7d,\x22viewName\x22\x3a\x22VideoOverlay\x22\x7d');
var configuration = {"id":"eW9PwCV2fiA","name":"How to Make Jolly Santa Claus Cake Video","aspectRatioPercent":56.2500,"autoplay":true,"playButtonText":"Watch Video","loadingImageUrl":"/-/media/GMI/Core-Sites/BC/PandoSites-DevOnly/Shared/YouTube/loading.gif?sc_lang=en","loadingImageAltText":"Loading","privacyScreenContent":"\u003cdiv class=\u0022privacyMessage\u0022\u003e\n\u003ch3\u003eThis feature is not available with your current cookie settings.\u003c/h3\u003e\n\u003cp\u003eYou can \u003ca href=\u0022#\u0022 data-show-preference-center=\u00221\u0022\u003eupdate your privacy settings\u003c/a\u003e to enable this content. Please enable all cookies to use this feature.\u003c/p\u003e\n\u003c/div\u003e"};
var moduleName = 'videoOverlay';
var isVueModule = true;
GeneralMills.PandoSites.RegisterControlInstance(moduleName, configuration, componentMetadata, isVueModule)
});
})();
(function() {
document.addEventListener('DOMContentLoaded', function() {
var componentMetadata = JSON.parse('\x7b\x22componentName\x22\x3a\x22ActionToolbar_b0b1222c-3701-42e5-b428-c40dd8ab45f7\x22,\x22deferOptions\x22\x3a\x7b\x22deferComponent\x22\x3afalse,\x22deferType\x22\x3a\x22None\x22,\x22deferId\x22\x3a\x22r0058f260f0334abab27c3df661dadb53\x22,\x22deferredContainerId\x22\x3a\x22\x2fmain\x2finlineActionToolbarDesktop\x22,\x22deferredContainerView\x22\x3anull\x7d,\x22viewName\x22\x3a\x22ActionToolbar\x22\x7d');
var configuration = {"contentId":"2ddf716f-5e60-4846-8939-1c4a0d279ed3","toolbarSettings":{"id":"b0b1222c-3701-42e5-b428-c40dd8ab45f7","registrationUrl":"/GMI/CoreSites/BC/Home/register/reg-fp","regAction":"FAVORITE","eSourceCode":11275,"namePassedToEvents":"RDPToolbarBODY","buttons":[{"addFavoriteErrorMessage":"Sorry, something went wrong. Please save again.","removeFavoriteErrorMessage":"Error occurred while removing from favorites","registrationUrl":"/GMI/CoreSites/BC/Home/register/reg-fp","regAction":"FAVORITE","eSourceCode":11275,"isCurrentUserAnonymous":false,"isFavoriteItem":false,"id":"16a29701-2b75-4d9a-aa9c-860376da50d7","allowedForAnonymousUsers":false,"type":"Favorite","displayName":"Save","namePassedToEvents":"Favorite","cssClassName":"atButtonFavorite","privacyOptOutMessage":"\u003cdiv class=\u0027privacyMessage\u0027\u003e\n\u003ch3\u003eThis feature is not available with your current cookie settings.\u003c/h3\u003e\n\u003cp\u003eYou can \u003ca href=\u0027#\u0027 data-show-preference-center=\u00271\u0027\u003eupdate your privacy settings\u003c/a\u003e to enable this content. Please enable “Functional Cookies” to use this feature.\u003c/p\u003e\n\u003c/div\u003e","showPrivacyOptOutMessage":false},{"layoutParameter":"p%3d1","id":"ce5ab433-0a0d-4a97-8c01-c4588e3e2c86","allowedForAnonymousUsers":true,"type":"Print","displayName":"Print","namePassedToEvents":"Print","cssClassName":"atButtonPrint","privacyOptOutMessage":"\u003cdiv class=\u0027privacyMessage\u0027\u003e\n\u003ch3\u003eThis feature is not available with your current cookie settings.\u003c/h3\u003e\n\u003cp\u003eYou can \u003ca href=\u0027#\u0027 data-show-preference-center=\u00271\u0027\u003eupdate your privacy settings\u003c/a\u003e to enable this content. Please enable “Functional Cookies” to use this feature.\u003c/p\u003e\n\u003c/div\u003e","showPrivacyOptOutMessage":false},{"providerName":"pinterest","providerNamePassedToEvents":"Pinterest","shareUrlFormat":"//pinterest.com/pin/create/link/?url={0}","id":"c18cf08e-e436-4cd0-a180-1bafb15369a6","allowedForAnonymousUsers":true,"type":"Social","displayName":"Pinterest","namePassedToEvents":"Pinterest","cssClassName":"atButtonPinterest","privacyOptOutMessage":"\u003cdiv class=\u0027privacyMessage\u0027\u003e\n\u003ch3\u003eThis feature is not available with your current cookie settings.\u003c/h3\u003e\n\u003cp\u003eYou can \u003ca href=\u0027#\u0027 data-show-preference-center=\u00271\u0027\u003eupdate your privacy settings\u003c/a\u003e to enable this content. Please enable “Functional Cookies” to use this feature.\u003c/p\u003e\n\u003c/div\u003e","showPrivacyOptOutMessage":false},{"providerName":"facebook","providerNamePassedToEvents":"Facebook","shareUrlFormat":"//facebook.com/sharer/sharer.php?u={0}","id":"6c3f442d-6ffe-460f-8360-b02b122d326c","allowedForAnonymousUsers":true,"type":"Social","displayName":"Facebook","namePassedToEvents":"Facebook","cssClassName":"atButtonFacebook","privacyOptOutMessage":"\u003cdiv class=\u0027privacyMessage\u0027\u003e\n\u003ch3\u003eThis feature is not available with your current cookie settings.\u003c/h3\u003e\n\u003cp\u003eYou can \u003ca href=\u0027#\u0027 data-show-preference-center=\u00271\u0027\u003eupdate your privacy settings\u003c/a\u003e to enable this content. Please enable “Functional Cookies” to use this feature.\u003c/p\u003e\n\u003c/div\u003e","showPrivacyOptOutMessage":false},{"templateId":"bf50810b-3823-4a07-a4a0-2e63d516cc3e","dialogHeading":"Email Recipe","emailCode":"BC_ContentEmail","dialogSettings":{"cancelButtonText":"Cancel","copyToSenderLabel":"Send a Copy to Myself","emailAddressesLabel":"* Email Address(es)","emailInstructionText":"Separate email addresses with commas","fromText":"From:","privacyPolicyText":"\u003cp\u003e\u0026copy;2024 General Mills, Inc. All Rights Reserved. This information will only be used to send an email to your friend(s) and will not be saved. Please read our \u003ca rel=\u0022noopener noreferrer\u0022 rel=\u0022noopener noreferrer\u0022 href=\u0022http://www.generalmills.com/company/privacy-policies/privacy-policy-us\u0022 target=\u0022_blank\u0022 shape=\u0022rect\u0022\u003ePrivacy Policy\u003c/a\u003e.\u003c/p\u003e","requiredFieldText":"* Required","sendButtonText":"Send","senderEmailAddressLabel":"* Your Email Address","senderFirstNameLabel":"* Your First Name","sendToText":"Send To:"},"id":"e9f8340b-cbb6-4959-8852-41f1ef67a2a1","allowedForAnonymousUsers":true,"type":"Email","displayName":"Email","namePassedToEvents":"Email","cssClassName":"atButtonEmail","privacyOptOutMessage":"\u003cdiv class=\u0027privacyMessage\u0027\u003e\n\u003ch3\u003eThis feature is not available with your current cookie settings.\u003c/h3\u003e\n\u003cp\u003eYou can \u003ca href=\u0027#\u0027 data-show-preference-center=\u00271\u0027\u003eupdate your privacy settings\u003c/a\u003e to enable this content. Please enable “Functional Cookies” to use this feature.\u003c/p\u003e\n\u003c/div\u003e","showPrivacyOptOutMessage":false}],"isSticky":false},"userSettings":{"isCurrentUserAnonymous":true,"isFavoriteItem":false},"pageAttributes":{"url":"https%3a%2f%2fwww.bettycrocker.com%2frecipes%2fjolly-santa-claus-cake%2f2ddf716f-5e60-4846-8939-1c4a0d279ed3","contentId":"2ddf716f-5e60-4846-8939-1c4a0d279ed3"},"recaptchaPublicKey":"6LfU_icUAAAAALSqSjRg5hqZwbPr1b8k-_80a_S_"};
var moduleName = 'actionToolbar';
var isVueModule = true;
GeneralMills.PandoSites.RegisterControlInstance(moduleName, configuration, componentMetadata, isVueModule)
});
})();
(function() {
document.addEventListener('DOMContentLoaded', function() {
var componentMetadata = JSON.parse('\x7b\x22componentName\x22\x3a\x22WakeLock_2ee1ece6-a33c-4f37-aafb-6377bfa48ff1\x22,\x22deferOptions\x22\x3a\x7b\x22deferComponent\x22\x3afalse,\x22deferType\x22\x3a\x22None\x22,\x22deferId\x22\x3a\x22r14a34789c67247a58986ce35100d98de\x22,\x22deferredContainerId\x22\x3a\x22\x2fmain\x2frdpWakeLockTop\x22,\x22deferredContainerView\x22\x3anull\x7d,\x22viewName\x22\x3a\x22WakeLock\x22\x7d');
var configuration = {"heading":"Ready to Make?","button":{"errorMessage":"","id":"3e721b3c-33ab-474b-beb4-53add7af05d2","allowedForAnonymousUsers":true,"type":"WakeLock","displayName":"Keep Screen On","namePassedToEvents":"Wakelock","cssClassName":"atButtonWakeLock","privacyOptOutMessage":"\u003cdiv class=\u0027privacyMessage\u0027\u003e\n\u003ch3\u003eThis feature is not available with your current cookie settings.\u003c/h3\u003e\n\u003cp\u003eYou can \u003ca href=\u0027#\u0027 data-show-preference-center=\u00271\u0027\u003eupdate your privacy settings\u003c/a\u003e to enable this content. Please enable “Functional Cookies” to use this feature.\u003c/p\u003e\n\u003c/div\u003e","showPrivacyOptOutMessage":false}};
var moduleName = 'wakeLockShared';
var isVueModule = true;
GeneralMills.PandoSites.RegisterControlInstance(moduleName, configuration, componentMetadata, isVueModule)
});
})();
Save
Shop
Share
Keep Screen On
(function() {
document.addEventListener('DOMContentLoaded', function() {
var componentMetadata = JSON.parse('\x7b\x22componentName\x22\x3a\x22ActionToolbar_63c13be0-5bfb-446f-b820-2790dadf6b3e\x22,\x22deferOptions\x22\x3a\x7b\x22deferComponent\x22\x3afalse,\x22deferType\x22\x3a\x22None\x22,\x22deferId\x22\x3a\x22rbfab3c82c3444dc4b7a1023200877826\x22,\x22deferredContainerId\x22\x3a\x22\x2fmain\x2fdockingActionToolbar\x22,\x22deferredContainerView\x22\x3anull\x7d,\x22viewName\x22\x3a\x22ActionToolbar\x22\x7d');
var configuration = {"contentId":"2ddf716f-5e60-4846-8939-1c4a0d279ed3","toolbarSettings":{"id":"63c13be0-5bfb-446f-b820-2790dadf6b3e","registrationUrl":"/GMI/CoreSites/BC/Home/register/reg-fp","regAction":"FAVORITE","eSourceCode":11275,"namePassedToEvents":"RDPToolbarSTICKY","buttons":[{"addFavoriteErrorMessage":"Sorry, something went wrong. Please save again.","removeFavoriteErrorMessage":"Error occurred while removing from favorites","registrationUrl":"/GMI/CoreSites/BC/Home/register/reg-fp","regAction":"FAVORITE","eSourceCode":11275,"isCurrentUserAnonymous":false,"isFavoriteItem":false,"id":"16a29701-2b75-4d9a-aa9c-860376da50d7","allowedForAnonymousUsers":false,"type":"Favorite","displayName":"Save","namePassedToEvents":"Favorite","cssClassName":"atButtonFavorite","privacyOptOutMessage":"\u003cdiv class=\u0027privacyMessage\u0027\u003e\n\u003ch3\u003eThis feature is not available with your current cookie settings.\u003c/h3\u003e\n\u003cp\u003eYou can \u003ca href=\u0027#\u0027 data-show-preference-center=\u00271\u0027\u003eupdate your privacy settings\u003c/a\u003e to enable this content. Please enable “Functional Cookies” to use this feature.\u003c/p\u003e\n\u003c/div\u003e","showPrivacyOptOutMessage":false},{"scriptUrl":"https://cdn.whisk.com/sdk/shopping-list.js","onLoadFunction":"var whisk = window.whisk || {};\r\nwhisk.queue = whisk.queue || [];\r\nwhisk.queue.push(function () {\r\n whisk.shoppingList.addRecipeToList({\r\n recipeUrl: window.location.href.replace(\u0027q.bettycrocker.com\u0027, \u0027bettycrocker.com\u0027),\r\n trackingId: \u0022wx-75324683-8f1f0fa2\u0022, // new action toolbar button ID\r\n whiteLabel: \u0022bettycrocker\u0022\r\n });\r\n GeneralMills.Analytics.raiseEvent({\r\n EventType: \u0022Buy_click\u0022,\r\n Position: \u0022Floating Toolbar\u0022,\r\n VendorExperience: \u0022Whisk_recipe\u0022\r\n });\r\n});\r\n","scriptId":"recipeBuyNow","id":"49605120-3aab-4f78-b82a-d66f139d0b81","allowedForAnonymousUsers":true,"type":"ThirdPartyScript","displayName":"Shop","namePassedToEvents":"Shop Recipe","cssClassName":"atButtonShop ","privacyCategories":[3],"privacyOptOutMessage":"\u003cdiv class=\u0027privacyMessage\u0027\u003e\n\u003ch3\u003eThis feature is not available with your current cookie settings.\u003c/h3\u003e\n\u003cp\u003eYou can \u003ca href=\u0027#\u0027 data-show-preference-center=\u00271\u0027\u003eupdate your privacy settings\u003c/a\u003e to enable this content. Please enable “Functional Cookies” to use this feature.\u003c/p\u003e\n\u003c/div\u003e","showPrivacyOptOutMessage":false},{"nestedButtons":[{"layoutParameter":"p%3d1","id":"e34d2f94-cbe2-439b-b435-da465f840b2e","allowedForAnonymousUsers":true,"type":"Print","displayName":"Print Recipe","namePassedToEvents":"Print","cssClassName":"atButtonPrint","privacyOptOutMessage":"\u003cdiv class=\u0027privacyMessage\u0027\u003e\n\u003ch3\u003eThis feature is not available with your current cookie settings.\u003c/h3\u003e\n\u003cp\u003eYou can \u003ca href=\u0027#\u0027 data-show-preference-center=\u00271\u0027\u003eupdate your privacy settings\u003c/a\u003e to enable this content. Please enable “Functional Cookies” to use this feature.\u003c/p\u003e\n\u003c/div\u003e","showPrivacyOptOutMessage":false},{"providerName":"pinterest","providerNamePassedToEvents":"Pinterest","shareUrlFormat":"//pinterest.com/pin/create/link/?url={0}","id":"f976c276-f147-4387-b249-8fcf4aa89ee5","allowedForAnonymousUsers":true,"type":"Social","displayName":"Save To Pinterest","namePassedToEvents":"Pinterest","cssClassName":"atButtonPinterest","privacyOptOutMessage":"\u003cdiv class=\u0027privacyMessage\u0027\u003e\n\u003ch3\u003eThis feature is not available with your current cookie settings.\u003c/h3\u003e\n\u003cp\u003eYou can \u003ca href=\u0027#\u0027 data-show-preference-center=\u00271\u0027\u003eupdate your privacy settings\u003c/a\u003e to enable this content. Please enable “Functional Cookies” to use this feature.\u003c/p\u003e\n\u003c/div\u003e","showPrivacyOptOutMessage":false},{"templateId":"bf50810b-3823-4a07-a4a0-2e63d516cc3e","dialogHeading":"Email Recipe","emailCode":"BC_ContentEmail","dialogSettings":{"cancelButtonText":"Cancel","copyToSenderLabel":"Send a Copy to Myself","emailAddressesLabel":"* Email Address(es)","emailInstructionText":"Separate email addresses with commas","fromText":"From:","privacyPolicyText":"\u003cp\u003e\u0026copy;2024 General Mills, Inc. All Rights Reserved. This information will only be used to send an email to your friend(s) and will not be saved. Please read our \u003ca rel=\u0022noopener noreferrer\u0022 rel=\u0022noopener noreferrer\u0022 href=\u0022http://www.generalmills.com/company/privacy-policies/privacy-policy-us\u0022 target=\u0022_blank\u0022 shape=\u0022rect\u0022\u003ePrivacy Policy\u003c/a\u003e.\u003c/p\u003e","requiredFieldText":"* Required","sendButtonText":"Send","senderEmailAddressLabel":"* Your Email Address","senderFirstNameLabel":"* Your First Name","sendToText":"Send To:"},"id":"e6d709ac-e7a5-44ca-8531-95cb04430374","allowedForAnonymousUsers":true,"type":"Email","displayName":"Share via Email","namePassedToEvents":"Email","cssClassName":"atButtonEmail","privacyOptOutMessage":"\u003cdiv class=\u0027privacyMessage\u0027\u003e\n\u003ch3\u003eThis feature is not available with your current cookie settings.\u003c/h3\u003e\n\u003cp\u003eYou can \u003ca href=\u0027#\u0027 data-show-preference-center=\u00271\u0027\u003eupdate your privacy settings\u003c/a\u003e to enable this content. Please enable “Functional Cookies” to use this feature.\u003c/p\u003e\n\u003c/div\u003e","showPrivacyOptOutMessage":false},{"providerName":"facebook","providerNamePassedToEvents":"Facebook","shareUrlFormat":"//facebook.com/sharer/sharer.php?u={0}","id":"0aa33652-0835-443c-a509-9401ff5784e4","allowedForAnonymousUsers":true,"type":"Social","displayName":"Share on Facebook","namePassedToEvents":"Facebook","cssClassName":"atButtonFacebook","privacyOptOutMessage":"\u003cdiv class=\u0027privacyMessage\u0027\u003e\n\u003ch3\u003eThis feature is not available with your current cookie settings.\u003c/h3\u003e\n\u003cp\u003eYou can \u003ca href=\u0027#\u0027 data-show-preference-center=\u00271\u0027\u003eupdate your privacy settings\u003c/a\u003e to enable this content. Please enable “Functional Cookies” to use this feature.\u003c/p\u003e\n\u003c/div\u003e","showPrivacyOptOutMessage":false},{"successMessage":"Copied.","errorMessage":"Press Ctrl+C and Enter to copy to clipboard","successMessageDuration":3000,"errorMessageDuration":10000,"id":"15e206df-bb9d-424e-9887-8eec2530432e","allowedForAnonymousUsers":true,"type":"CopyLink","displayName":"Copy Link","namePassedToEvents":"Copy","cssClassName":"atButtonCopyLink","privacyOptOutMessage":"\u003cdiv class=\u0027privacyMessage\u0027\u003e\n\u003ch3\u003eThis feature is not available with your current cookie settings.\u003c/h3\u003e\n\u003cp\u003eYou can \u003ca href=\u0027#\u0027 data-show-preference-center=\u00271\u0027\u003eupdate your privacy settings\u003c/a\u003e to enable this content. Please enable “Functional Cookies” to use this feature.\u003c/p\u003e\n\u003c/div\u003e","showPrivacyOptOutMessage":false}],"id":"256769a9-5624-4a2a-b511-ac4dec1916fd","allowedForAnonymousUsers":true,"type":"Reveal","displayName":"Share","namePassedToEvents":"Share","cssClassName":"atButtonReveal","privacyOptOutMessage":"\u003cdiv class=\u0027privacyMessage\u0027\u003e\n\u003ch3\u003eThis feature is not available with your current cookie settings.\u003c/h3\u003e\n\u003cp\u003eYou can \u003ca href=\u0027#\u0027 data-show-preference-center=\u00271\u0027\u003eupdate your privacy settings\u003c/a\u003e to enable this content. Please enable “Functional Cookies” to use this feature.\u003c/p\u003e\n\u003c/div\u003e","showPrivacyOptOutMessage":false},{"errorMessage":"","id":"3e721b3c-33ab-474b-beb4-53add7af05d2","allowedForAnonymousUsers":true,"type":"WakeLock","displayName":"Keep Screen On","namePassedToEvents":"Wakelock","cssClassName":"atButtonWakeLock","privacyOptOutMessage":"\u003cdiv class=\u0027privacyMessage\u0027\u003e\n\u003ch3\u003eThis feature is not available with your current cookie settings.\u003c/h3\u003e\n\u003cp\u003eYou can \u003ca href=\u0027#\u0027 data-show-preference-center=\u00271\u0027\u003eupdate your privacy settings\u003c/a\u003e to enable this content. Please enable “Functional Cookies” to use this feature.\u003c/p\u003e\n\u003c/div\u003e","showPrivacyOptOutMessage":false}],"isSticky":true},"userSettings":{"isCurrentUserAnonymous":true,"isFavoriteItem":false},"pageAttributes":{"url":"https%3a%2f%2fwww.bettycrocker.com%2frecipes%2fjolly-santa-claus-cake%2f2ddf716f-5e60-4846-8939-1c4a0d279ed3","contentId":"2ddf716f-5e60-4846-8939-1c4a0d279ed3"},"recaptchaPublicKey":"6LfU_icUAAAAALSqSjRg5hqZwbPr1b8k-_80a_S_"};
var moduleName = 'actionToolbar';
var isVueModule = true;
GeneralMills.PandoSites.RegisterControlInstance(moduleName, configuration, componentMetadata, isVueModule)
});
})();
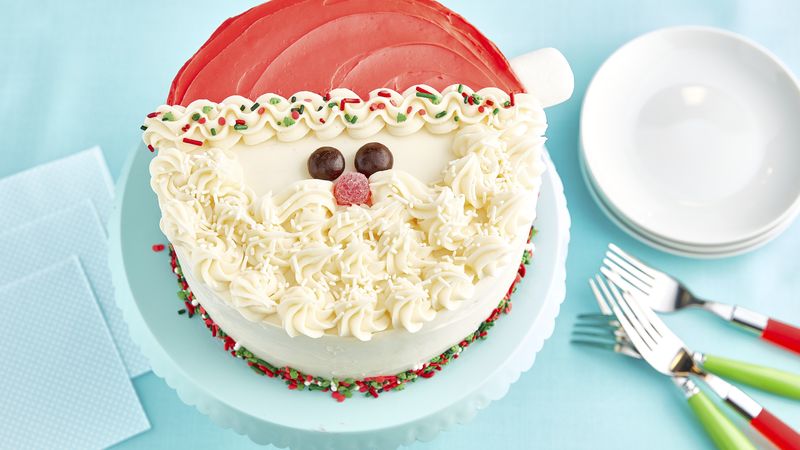
Holiday dessert is made easy, delicious and extra fun with Betty Crocker™ Super Moist™ White Cake Mix, vanilla frosting and festive sprinkles. Serve up this jolly Santa cake as a fun family dessert after your holiday dinner, or bring it out at the end of a Christmas party if you really want to feel like Saint Nick himself.
(function() {
document.addEventListener('DOMContentLoaded', function() {
var componentMetadata = JSON.parse('\x7b\x22componentName\x22\x3a\x22ActionToolbar_63c13be0-5bfb-446f-b820-2790dadf6b3e\x22,\x22deferOptions\x22\x3a\x7b\x22deferComponent\x22\x3afalse,\x22deferType\x22\x3a\x22None\x22,\x22deferId\x22\x3a\x22r64ada46e775f4419a667426257bb7d99\x22,\x22deferredContainerId\x22\x3a\x22\x2fmain\x2fdockingActionToolbarMobile\x22,\x22deferredContainerView\x22\x3anull\x7d,\x22viewName\x22\x3a\x22ActionToolbar\x22\x7d');
var configuration = {"contentId":"2ddf716f-5e60-4846-8939-1c4a0d279ed3","toolbarSettings":{"id":"63c13be0-5bfb-446f-b820-2790dadf6b3e","registrationUrl":"/GMI/CoreSites/BC/Home/register/reg-fp","regAction":"FAVORITE","eSourceCode":11275,"namePassedToEvents":"RDPToolbarSTICKY","buttons":[{"addFavoriteErrorMessage":"Sorry, something went wrong. Please save again.","removeFavoriteErrorMessage":"Error occurred while removing from favorites","registrationUrl":"/GMI/CoreSites/BC/Home/register/reg-fp","regAction":"FAVORITE","eSourceCode":11275,"isCurrentUserAnonymous":false,"isFavoriteItem":false,"id":"16a29701-2b75-4d9a-aa9c-860376da50d7","allowedForAnonymousUsers":false,"type":"Favorite","displayName":"Save","namePassedToEvents":"Favorite","cssClassName":"atButtonFavorite","privacyOptOutMessage":"\u003cdiv class=\u0027privacyMessage\u0027\u003e\n\u003ch3\u003eThis feature is not available with your current cookie settings.\u003c/h3\u003e\n\u003cp\u003eYou can \u003ca href=\u0027#\u0027 data-show-preference-center=\u00271\u0027\u003eupdate your privacy settings\u003c/a\u003e to enable this content. Please enable “Functional Cookies” to use this feature.\u003c/p\u003e\n\u003c/div\u003e","showPrivacyOptOutMessage":false},{"scriptUrl":"https://cdn.whisk.com/sdk/shopping-list.js","onLoadFunction":"var whisk = window.whisk || {};\r\nwhisk.queue = whisk.queue || [];\r\nwhisk.queue.push(function () {\r\n whisk.shoppingList.addRecipeToList({\r\n recipeUrl: window.location.href.replace(\u0027q.bettycrocker.com\u0027, \u0027bettycrocker.com\u0027),\r\n trackingId: \u0022wx-75324683-8f1f0fa2\u0022, // new action toolbar button ID\r\n whiteLabel: \u0022bettycrocker\u0022\r\n });\r\n GeneralMills.Analytics.raiseEvent({\r\n EventType: \u0022Buy_click\u0022,\r\n Position: \u0022Floating Toolbar\u0022,\r\n VendorExperience: \u0022Whisk_recipe\u0022\r\n });\r\n});\r\n","scriptId":"recipeBuyNow","id":"49605120-3aab-4f78-b82a-d66f139d0b81","allowedForAnonymousUsers":true,"type":"ThirdPartyScript","displayName":"Shop","namePassedToEvents":"Shop Recipe","cssClassName":"atButtonShop ","privacyCategories":[3],"privacyOptOutMessage":"\u003cdiv class=\u0027privacyMessage\u0027\u003e\n\u003ch3\u003eThis feature is not available with your current cookie settings.\u003c/h3\u003e\n\u003cp\u003eYou can \u003ca href=\u0027#\u0027 data-show-preference-center=\u00271\u0027\u003eupdate your privacy settings\u003c/a\u003e to enable this content. Please enable “Functional Cookies” to use this feature.\u003c/p\u003e\n\u003c/div\u003e","showPrivacyOptOutMessage":false},{"nestedButtons":[{"layoutParameter":"p%3d1","id":"e34d2f94-cbe2-439b-b435-da465f840b2e","allowedForAnonymousUsers":true,"type":"Print","displayName":"Print Recipe","namePassedToEvents":"Print","cssClassName":"atButtonPrint","privacyOptOutMessage":"\u003cdiv class=\u0027privacyMessage\u0027\u003e\n\u003ch3\u003eThis feature is not available with your current cookie settings.\u003c/h3\u003e\n\u003cp\u003eYou can \u003ca href=\u0027#\u0027 data-show-preference-center=\u00271\u0027\u003eupdate your privacy settings\u003c/a\u003e to enable this content. Please enable “Functional Cookies” to use this feature.\u003c/p\u003e\n\u003c/div\u003e","showPrivacyOptOutMessage":false},{"providerName":"pinterest","providerNamePassedToEvents":"Pinterest","shareUrlFormat":"//pinterest.com/pin/create/link/?url={0}","id":"f976c276-f147-4387-b249-8fcf4aa89ee5","allowedForAnonymousUsers":true,"type":"Social","displayName":"Save To Pinterest","namePassedToEvents":"Pinterest","cssClassName":"atButtonPinterest","privacyOptOutMessage":"\u003cdiv class=\u0027privacyMessage\u0027\u003e\n\u003ch3\u003eThis feature is not available with your current cookie settings.\u003c/h3\u003e\n\u003cp\u003eYou can \u003ca href=\u0027#\u0027 data-show-preference-center=\u00271\u0027\u003eupdate your privacy settings\u003c/a\u003e to enable this content. Please enable “Functional Cookies” to use this feature.\u003c/p\u003e\n\u003c/div\u003e","showPrivacyOptOutMessage":false},{"templateId":"bf50810b-3823-4a07-a4a0-2e63d516cc3e","dialogHeading":"Email Recipe","emailCode":"BC_ContentEmail","dialogSettings":{"cancelButtonText":"Cancel","copyToSenderLabel":"Send a Copy to Myself","emailAddressesLabel":"* Email Address(es)","emailInstructionText":"Separate email addresses with commas","fromText":"From:","privacyPolicyText":"\u003cp\u003e\u0026copy;2024 General Mills, Inc. All Rights Reserved. This information will only be used to send an email to your friend(s) and will not be saved. Please read our \u003ca rel=\u0022noopener noreferrer\u0022 rel=\u0022noopener noreferrer\u0022 href=\u0022http://www.generalmills.com/company/privacy-policies/privacy-policy-us\u0022 target=\u0022_blank\u0022 shape=\u0022rect\u0022\u003ePrivacy Policy\u003c/a\u003e.\u003c/p\u003e","requiredFieldText":"* Required","sendButtonText":"Send","senderEmailAddressLabel":"* Your Email Address","senderFirstNameLabel":"* Your First Name","sendToText":"Send To:"},"id":"e6d709ac-e7a5-44ca-8531-95cb04430374","allowedForAnonymousUsers":true,"type":"Email","displayName":"Share via Email","namePassedToEvents":"Email","cssClassName":"atButtonEmail","privacyOptOutMessage":"\u003cdiv class=\u0027privacyMessage\u0027\u003e\n\u003ch3\u003eThis feature is not available with your current cookie settings.\u003c/h3\u003e\n\u003cp\u003eYou can \u003ca href=\u0027#\u0027 data-show-preference-center=\u00271\u0027\u003eupdate your privacy settings\u003c/a\u003e to enable this content. Please enable “Functional Cookies” to use this feature.\u003c/p\u003e\n\u003c/div\u003e","showPrivacyOptOutMessage":false},{"providerName":"facebook","providerNamePassedToEvents":"Facebook","shareUrlFormat":"//facebook.com/sharer/sharer.php?u={0}","id":"0aa33652-0835-443c-a509-9401ff5784e4","allowedForAnonymousUsers":true,"type":"Social","displayName":"Share on Facebook","namePassedToEvents":"Facebook","cssClassName":"atButtonFacebook","privacyOptOutMessage":"\u003cdiv class=\u0027privacyMessage\u0027\u003e\n\u003ch3\u003eThis feature is not available with your current cookie settings.\u003c/h3\u003e\n\u003cp\u003eYou can \u003ca href=\u0027#\u0027 data-show-preference-center=\u00271\u0027\u003eupdate your privacy settings\u003c/a\u003e to enable this content. Please enable “Functional Cookies” to use this feature.\u003c/p\u003e\n\u003c/div\u003e","showPrivacyOptOutMessage":false},{"successMessage":"Copied.","errorMessage":"Press Ctrl+C and Enter to copy to clipboard","successMessageDuration":3000,"errorMessageDuration":10000,"id":"15e206df-bb9d-424e-9887-8eec2530432e","allowedForAnonymousUsers":true,"type":"CopyLink","displayName":"Copy Link","namePassedToEvents":"Copy","cssClassName":"atButtonCopyLink","privacyOptOutMessage":"\u003cdiv class=\u0027privacyMessage\u0027\u003e\n\u003ch3\u003eThis feature is not available with your current cookie settings.\u003c/h3\u003e\n\u003cp\u003eYou can \u003ca href=\u0027#\u0027 data-show-preference-center=\u00271\u0027\u003eupdate your privacy settings\u003c/a\u003e to enable this content. Please enable “Functional Cookies” to use this feature.\u003c/p\u003e\n\u003c/div\u003e","showPrivacyOptOutMessage":false}],"id":"256769a9-5624-4a2a-b511-ac4dec1916fd","allowedForAnonymousUsers":true,"type":"Reveal","displayName":"Share","namePassedToEvents":"Share","cssClassName":"atButtonReveal","privacyOptOutMessage":"\u003cdiv class=\u0027privacyMessage\u0027\u003e\n\u003ch3\u003eThis feature is not available with your current cookie settings.\u003c/h3\u003e\n\u003cp\u003eYou can \u003ca href=\u0027#\u0027 data-show-preference-center=\u00271\u0027\u003eupdate your privacy settings\u003c/a\u003e to enable this content. Please enable “Functional Cookies” to use this feature.\u003c/p\u003e\n\u003c/div\u003e","showPrivacyOptOutMessage":false},{"errorMessage":"","id":"3e721b3c-33ab-474b-beb4-53add7af05d2","allowedForAnonymousUsers":true,"type":"WakeLock","displayName":"Keep Screen On","namePassedToEvents":"Wakelock","cssClassName":"atButtonWakeLock","privacyOptOutMessage":"\u003cdiv class=\u0027privacyMessage\u0027\u003e\n\u003ch3\u003eThis feature is not available with your current cookie settings.\u003c/h3\u003e\n\u003cp\u003eYou can \u003ca href=\u0027#\u0027 data-show-preference-center=\u00271\u0027\u003eupdate your privacy settings\u003c/a\u003e to enable this content. Please enable “Functional Cookies” to use this feature.\u003c/p\u003e\n\u003c/div\u003e","showPrivacyOptOutMessage":false}],"isSticky":true},"userSettings":{"isCurrentUserAnonymous":true,"isFavoriteItem":false},"pageAttributes":{"url":"https%3a%2f%2fwww.bettycrocker.com%2frecipes%2fjolly-santa-claus-cake%2f2ddf716f-5e60-4846-8939-1c4a0d279ed3","contentId":"2ddf716f-5e60-4846-8939-1c4a0d279ed3"},"recaptchaPublicKey":"6LfU_icUAAAAALSqSjRg5hqZwbPr1b8k-_80a_S_"};
var moduleName = 'actionToolbar';
var isVueModule = true;
GeneralMills.PandoSites.RegisterControlInstance(moduleName, configuration, componentMetadata, isVueModule)
});
})();
Heat oven to 350°F (325°F for dark or nonstick pans). Spray bottoms and sides of 2 (8-inch) round cake pans with cooking spray.
2
In large bowl, beat cake mix, water, oil and eggs with electric mixer on medium speed 2 minutes, scraping bowl occasionally. In small bowl, place 1/2 cup of the batter; stir in 1/2 teaspoon of the food color. Divide remaining batter between pans. Drop tablespoonfuls of colored batter in random pattern over top of batter in each pan. Cut through batters with table knife in zigzag pattern for marbled design.
3
Bake 29 to 34 minutes or until toothpick inserted in center comes out clean. Cool 10 minutes; run metal spatula around edges of pans to loosen cakes. Remove from pans to cooling rack. Cool completely, about 1 hour. Trim off rounded tops of cake layers, if necessary.
4
Place one cake layer on serving plate, bottom side down. Spread 2/3 cup frosting on top; top with second cake layer. Frost top and side of cake with thin layer of frosting to form a crumb coat. Refrigerate 30 minutes to set.
5
In small bowl, place 3 tablespoons of the frosting; stir in remaining 1/4 teaspoon food color until blended. Fit decorating bag with 1/2-inch star piping tip; fill with 3/4 cup of the untinted frosting. Set red colored frosting and filled decorating bag aside.
6
Remove cake from refrigerator. Using remaining 3/4 cup untinted frosting, spread around side and two-thirds of top of cake (use photo as a guide).
7
To decorate Santa’s face: For hat, spread red frosting on top third of cake. Place 2 candies for eyes. Slightly flatten gumdrop to form nose; place in center of cake. Using decorating bag, pipe brim for hat, mustache and decorative swirls for the beard. Slightly flatten marshmallow; place at side of hat for pom pom (use photo as a guide).
8
Sprinkle 1 tablespoon white candy sprinkles on beard. Sprinkle 1/4 teaspoon of the holiday mix sprinkles on brim of hat. Press remaining holiday mix sprinkles along bottom edge of cake. Store loosely covered at room temperature.
(function() {
document.addEventListener('DOMContentLoaded', function() {
var componentMetadata = JSON.parse('\x7b\x22componentName\x22\x3a\x22RecipeSteps_2ee1ece6-a33c-4f37-aafb-6377bfa48ff1\x22,\x22deferOptions\x22\x3a\x7b\x22deferComponent\x22\x3atrue,\x22deferType\x22\x3a\x22OnDemand\x22,\x22deferId\x22\x3a\x22rcd604cf3010747239379304155eaa5b6\x22,\x22deferredContainerId\x22\x3a\x22\x2fmain\x2frdpSteps\x22,\x22deferredContainerView\x22\x3a\x22RecipeDetail\x22\x7d,\x22viewName\x22\x3a\x22RecipeSteps\x22\x7d');
var configuration = {"initAreImagesHidden":false,"hideImagesEventName":"HideStepShots","showImagesEventName":"ShowStepShots","hideImagesButtonText":"Hide Images","showImagesButtonText":"Show Images","hideImagesClass":"rdpHideStepImages"};
var moduleName = 'recipeStepShots';
var isVueModule = true;
GeneralMills.PandoSites.RegisterControlInstance(moduleName, configuration, componentMetadata, isVueModule)
});
})();
Tips from the Betty Crocker Kitchens
tip 1
Try using Betty Crocker™ Decorating Bags and Decorating Tips for this jolly Santa cake.
tip 2
Applying a thin layer of frosting to a cake and refrigerating helps to seal in the crumbs before the final decorating.
tip 3
Get creative and try using other sprinkles to decorate this Santa face cake, such as Betty Crocker™ Sprinkles Classic Pearls or Betty Crocker™ White Shimmer Sugar for Santa’s beard. Try sprinkling Betty Crocker™ Holly Berry & Leaves or Red & Green Pearls for the brim of the hat and edge of cake.
tip 4
Not sure where two-thirds is on top of the cake? Use toothpick to draw a faint line across top of cake, and use this as a guide when spreading frosting.
tip 5
Short on time? Make and bake cake layers the day before. Once cooled completely, store loosely covered on a cookie sheet at room temperature. The next day, continue with the recipe.
tip 6
An easy way to put candy sprinkles on the side of your Santa face cake is to hold the plated cake over a small bowl of the sprinkles. Cup your hand and press the sprinkles onto the bottom of the cake, using the bowl to catch extras. Keep using what is in the bowl as you press the sprinkles all around the edge.
tip 7
To keep your serving plate clean while frosting the cake, place strips of waxed paper around the edge of the plate. Remove after frosting and sprinkling the edge of the cake with sprinkles is complete.
(function() {
document.addEventListener('DOMContentLoaded', function() {
var componentMetadata = JSON.parse('\x7b\x22componentName\x22\x3a\x22RecipeTipsNonPrint_2ee1ece6-a33c-4f37-aafb-6377bfa48ff1\x22,\x22deferOptions\x22\x3a\x7b\x22deferComponent\x22\x3atrue,\x22deferType\x22\x3a\x22Simple\x22,\x22deferId\x22\x3a\x22rced5f0592fed48ae8c16844b52200852\x22,\x22deferredContainerId\x22\x3a\x22\x2fmain\x2frdpTips\x22,\x22deferredContainerView\x22\x3a\x22RecipeDetail\x22\x7d,\x22viewName\x22\x3a\x22RecipeTipsNonPrint\x22\x7d');
var configuration = {};
var moduleName = 'expandableTextContainer';
var isVueModule = true;
GeneralMills.PandoSites.RegisterControlInstance(moduleName, configuration, componentMetadata, isVueModule)
});
})();
Nutrition
Nutrition Facts are not available for this recipe
(function() {
document.addEventListener('DOMContentLoaded', function() {
var componentMetadata = JSON.parse('\x7b\x22componentName\x22\x3a\x22RecipeNutritionNonPrint_2ee1ece6-a33c-4f37-aafb-6377bfa48ff1\x22,\x22deferOptions\x22\x3a\x7b\x22deferComponent\x22\x3atrue,\x22deferType\x22\x3a\x22Simple\x22,\x22deferId\x22\x3a\x22rb7efac51af4d47c6be6631100ed7f35c\x22,\x22deferredContainerId\x22\x3a\x22\x2fmain\x2frdpNutrition\x22,\x22deferredContainerView\x22\x3a\x22RecipeDetail\x22\x7d,\x22viewName\x22\x3a\x22RecipeNutritionNonPrint\x22\x7d');
var configuration = {"initIsExpanded":false,"expandEventName":"NutritionExpand","collapseEventName":"NutritionCollapse"};
var moduleName = 'recipeNutrition';
var isVueModule = true;
GeneralMills.PandoSites.RegisterControlInstance(moduleName, configuration, componentMetadata, isVueModule)
});
})();
Trademarks referred to herein are the properties of their respective owners.
(function() {
document.addEventListener('DOMContentLoaded', function() {
var componentMetadata = JSON.parse('\x7b\x22componentName\x22\x3a\x22RelatedContent_95839d36-873b-47cc-ae66-5564127025b9\x22,\x22deferOptions\x22\x3a\x7b\x22deferComponent\x22\x3atrue,\x22deferType\x22\x3a\x22OnDemand\x22,\x22deferId\x22\x3a\x22r2b9e256e5deb48368bbafcc399c7fb31\x22,\x22deferredContainerId\x22\x3a\x22\x2fmain\x2frdpRelatedContent1_NonDeferred\x22,\x22deferredContainerView\x22\x3a\x22RecipeDetail\x22\x7d,\x22viewName\x22\x3a\x22RelatedContent\x22\x7d');
var configuration = {"dataSourceId":"95839d36-873b-47cc-ae66-5564127025b9","isCurrentUserAnonymous":true,"relatedContentList":{"contentId":"2ddf716f-5e60-4846-8939-1c4a0d279ed3","listSettings":{"pageSize":3,"startPage":1,"listType":1,"title":"Explore Categories","useModalRegistration":false,"regAction":"","esrcCode":0,"favoriteButtonLabelFormat":"Add {0} to favorites","contentTypes":["Category"],"showImages":false,"showRatings":false,"allowFavoriting":false,"cssClassName":"relatedContentWithoutImages"},"items":[{"contentId":"d6730251-314b-484c-9efd-69151eac8690","contentType":"Category","title":"Vanilla Cake Recipes","isFavorite":false,"linkUrl":"/recipes/dishes/cake-recipes/vanilla-cake","numberOfRatings":"0","averageRating":"0","averageRatingStars":"0","smallImageUrl":"/-/media/GMI/Core-Sites/BC/legacy/Images/Betty-Crocker/Recipe-Browse/Dish/Cakes/vanilla-cake-recipes_hero.jpg?W=276","mediumImageUrl":"/-/media/GMI/Core-Sites/BC/legacy/Images/Betty-Crocker/Recipe-Browse/Dish/Cakes/vanilla-cake-recipes_hero.jpg?W=680"},{"contentId":"e35220ba-b2b6-4dc6-af65-6f9174e64fce","contentType":"Category","title":"Vanilla Cupcake Recipes","isFavorite":false,"linkUrl":"/recipes/dishes/cupcake-recipes/vanilla-cupcakes","numberOfRatings":"0","averageRating":"0","averageRatingStars":"0","smallImageUrl":"/-/media/GMI/Core-Sites/BC/legacy/Images/Betty-Crocker/Recipe-Browse/Extras/spring-cupcakes.jpg?W=276","mediumImageUrl":"/-/media/GMI/Core-Sites/BC/legacy/Images/Betty-Crocker/Recipe-Browse/Extras/spring-cupcakes.jpg?W=680"},{"contentId":"18514095-8d96-4ee8-b775-2484640971b2","contentType":"Category","title":"Cake Mix Cookie Recipes","isFavorite":false,"linkUrl":"/recipes/dishes/cookie-recipes/cake-mix-cookies","numberOfRatings":"0","averageRating":"0","averageRatingStars":"0","smallImageUrl":"/-/media/GMI/Core-Sites/BC/legacy/Images/Betty-Crocker/Recipe-Browse/Dish/Cookies/new/cake-mix-cookie-recipes_hero.jpg?W=276","mediumImageUrl":"/-/media/GMI/Core-Sites/BC/legacy/Images/Betty-Crocker/Recipe-Browse/Dish/Cookies/new/cake-mix-cookie-recipes_hero.jpg?W=680"}],"availableItems":[{"contentId":"d6730251-314b-484c-9efd-69151eac8690","contentType":"Category","title":"Vanilla Cake Recipes","isFavorite":false,"linkUrl":"/recipes/dishes/cake-recipes/vanilla-cake","numberOfRatings":"0","averageRating":"0","averageRatingStars":"0","smallImageUrl":"/-/media/GMI/Core-Sites/BC/legacy/Images/Betty-Crocker/Recipe-Browse/Dish/Cakes/vanilla-cake-recipes_hero.jpg?W=276","mediumImageUrl":"/-/media/GMI/Core-Sites/BC/legacy/Images/Betty-Crocker/Recipe-Browse/Dish/Cakes/vanilla-cake-recipes_hero.jpg?W=680"},{"contentId":"e35220ba-b2b6-4dc6-af65-6f9174e64fce","contentType":"Category","title":"Vanilla Cupcake Recipes","isFavorite":false,"linkUrl":"/recipes/dishes/cupcake-recipes/vanilla-cupcakes","numberOfRatings":"0","averageRating":"0","averageRatingStars":"0","smallImageUrl":"/-/media/GMI/Core-Sites/BC/legacy/Images/Betty-Crocker/Recipe-Browse/Extras/spring-cupcakes.jpg?W=276","mediumImageUrl":"/-/media/GMI/Core-Sites/BC/legacy/Images/Betty-Crocker/Recipe-Browse/Extras/spring-cupcakes.jpg?W=680"},{"contentId":"18514095-8d96-4ee8-b775-2484640971b2","contentType":"Category","title":"Cake Mix Cookie Recipes","isFavorite":false,"linkUrl":"/recipes/dishes/cookie-recipes/cake-mix-cookies","numberOfRatings":"0","averageRating":"0","averageRatingStars":"0","smallImageUrl":"/-/media/GMI/Core-Sites/BC/legacy/Images/Betty-Crocker/Recipe-Browse/Dish/Cookies/new/cake-mix-cookie-recipes_hero.jpg?W=276","mediumImageUrl":"/-/media/GMI/Core-Sites/BC/legacy/Images/Betty-Crocker/Recipe-Browse/Dish/Cookies/new/cake-mix-cookie-recipes_hero.jpg?W=680"}]}};
var moduleName = 'relatedContent';
var isVueModule = true;
GeneralMills.PandoSites.RegisterControlInstance(moduleName, configuration, componentMetadata, isVueModule)
});
})();
(function() {
document.addEventListener('DOMContentLoaded', function() {
var componentMetadata = JSON.parse('\x7b\x22componentName\x22\x3a\x22ConsumerGeneratedContent_2ee1ece6-a33c-4f37-aafb-6377bfa48ff1\x22,\x22deferOptions\x22\x3a\x7b\x22deferComponent\x22\x3atrue,\x22deferType\x22\x3a\x22OnDemand\x22,\x22deferId\x22\x3a\x22r527b1fd9c1f84246af03a3ba90752804\x22,\x22deferredContainerId\x22\x3a\x22\x2fmain\x2frdpCgc\x22,\x22deferredContainerView\x22\x3a\x22RecipeDetail\x22\x7d,\x22viewName\x22\x3a\x22ConsumerGeneratedContent\x22\x7d');
var configuration = {"loaderScript":"https://apps.bazaarvoice.com/deployments/bettycrocker/main_site/production/en_US/bv.js","type":"RatingAndReview","language":"en","includeRatings":true};
var moduleName = 'consumerGeneratedContent';
var isVueModule = true;
GeneralMills.PandoSites.RegisterControlInstance(moduleName, configuration, componentMetadata, isVueModule)
});
})();
(function() {
document.addEventListener('DOMContentLoaded', function() {
var componentMetadata = JSON.parse('\x7b\x22componentName\x22\x3a\x22ConsumerGeneratedContent_2ee1ece6-a33c-4f37-aafb-6377bfa48ff1\x22,\x22deferOptions\x22\x3a\x7b\x22deferComponent\x22\x3atrue,\x22deferType\x22\x3a\x22OnDemand\x22,\x22deferId\x22\x3a\x22r4be9c300d36248b1940c6954727054b6\x22,\x22deferredContainerId\x22\x3a\x22\x2fmain\x2frdpCgc\x22,\x22deferredContainerView\x22\x3a\x22RecipeDetail\x22\x7d,\x22viewName\x22\x3a\x22ConsumerGeneratedContent\x22\x7d');
var configuration = {"loaderScript":"https://apps.bazaarvoice.com/deployments/bettycrocker/main_site/production/en_US/bv.js","type":"QuestionAndAnswer","language":"en","includeRatings":false};
var moduleName = 'consumerGeneratedContent';
var isVueModule = true;
GeneralMills.PandoSites.RegisterControlInstance(moduleName, configuration, componentMetadata, isVueModule)
});
})();
(function() {
document.addEventListener('DOMContentLoaded', function() {
var componentMetadata = JSON.parse('\x7b\x22componentName\x22\x3a\x22DoubleClick_bacf9bda-21c4-4e72-b17f-8c348c0ec61d\x22,\x22deferOptions\x22\x3a\x7b\x22deferComponent\x22\x3afalse,\x22deferType\x22\x3a\x22None\x22,\x22deferId\x22\x3a\x22r9a364eb9e63b42e0b14d63ce90e989af\x22,\x22deferredContainerId\x22\x3a\x22\x2fmain\x2frdpSecondaryAd\x22,\x22deferredContainerView\x22\x3a\x22DoubleClick\x22\x7d,\x22viewName\x22\x3a\x22DoubleClick\x22\x7d');
var configuration = {"adId":"OMP/bettycrocker/recipes/300x250_bottom","minPageWidth":"1000","maxPageWidth":"9999","defaultMinPageWidth":"1000","defaultMaxPageWidth":"9999","size":"[[300,600],[300,250]]","refreshWhenViewed":false,"adContainerId":"86ccf80c-f008-47c6-9c33-40d8d39286da","doubleClickAdContainerId":"ff42510d-0712-4e12-a03f-5e5f3ac91553","adCaptionText":"Advertisement","networkCode":"/15704463/","relevantMetadata":["Dessert","Christmas"],"privacyOptOut":false,"adProvider":"Sovrn","sovrnCssClass":"bettycrocker_right_rail","responsive":true,"contentType":"Recipe","itemId":"2ddf716f-5e60-4846-8939-1c4a0d279ed3","continuesBelowText":"Recipe Continues Below"};
var moduleName = 'sovrn';
var isVueModule = true;
GeneralMills.PandoSites.RegisterControlInstance(moduleName, configuration, componentMetadata, isVueModule)
});
})();
(function() {
document.addEventListener('DOMContentLoaded', function() {
var componentMetadata = JSON.parse('\x7b\x22componentName\x22\x3a\x22DoubleClick_b9e00565-0c49-47b8-85af-9355f671c3f6\x22,\x22deferOptions\x22\x3a\x7b\x22deferComponent\x22\x3afalse,\x22deferType\x22\x3a\x22None\x22,\x22deferId\x22\x3a\x22r285b0caa45ec49768e8789b2df62d4f2\x22,\x22deferredContainerId\x22\x3a\x22\x2fmain\x2frdpSecondaryAd\x22,\x22deferredContainerView\x22\x3a\x22DoubleClick\x22\x7d,\x22viewName\x22\x3a\x22DoubleClick\x22\x7d');
var configuration = {"adId":"OMP/m_bettycrocker/recipes/300x250_bottom","minPageWidth":"299","maxPageWidth":"767","defaultMinPageWidth":"1000","defaultMaxPageWidth":"9999","size":"[[300,250], [300,600]]","refreshWhenViewed":false,"adContainerId":"fa3a457a-53a2-4e3e-bffe-b0b34e9cfd43","doubleClickAdContainerId":"d9beb6d2-b02e-4a07-a8c3-836bd7e4726a","adCaptionText":"Advertisement","networkCode":"/15704463/","relevantMetadata":["Dessert","Christmas"],"privacyOptOut":false,"adProvider":"Sovrn","sovrnCssClass":"bettycrocker_content_standard_rdp","responsive":true,"contentType":"Recipe","itemId":"2ddf716f-5e60-4846-8939-1c4a0d279ed3","continuesBelowText":"Recipe Continues Below"};
var moduleName = 'sovrn';
var isVueModule = true;
GeneralMills.PandoSites.RegisterControlInstance(moduleName, configuration, componentMetadata, isVueModule)
});
})();
(function() {
document.addEventListener('DOMContentLoaded', function() {
var componentMetadata = JSON.parse('\x7b\x22componentName\x22\x3a\x22NewsletterCTA_816daf34-caf4-4ea1-ab97-26268fb4b2ee\x22,\x22deferOptions\x22\x3a\x7b\x22deferComponent\x22\x3atrue,\x22deferType\x22\x3a\x22OnDemand\x22,\x22deferId\x22\x3a\x22r40c06014c525427f9e955f5f306b0ca3\x22,\x22deferredContainerId\x22\x3a\x22\x2fmain\x2frdpMobileSubscriber\x22,\x22deferredContainerView\x22\x3a\x22RecipeDetail\x22\x7d,\x22viewName\x22\x3a\x22NewsletterCTA\x22\x7d');
var configuration = {"unsubscribedNewsletters":[{"listId":"1e34a555-89d1-45f0-8f07-b3ae6b01c03c","thumbnailImageUrl":"/-/media/GMI/Core-Sites/BC/Images/Shared/myaccount/newsletters/BC_Thumb157x157.png?sc_lang=en","previewUrl":"https://morpheus3.idpk.net/email_sends/9111/preview","name":"Betty\u0027s Email","isPromo":false}],"settings":{"anonymousCopy":"Subscribe for more recipe inspiration","anonymousDescriptionCopy":"","anonymousThankYouCopy":"\u003cp\u003eThanks! Your first email is on its way.\u003c/p\u003e\n","anonymousThankYouDescriptionCopy":"\u003cp\u003e\u003cspan\u003eNow that you\u0026rsquo;re signed up, create an account on BettyCrocker.com to save your favorite recipes, learn more about special promotions and get inspired through Betty\u0026rsquo;s expert tips.\u003c/span\u003e\u003c/p\u003e","anonymousButtonText":"Sign Up","anonymousEmailInvalidErrorText":"Please enter a valid email address.","anonymousSubscribeErrorText":"We encountered an error while signing you up. Please try again.","anonymousEmailAddressPlaceholderText":"Enter your email address","anonymousEmailAddressLabel":"Email Address","anonymousLegalCopy":"","requiredFieldText":"","backgroundColor":"#EEEEEE","accentColor":"","registrationUrl":"/register/reg-fp?RegAction=SUBSCRIBERUPGRADE\u0026esrc=11275\u0026returnUrl=%2frecipes%2fjolly-santa-claus-cake%2f2ddf716f-5e60-4846-8939-1c4a0d279ed3","registrationLinkText":"Join free!","enableExpandedFields":false,"hideForSessionCookieExpiration":0,"ctaType":"StandardAnonymous","location":"Inline","userState":"Anonymous","sourceCodeOverride":0}};
var moduleName = 'newsletterCta';
var isVueModule = true;
GeneralMills.PandoSites.RegisterControlInstance(moduleName, configuration, componentMetadata, isVueModule)
});
})();
(function() {
document.addEventListener('DOMContentLoaded', function() {
var componentMetadata = JSON.parse('\x7b\x22componentName\x22\x3a\x22NewsletterCTA_bd5ae258-d9fc-44bd-ad12-15c4bb23e297\x22,\x22deferOptions\x22\x3a\x7b\x22deferComponent\x22\x3atrue,\x22deferType\x22\x3a\x22OnDemand\x22,\x22deferId\x22\x3a\x22r248821423bd74a149d8ae27697b2ce6d\x22,\x22deferredContainerId\x22\x3a\x22\x2fmain\x2frdpInlineSubscriber\x22,\x22deferredContainerView\x22\x3a\x22RecipeDetail\x22\x7d,\x22viewName\x22\x3a\x22NewsletterCTA\x22\x7d');
var configuration = {"unsubscribedNewsletters":[{"listId":"1e34a555-89d1-45f0-8f07-b3ae6b01c03c","thumbnailImageUrl":"/-/media/GMI/Core-Sites/BC/Images/Shared/myaccount/newsletters/BC_Thumb157x157.png?sc_lang=en","previewUrl":"https://morpheus3.idpk.net/email_sends/9111/preview","name":"Betty\u0027s Email","isPromo":false}],"settings":{"anonymousCopy":"Get inspired by Betty\u0027s superstar recipes.","anonymousDescriptionCopy":"Baking brain freeze? Betty\u0027s got your back. The Betty Crocker newsletter includes all the baking inspiration you need to whip up something showstopping!","anonymousThankYouCopy":"\u003cp\u003eThanks! Your first email is on its way.\u003c/p\u003e\n","anonymousThankYouDescriptionCopy":"\u003cp\u003e\u003cspan\u003eNow that you\u0026rsquo;re signed up, create an account on BettyCrocker.com to save your favorite recipes, learn more about special promotions and get inspired through Betty\u0026rsquo;s expert tips.\u003c/span\u003e\u003c/p\u003e","anonymousButtonText":"Sign up now","anonymousEmailInvalidErrorText":"Please enter a valid email address.","anonymousSubscribeErrorText":"We encountered an error while signing you up. Please try again.","anonymousEmailAddressPlaceholderText":"Enter your email address","anonymousEmailAddressLabel":"Email Address","anonymousLegalCopy":"By signing up, you accept our\u0026nbsp;\u003ca rel=\u0022noopener noreferrer\u0022 href=\u0022https://www.generalmills.com/privacy-security/us-english-privacy-policy\u0022 target=\u0022_blank\u0022\u003e\u003cspan style=\u0022text-decoration: underline;\u0022\u003ePrivacy Policy\u003c/span\u003e\u003c/a\u003e\u0026nbsp;and agree that your information may be used across our\u0026nbsp;\u003ca rel=\u0022noopener noreferrer\u0022 href=\u0022https://www.generalmills.com/food-we-make/brands\u0022 target=\u0022_blank\u0022\u003e\u003cspan style=\u0022text-decoration: underline;\u0022\u003efamily of brands.\u003c/span\u003e\u003c/a\u003e","requiredFieldText":"","standardSmallImageUrl":"/-/media/GMI/Core-Sites/BC/Images/BC/seasonal/2021_Christmas/ncta_bg.png","standardLargeImageUrl":"/-/media/GMI/Core-Sites/BC/Images/BC/seasonal/2021_Christmas/ncta_bg.png","backgroundColor":"#333333","accentColor":"","patternImageUrl":"/-/media/GMI/Core-Sites/BC/Images/BC/seasonal/2021_Christmas/ncta_bg.png","registrationUrl":"/register/reg-fp?RegAction=SUBSCRIBERUPGRADE\u0026esrc=11275\u0026returnUrl=%2frecipes%2fjolly-santa-claus-cake%2f2ddf716f-5e60-4846-8939-1c4a0d279ed3","registrationLinkText":"Join free!","enableExpandedFields":false,"hideForSessionCookieExpiration":0,"ctaType":"StandardAnonymous","location":"Rail","userState":"Anonymous","sourceCodeOverride":0}};
var moduleName = 'newsletterCta';
var isVueModule = true;
GeneralMills.PandoSites.RegisterControlInstance(moduleName, configuration, componentMetadata, isVueModule)
});
})();
(function() {
document.addEventListener('DOMContentLoaded', function() {
var componentMetadata = JSON.parse('\x7b\x22componentName\x22\x3a\x22DoubleClick_bc1f07c6-65bb-4069-a2b2-8be43a3922de\x22,\x22deferOptions\x22\x3a\x7b\x22deferComponent\x22\x3afalse,\x22deferType\x22\x3a\x22None\x22,\x22deferId\x22\x3a\x22r3a2006e52ac84c148c5a9841c48587c5\x22,\x22deferredContainerId\x22\x3a\x22\x2fmain\x2frdpTernaryAd\x22,\x22deferredContainerView\x22\x3a\x22DoubleClick\x22\x7d,\x22viewName\x22\x3a\x22DoubleClick\x22\x7d');
var configuration = {"adId":"OMP/bettycrocker/recipes/300x250_bottom2","minPageWidth":"1000","maxPageWidth":"9999","defaultMinPageWidth":"1000","defaultMaxPageWidth":"9999","size":"[[300,600],[300,250]]","refreshWhenViewed":false,"adContainerId":"8b86df1d-8959-437c-b09b-8daefb3d43b1","doubleClickAdContainerId":"d1c71d08-7ed7-4bd9-b5c8-d07efb8cda6f","adCaptionText":"Advertisement","networkCode":"/15704463/","relevantMetadata":["Dessert","Christmas"],"privacyOptOut":false,"adProvider":"Sovrn","sovrnCssClass":"bettycrocker_right_rail","responsive":true,"contentType":"Recipe","itemId":"2ddf716f-5e60-4846-8939-1c4a0d279ed3","continuesBelowText":"Recipe Continues Below"};
var moduleName = 'sovrn';
var isVueModule = true;
GeneralMills.PandoSites.RegisterControlInstance(moduleName, configuration, componentMetadata, isVueModule)
});
})();
(function() {
document.addEventListener('DOMContentLoaded', function() {
var componentMetadata = JSON.parse('\x7b\x22componentName\x22\x3a\x22NewsletterCTA_b3491591-4bfe-462e-a62e-0c254645f7bb\x22,\x22deferOptions\x22\x3a\x7b\x22deferComponent\x22\x3atrue,\x22deferType\x22\x3a\x22OnDemand\x22,\x22deferId\x22\x3a\x22rd90d70a2bf1843c380ad57b91b178656\x22,\x22deferredContainerId\x22\x3a\x22\x2ffooterNewsLetterCTA\x22,\x22deferredContainerView\x22\x3a\x22Default\x22\x7d,\x22viewName\x22\x3a\x22NewsletterCTA\x22\x7d');
var configuration = {"unsubscribedNewsletters":[{"listId":"1e34a555-89d1-45f0-8f07-b3ae6b01c03c","thumbnailImageUrl":"/-/media/GMI/Core-Sites/BC/Images/Shared/myaccount/newsletters/BC_Thumb157x157.png?sc_lang=en","previewUrl":"https://morpheus3.idpk.net/email_sends/9111/preview","name":"Betty\u0027s Email","isPromo":false}],"settings":{"anonymousCopy":"Take a big bite of Betty inspiration.","anonymousDescriptionCopy":"Betty\u0027s got the must-have recipes. With our newsletter, you\u0027ll get Betty\u0027s best-of-the-best sent straight to you!","anonymousThankYouCopy":"\u003cspan data-contrast=\u0022auto\u0022 class=\u0022TextRun BCX0 SCXO85832529\u0022 style=\u0022border:0px none #000000;opacity: 1; height: auto; width: auto; margin: 0px; padding: 0px; border-spacing: 0px; list-style-type: circle; list-style-image: none;\u0022\u003e\u003cspan class=\u0022NormalTextRun BCX0 SCXO85832529\u0022\u003eThanks! Your first email is on its way.\u003c/span\u003e\u003c/span\u003e","anonymousThankYouDescriptionCopy":"\u003cspan data-contrast=\u0022auto\u0022 class=\u0022TextRun BCX0 SCXO119148308\u0022 style=\u0022border:0px none #000000;opacity: 1; height: auto; width: auto; margin: 0px; padding: 0px; border-spacing: 0px; list-style-type: circle; list-style-image: none;\u0022\u003e\u003cspan class=\u0022NormalTextRun BCX0 SCXO119148308\u0022\u003eNow that you\u0027re signed up, create an account on BettyCrocker.com to save your favorite recipes, learn more about special promotions and get inspired through Betty\u0027s expert tips.\u003c/span\u003e\u003c/span\u003e","anonymousButtonText":"Sign up now","anonymousEmailInvalidErrorText":"Please enter a valid email address.","anonymousSubscribeErrorText":"We encountered an error while signing you up. Please try again.","anonymousEmailAddressPlaceholderText":"","anonymousEmailAddressLabel":"Your Email Address","anonymousLegalCopy":"By signing up, you accept our\u0026nbsp;\u003ca rel=\u0022noopener noreferrer\u0022 href=\u0022https://www.generalmills.com/privacy-security/us-english-privacy-policy\u0022 target=\u0022_blank\u0022\u003e\u003cspan style=\u0022text-decoration: underline;\u0022\u003ePrivacy Policy\u003c/span\u003e\u003c/a\u003e\u0026nbsp;and agree that your information may be used across our\u0026nbsp;\u003ca rel=\u0022noopener noreferrer\u0022 href=\u0022https://www.generalmills.com/food-we-make/brands\u0022 target=\u0022_blank\u0022\u003e\u003cspan style=\u0022text-decoration: underline;\u0022\u003efamily of brands\u003c/span\u003e.\u003c/a\u003e","requiredFieldText":"","standardSmallImageUrl":"/-/media/GMI/Core-Sites/BC/Images/Shared/myaccount/acq-landing-pages-2024/Organic-Acquisition_Bottom-Banner_800x450_Chocolate-Strawberry-Cake-with-Fluffy-Frosting.jpg?sc_lang=en","standardLargeImageUrl":"/-/media/GMI/Core-Sites/BC/Images/Shared/myaccount/acq-landing-pages-2024/Organic-Acquisition_Bottom-Banner_800x450_Chocolate-Strawberry-Cake-with-Fluffy-Frosting.jpg?sc_lang=en","backgroundColor":"#e60000","accentColor":"","patternImageUrl":"/-/media/GMI/Core-Sites/BC/Images/Shared/myaccount/newsletter_cta_images/bc-footer-dots2x.png?sc_lang=en","registrationUrl":"/register/reg-fp?RegAction=SUBSCRIBERUPGRADE\u0026esrc=11275\u0026returnUrl=%2frecipes%2fjolly-santa-claus-cake%2f2ddf716f-5e60-4846-8939-1c4a0d279ed3","registrationLinkText":"Sign up now","enableExpandedFields":false,"hideForSessionCookieExpiration":0,"ctaType":"StandardAnonymous","location":"Footer","userState":"Anonymous","sourceCodeOverride":0}};
var moduleName = 'newsletterCta';
var isVueModule = true;
GeneralMills.PandoSites.RegisterControlInstance(moduleName, configuration, componentMetadata, isVueModule)
});
})();