1/4
cup sliced green onions (4 medium, if desired)
(function() {
document.addEventListener('DOMContentLoaded', function() {
var componentMetadata = JSON.parse('\x7b\x22componentName\x22\x3a\x22RecipeIngredients_2ee1ece6-a33c-4f37-aafb-6377bfa48ff1\x22,\x22deferOptions\x22\x3a\x7b\x22deferComponent\x22\x3afalse,\x22deferType\x22\x3a\x22None\x22,\x22deferId\x22\x3a\x22r37c31d9ba43446eaafce688831fa8c9e\x22,\x22deferredContainerId\x22\x3a\x22\x2fmain\x2frdpIngredients\x22,\x22deferredContainerView\x22\x3anull\x7d,\x22viewName\x22\x3a\x22RecipeIngredients\x22\x7d');
var configuration = {};
var moduleName = 'recipeIngredients';
var isVueModule = false;
GeneralMills.PandoSites.RegisterControlInstance(moduleName, configuration, componentMetadata, isVueModule)
});
})();
Steps
1
Heat oven to 375°F. Spray 12 regular-size muffin cups with cooking spray.
2
In 10-inch nonstick skillet, heat oil over medium-high heat. Cook chicken in oil 5 to 7 minutes, stirring occasionally, until chicken is no longer pink in center. Add onion; cook 2 to 3 minutes. Add green onions, cilantro, red curry paste and lime juice, stirring occasionally, until mixture is heated through. Cool 5 minutes; stir in cheese.
3
In medium bowl, stir baking mixture ingredients with whisk or fork until blended. Spoon 1 scant tablespoon baking mixture into each muffin cup. Top with about 1/4 cup Thai chicken mixture. Spoon 1 tablespoon baking mixture onto Thai chicken mixture in each muffin cup.
4
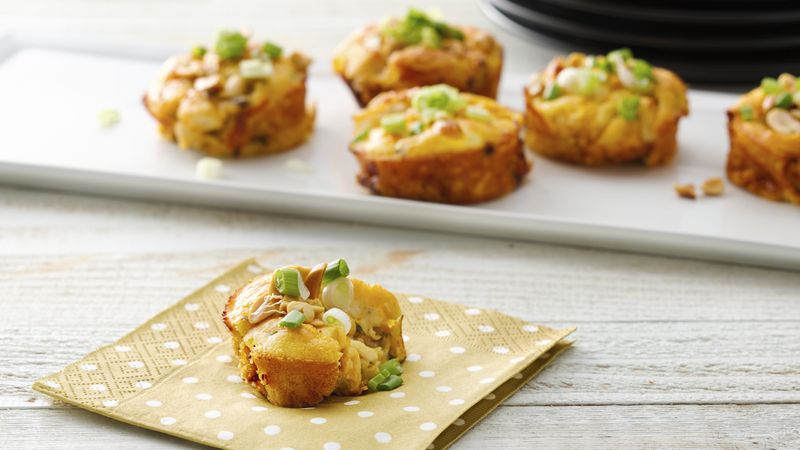
Bake 30 to 35 minutes or until toothpick inserted in center comes out clean and tops of pies are golden brown. Ten minutes into baking, carefully open oven and sprinkle 1/2 tablespoon peanuts on top of each muffin. Close oven door and finish baking. Cool 5 minutes. With thin knife, loosen sides of pies from pan; remove from pan and place top sides up on cooling rack. Cool 10 minutes longer; serve with sliced green onions.
(function() {
document.addEventListener('DOMContentLoaded', function() {
var componentMetadata = JSON.parse('\x7b\x22componentName\x22\x3a\x22RecipeSteps_2ee1ece6-a33c-4f37-aafb-6377bfa48ff1\x22,\x22deferOptions\x22\x3a\x7b\x22deferComponent\x22\x3afalse,\x22deferType\x22\x3a\x22None\x22,\x22deferId\x22\x3a\x22rddf6d7cad8ea4ce0b30cfde02e0a9c30\x22,\x22deferredContainerId\x22\x3a\x22\x2fmain\x2frdpSteps\x22,\x22deferredContainerView\x22\x3anull\x7d,\x22viewName\x22\x3a\x22RecipeSteps\x22\x7d');
var configuration = {"initAreImagesHidden":false,"hideImagesEventName":"HideStepShots","showImagesEventName":"ShowStepShots","hideImagesButtonText":"Hide Images","showImagesButtonText":"Show Images","hideImagesClass":"rdpHideStepImages"};
var moduleName = 'recipeStepShots';
var isVueModule = true;
GeneralMills.PandoSites.RegisterControlInstance(moduleName, configuration, componentMetadata, isVueModule)
});
})();
Savory Impossibly Easy Pies can be covered and refrigerated up to 24 hours before baking. You may need to bake a bit longer than the recipe directs since you’ll be starting with a cold pie. Watch carefully for doneness.
(function() {
document.addEventListener('DOMContentLoaded', function() {
var componentMetadata = JSON.parse('\x7b\x22componentName\x22\x3a\x22RecipeTips_2ee1ece6-a33c-4f37-aafb-6377bfa48ff1\x22,\x22deferOptions\x22\x3a\x7b\x22deferComponent\x22\x3afalse,\x22deferType\x22\x3a\x22None\x22,\x22deferId\x22\x3a\x22r3580b611f78f47c2b6b624fe74936875\x22,\x22deferredContainerId\x22\x3a\x22\x2fmain\x2frdpTips\x22,\x22deferredContainerView\x22\x3anull\x7d,\x22viewName\x22\x3a\x22RecipeTips\x22\x7d');
var configuration = {"initIsExpanded":true,"showDrawerText":"Show ","hideDrawerText":"Hide","expandEventName":"TipExpand","collapseEventName":"TipCollapse"};
var moduleName = 'recipeDrawer';
var isVueModule = true;
GeneralMills.PandoSites.RegisterControlInstance(moduleName, configuration, componentMetadata, isVueModule)
});
})();