(function() {
document.addEventListener('DOMContentLoaded', function() {
var componentMetadata = JSON.parse('\x7b\x22componentName\x22\x3a\x22ChannelLinks_8918a218-1030-4c2b-87de-605f1d7de656\x22,\x22deferOptions\x22\x3a\x7b\x22deferComponent\x22\x3afalse,\x22deferType\x22\x3a\x22None\x22,\x22deferId\x22\x3a\x22ra3097dee1fa74868a31458c5155e78e4\x22,\x22deferredContainerId\x22\x3a\x22\x2fchannelLinks\x22,\x22deferredContainerView\x22\x3anull\x7d,\x22viewName\x22\x3a\x22ChannelLinks\x22\x7d');
var configuration = {};
var moduleName = 'channelLinks';
var isVueModule = true;
GeneralMills.PandoSites.RegisterControlInstance(moduleName, configuration, componentMetadata, isVueModule)
});
})();
(function() {
document.addEventListener('DOMContentLoaded', function() {
var componentMetadata = JSON.parse('\x7b\x22componentName\x22\x3a\x22ActionToolbar_59e5fa31-dc57-46ea-93d1-265650a760f0\x22,\x22deferOptions\x22\x3a\x7b\x22deferComponent\x22\x3atrue,\x22deferType\x22\x3a\x22OnDemand\x22,\x22deferId\x22\x3a\x22r34eaf725a2954a188708c099f5ef5b0c\x22,\x22deferredContainerId\x22\x3a\x22\x2ffloatingActionToolbar\x2ffloatingActionToolbar_interop\x22,\x22deferredContainerView\x22\x3a\x22InteropDeferWrapper\x22\x7d,\x22viewName\x22\x3a\x22ActionToolbar\x22\x7d');
var configuration = {"contentId":"8bf4cea6-ac65-4bdc-9d86-d775ac6abb47","toolbarSettings":{"id":"59e5fa31-dc57-46ea-93d1-265650a760f0","regAction":"FAVORITE","eSourceCode":11275,"namePassedToEvents":"ArticleStandardLongFormToolbar","buttons":[{"addFavoriteErrorMessage":"Sorry, something went wrong. Please save again.","removeFavoriteErrorMessage":"Error occurred while removing from favorites","regAction":"FAVORITE","eSourceCode":11275,"isCurrentUserAnonymous":false,"isFavoriteItem":false,"id":"16a29701-2b75-4d9a-aa9c-860376da50d7","allowedForAnonymousUsers":false,"type":"Favorite","displayName":"Save","namePassedToEvents":"Favorite","cssClassName":"atButtonFavorite","privacyOptOutMessage":"\u003cdiv class=\u0027privacyMessage\u0027\u003e\n\u003ch3\u003eThis feature is not available with your current cookie settings.\u003c/h3\u003e\n\u003cp\u003eYou can \u003ca href=\u0027#\u0027 data-show-preference-center=\u00271\u0027\u003eupdate your privacy settings\u003c/a\u003e to enable this content. Please enable “Functional Cookies” to use this feature.\u003c/p\u003e\n\u003c/div\u003e","showPrivacyOptOutMessage":false},{"providerName":"pinterest","providerNamePassedToEvents":"Pinterest","shareUrlFormat":"//pinterest.com/pin/create/link/?url={0}","id":"c18cf08e-e436-4cd0-a180-1bafb15369a6","allowedForAnonymousUsers":true,"type":"Social","displayName":"Pinterest","namePassedToEvents":"Pinterest","cssClassName":"atButtonPinterest","privacyOptOutMessage":"\u003cdiv class=\u0027privacyMessage\u0027\u003e\n\u003ch3\u003eThis feature is not available with your current cookie settings.\u003c/h3\u003e\n\u003cp\u003eYou can \u003ca href=\u0027#\u0027 data-show-preference-center=\u00271\u0027\u003eupdate your privacy settings\u003c/a\u003e to enable this content. Please enable “Functional Cookies” to use this feature.\u003c/p\u003e\n\u003c/div\u003e","showPrivacyOptOutMessage":false},{"templateId":"13bdd311-4300-4fb8-9d78-9cbaf98f5578","dialogHeading":"Email Article","emailCode":"BC_ContentEmail","dialogSettings":{"cancelButtonText":"Cancel","copyToSenderLabel":"Send a Copy to Myself","emailAddressesLabel":"* Email Address(es)","emailInstructionText":"Separate email addresses with commas","fromText":"From:","privacyPolicyText":"\u003cp\u003e\u0026copy;2024 General Mills, Inc. All Rights Reserved. This information will only be used to send an email to your friend(s) and will not be saved. Please read our \u003ca rel=\u0022noopener noreferrer\u0022 rel=\u0022noopener noreferrer\u0022 href=\u0022http://www.generalmills.com/company/privacy-policies/privacy-policy-us\u0022 target=\u0022_blank\u0022 shape=\u0022rect\u0022\u003ePrivacy Policy\u003c/a\u003e.\u003c/p\u003e","requiredFieldText":"* Required","sendButtonText":"Send","senderEmailAddressLabel":"* Your Email Address","senderFirstNameLabel":"* Your First Name","sendToText":"Send To:"},"id":"be9422a3-85a8-4c31-86f5-e171255bb89d","allowedForAnonymousUsers":true,"type":"Email","displayName":"Email","namePassedToEvents":"Email","cssClassName":"atButtonEmail","privacyOptOutMessage":"\u003cdiv class=\u0027privacyMessage\u0027\u003e\n\u003ch3\u003eThis feature is not available with your current cookie settings.\u003c/h3\u003e\n\u003cp\u003eYou can \u003ca href=\u0027#\u0027 data-show-preference-center=\u00271\u0027\u003eupdate your privacy settings\u003c/a\u003e to enable this content. Please enable “Functional Cookies” to use this feature.\u003c/p\u003e\n\u003c/div\u003e","showPrivacyOptOutMessage":false},{"providerName":"facebook","providerNamePassedToEvents":"Facebook","shareUrlFormat":"//facebook.com/sharer/sharer.php?u={0}","id":"6c3f442d-6ffe-460f-8360-b02b122d326c","allowedForAnonymousUsers":true,"type":"Social","displayName":"Facebook","namePassedToEvents":"Facebook","cssClassName":"atButtonFacebook","privacyOptOutMessage":"\u003cdiv class=\u0027privacyMessage\u0027\u003e\n\u003ch3\u003eThis feature is not available with your current cookie settings.\u003c/h3\u003e\n\u003cp\u003eYou can \u003ca href=\u0027#\u0027 data-show-preference-center=\u00271\u0027\u003eupdate your privacy settings\u003c/a\u003e to enable this content. Please enable “Functional Cookies” to use this feature.\u003c/p\u003e\n\u003c/div\u003e","showPrivacyOptOutMessage":false},{"layoutParameter":"p%3d1","id":"de022929-4416-4bc9-ab3c-ae5711d562bf","allowedForAnonymousUsers":true,"type":"Print","displayName":"Print","namePassedToEvents":"Print","cssClassName":"atButtonPrint","privacyOptOutMessage":"\u003cdiv class=\u0027privacyMessage\u0027\u003e\n\u003ch3\u003eThis feature is not available with your current cookie settings.\u003c/h3\u003e\n\u003cp\u003eYou can \u003ca href=\u0027#\u0027 data-show-preference-center=\u00271\u0027\u003eupdate your privacy settings\u003c/a\u003e to enable this content. Please enable “Functional Cookies” to use this feature.\u003c/p\u003e\n\u003c/div\u003e","showPrivacyOptOutMessage":false}],"isSticky":true},"userSettings":{"isCurrentUserAnonymous":true,"isFavoriteItem":false},"pageAttributes":{"url":"https%3a%2f%2fwww.bettycrocker.com%2fhow-to%2fhow-to-make-a-gingerbread-house","contentId":"8bf4cea6-ac65-4bdc-9d86-d775ac6abb47"},"recaptchaPublicKey":"6LfU_icUAAAAALSqSjRg5hqZwbPr1b8k-_80a_S_"};
var moduleName = 'actionToolbar';
var isVueModule = true;
GeneralMills.PandoSites.RegisterControlInstance(moduleName, configuration, componentMetadata, isVueModule)
});
})();
Steps for Building Your Gingerbread House
Gingerbread House Building Supplies
It’s time to gather your ingredients and equipment. First, print out the template and read through the recipe.
Printable Gingerbread House template—print on 8.5x11-inch paper then cut out your pieces for a perfectly proportioned house.
What You’ll Need for Making a Gingerbread House
Though the list is long, ingredients called for are standard. For the few that are not, we’ve included notes to help you find what you need (or hack another solution). As for equipment, you probably have most of what’s needed, particularly if you bake often.
Gingerbread Ingredients
All the baking ingredients below are easy to find at most grocery stores.
- 10 1/2 cups Gold Medal™ all-purpose flour
- 3 teaspoons baking soda
- 3 teaspoons ground ginger
- 1 1/2 teaspoons ground allspice
- 1 1/2 teaspoons ground cinnamon
- 1 1/2 teaspoons ground cloves
- 3/4 teaspoon salt
- 1/2 cup shortening
- 1 1/2 cups packed brown sugar
- 2 cups mild molasses
- 1 1/8 cups cold water
- 2 clear hard fruit candies (red, yellow, blue or green)
Royal Icing Ingredients
If you don’t think you’ll use meringue powder or cream of tartar for anything besides this recipe, look for these items in the bulk section of your grocery store.
- 4 1/2 cups powdered sugar
- 1/3 cup warm water (105°F to 115°F)
- 3 tablespoons meringue powder
- 1 teaspoon vanilla
- 1/2 teaspoon cream of tartar
Decorating Ingredients
Raid the cake decorating aisle of your craft store or the candy aisle of your grocery store to find decorations. We used the items below to decorate our house, but let your creativity guide you.
- Green gumdrops
- Snaps pretzels
- Candy canes
- Candy-coated chocolate balls
- Assorted holiday sprinkles
Equipment
Look for the more specialized items in the cake decorating section of your local craft store; see notes below.
- Stand mixer or electric hand mixer
- Rolling pin
- Decorator bag and small round tip (check your craft store or substitute a resealable plastic bag with one of the corners snipped off)
- Squeeze bottle
- Pizza cutter or sharp knife
- Rubber spatula
- Cookie sheet
- Cooling rack
- Parchment paper
- Resealable plastic bag
- 1-inch round cookie cutter
- 1 ½-inch round cookie cutter
- Cans or bottles (for propping up house from the inside)
- Gel food coloring, if desired
- Tree-shaped cookie cutters, if desired
- People-shaped cookie cutters, if desired
Make the Dough
Dough will roll out better after a rest of at least 2 hours, so do this step ahead if possible.
1. In large bowl, mix flour, baking soda, ginger, allspice, cinnamon, cloves and salt. In bowl of a 5-quart (or larger) electric stand mixer fitted with paddle attachment, beat shortening and brown sugar on medium speed, scraping bowl occasionally, until light and fluffy. Reduce speed to low; beat in molasses and 1 1/8 cups cold water until mixed well. On low speed, beat in one-fourth of the flour mixture until mixed well, repeating in one-fourth amounts of flour mixture, beating well after each addition, until mixture forms into a ball. Scrape side of bowl occasionally. Divide dough into 4 equal portions; shape into round disks and wrap in plastic wrap. Refrigerate at least 2 hours or up to overnight.
EXPERT TIP: We tested this recipe with a 5-quart electric stand mixer. A combination of an electric hand mixer and mixing by hand may also be used. Since all mixers vary, you’ll want to be sure the mixer’s motor can handle it; the beating and mixing time may take a little longer. Depending on your style of stand mixer, you may also need to mix the last amounts of flour by hand if you notice that the motor seems to be working too hard.

Roll, Cut Out and Bake the Walls and Roof
These are also good steps to take ahead of time, if possible. Remember to print out the template to make cutting out your pieces easy.
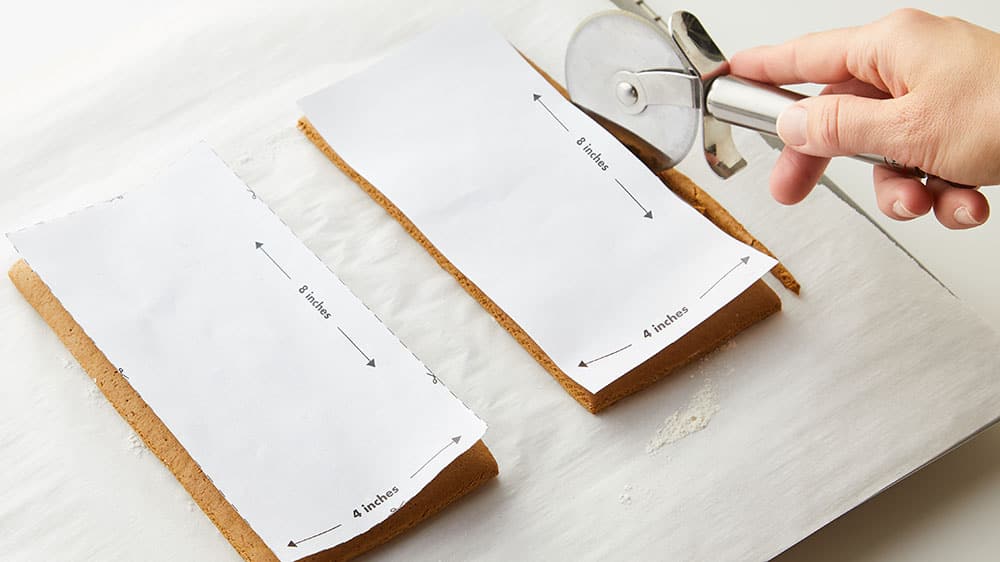
1. Heat oven to 375°F. On lightly floured 16x12-inch piece of cooking parchment paper, roll one dough disk 1/4-inch thick, into 12x9-inch rectangle. Place two side-wall pattern pieces on dough, at least 1/2-inch apart. (See photo below.) Cut around pattern pieces with pizza cutter or sharp knife. Remove pattern pieces; remove dough scraps, and reserve for rerolling. Transfer dough cutouts and parchment to large cookie sheet.
EXPERT TIP: Typically, we consider parchment paper a nice-to-have, rather than need-to-have, but not in this recipe. Parchment makes it easier to roll and transfer pieces between the counter, cookie sheet and cooling rack. When rolling out gingerbread dough, we recommend attaching one end of the parchment paper to end of countertop with tape. Tape remaining end to top of countertop. This will help reduce the amount of slipping during rolling. You can also place heavy objects on corners of parchment paper.

2. Bake cutouts 10 to 13 minutes or until firm in center; remove from oven. With cutouts on pan, carefully replace pattern pieces on top of baked dough cutouts, and trim around edges; discard any trimmings, and remove pattern pieces. (Pan and dough will be hot.) Return cutouts to oven 4 to 6 minutes longer or until dry and lightly browned. Transfer parchment with cutouts to rack to cool completely.
EXPERT TIP: Is there any coffee left? The scraps you just trimmed away would make a perfect snack alongside a steaming cup. After all, this is a long recipe and you need to keep your energy up!
3. Allow cookie sheet to cool completely before moving onto next pieces, or use another large cookie sheet if you have more than one. Working one piece at a time, repeat process with remaining dough, rolling, cutting and baking front wall, back wall and roof pattern pieces on cooking parchment paper until all six pieces are done.
EXPERT TIP: It’s important to allow cookie sheets to cool in between batches but that doesn’t mean you can’t speed it up. Here’s our favorite trick: Allow sheet to cool to room temperature (this will help you avoid warping your pan), then run pan under cold water, dry it and you’re ready for the next batch.
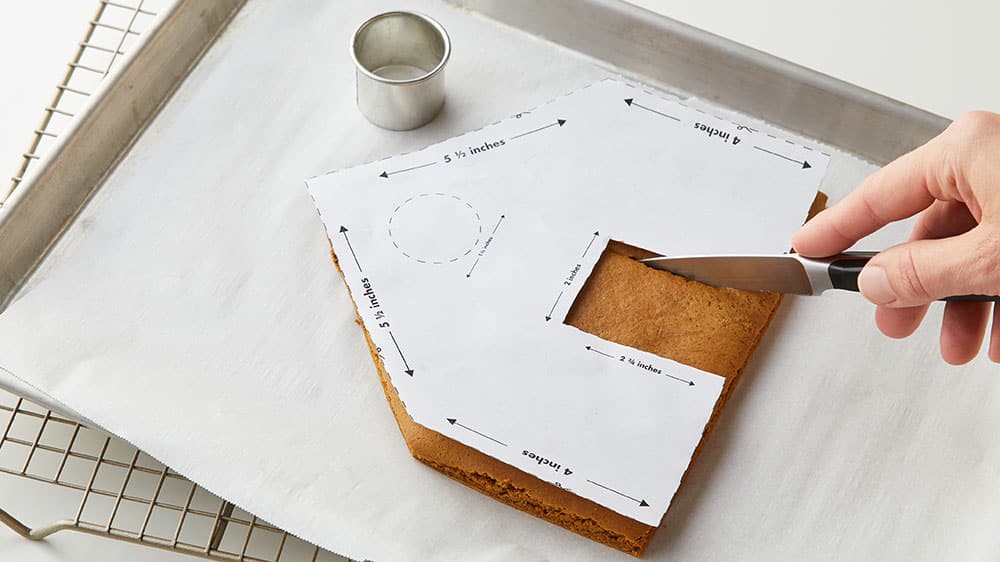
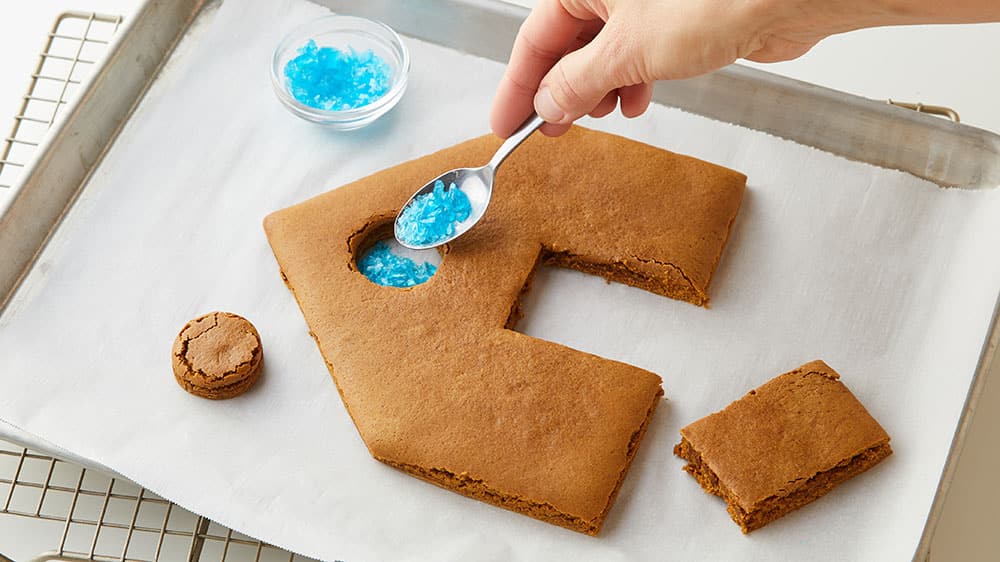
4. To make door and stained-glass window, with front wall still on parchment paper, replace front wall pattern piece (with door and window cut out). Carefully cut small door opening from front wall and remove cutout; set aside for later. Using a 1 1/2-inch circle cutter, cut small opening for window near top of front wall; remove cutout and any crumbs, and discard. In small resealable food-storage plastic bag, place two clear hard fruit candies, and seal. Using flat side of meat mallet, gently pound to crush candies. Spoon crushed candies into opening, making sure candies touch edges of baked dough. (Do not mound candy in opening.) Carefully transfer parchment to large cookie sheet; return to oven 4 to 6 minutes or until melted. Remove from oven; cool 5 minutes on cookie sheet. Transfer parchment and baked piece to cooling rack to cool completely. Carefully remove parchment from gingerbread house pieces.
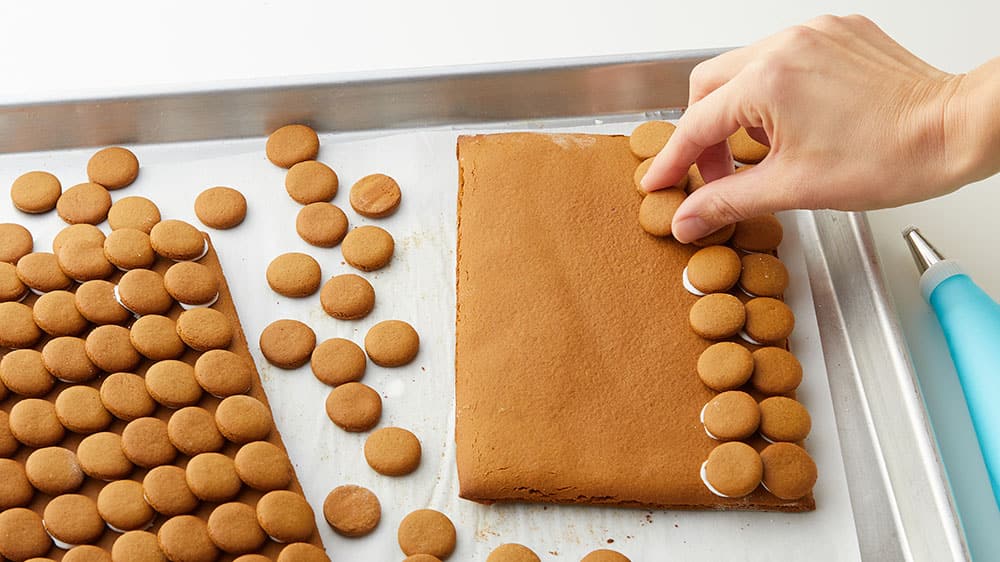
5. On lightly floured 16x12-inch piece of cooking parchment paper, roll remaining dough 1/8-inch thick. With lightly floured 1-inch round cutter, cut at least 120 circles to make shingles from dough, and transfer to large parchment-lined cookie sheet, spacing slightly apart. If necessary, reroll scraps, and continue with cutouts. Bake 8 to 10 minutes or until firm in center; transfer parchment with cutouts to cooling rack to cool completely.
EXPERT TIP: If you’re looking to streamline this recipe, you can skip the homemade shingles and check out our substitute suggestions in the “Expert Tips” below.
6. On lightly floured 16x12-inch piece of cooking parchment paper, roll remaining dough scraps 1/8-inch thick. With lightly floured 2- to 3 1/4-inch and 1 1/2-inch round cookie cutters, cut out desired shapes for gingerbread men and women, trees and stepping stones. Transfer to large parchment-lined cookie sheets. Bake 8 to 10 minutes or until firm in center; transfer parchment with cutouts to cooling racks to cool completely.
EXPERT TIP: If you’ve got a little baker in the house, cutting out the trees and gingerbread people is a great way to keep them busy.
Make the Icing
Royal icing is used to attach decorations and hold together walls and roof together. Mix up a batch using the instructions below.
1. In large bowl, beat royal icing ingredients with electric mixer on low speed until mixed. Change speed to high and beat 7 to 10 minutes, scraping bowl occasionally, until very stiff. If desired, add gel food color to icing to create different looks for decorating.
EXPERT TIP: If you’re using an electric hand mixer, hang in there—7 to 10 minutes can feel like a long time, even with a motor on your side. We promise it’s worth the effort. There’s no better glue than stiff royal icing. Plus, once it does come together, you’ll have mastered bakery-quality royal icing, which is to the benefit of all your Christmas cookies going forward!
2. Spoon 1 cup of the icing into small decorating bag fitted with small round tip or cut small corner off end of off a plastic food storage bag; twist bag to keep closed. Keep remaining icing covered with plastic wrap to prevent drying out; set aside.
EXPERT TIPS: Royal icing dries quickly when exposed to air. Be sure to keep icing bowl covered with plastic wrap while you’re decorating. If piping tip or tip of squeeze bottle gets clogged, use a toothpick to loosen, and squeeze to remove clump.
Decorate the House
Before assembling your house, add your decorations. For more ideas on how to do this, check out How to Decorate Your Gingerbread House.
1. Using the photo at the beginning of this article as a guide, decorate side walls, front and back walls of house with icing and assorted decorations to make windows and wreath. Add shingles to roof pieces, attaching the round cutouts with a small amount of icing and overlapping them slightly, using photo as a guide. Let decorated gingerbread pieces stand at least 30 minutes until icing is set, before assembling the house.
EXPERT TIP: It’s much easier to decorate when walls and roof pieces are laid flat, so we recommend adding all the bells and whistles before assembly. This part is really the most fun, so get little bakers in on the action. This would be a great project to keep kiddos occupied at a cookie exchange.
2. Uncover remaining icing and add additional icing to piping bag as needed for assembly. Cut larger tip from end of decorating bag.
STOP and read this note before taking the next step: It’s time to pull out the surface you’ll display your gingerbread house on. You don’t want to move your house after assembly, so take a minute to pick out a tray, cutting board or rimmed baking sheet you can do without for a time. If there’s no equipment to spare, go the classic route of covering a piece of cardboard with aluminum foil.
Build the House
Once you’ve added your decorations and allowed time for the frosting to set, it’s time to build your house.
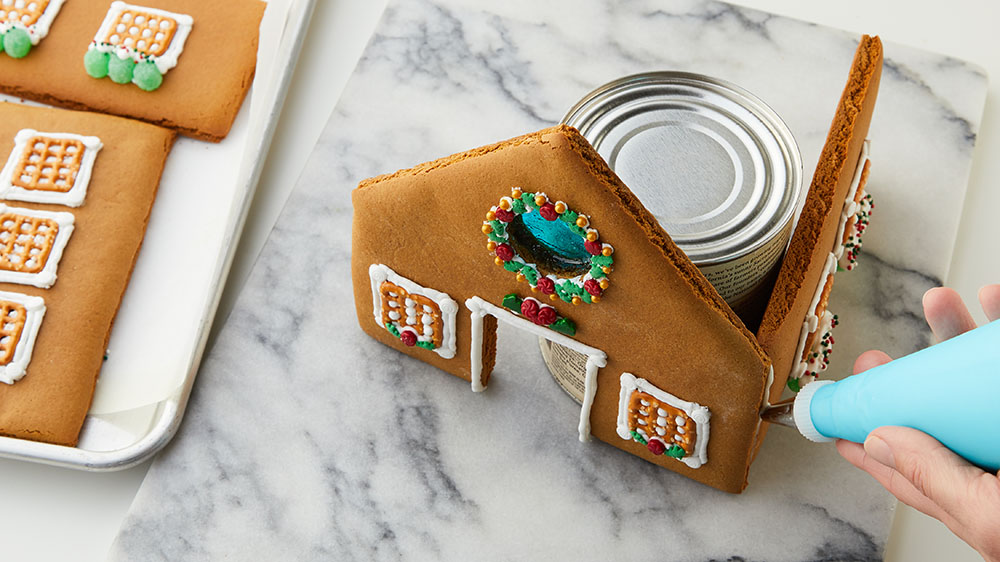
1. Working with front wall piece and one side wall piece, pipe thick line of icing on one end of the side wall seam and on one of the inner edges of front wall; place pieces together, attaching the icing. Add more icing to support the seam, if necessary. Prop up walls with cans or bottles; allow to set 30 minutes. Repeat for remaining back wall and side wall pieces, attaching all sides of house; allow to set 30 minutes.
EXPERT TIP: Using something sturdy during your assembly will help ensure a successful gingerbread house. We recommend using glass bottles, cans or other heavy containers as temporary support until your icing is set. You can also use a couple of empty jars or bottles as support for the roof, leaving them inside when adding the roof pieces. The jars we used were about 6 inches tall.
2. Carefully attach one side of the roof to the top of one side of the house using thick line of icing on top edge of side wall, top edges of front and back walls and the inside outer edges of the roof piece. Roof piece will hang slightly over the edges. Hold in place 1 to 2 minutes until icing starts to set. Use one to two jars or bottles for support underneath; allow to set 30 minutes. Repeat with remaining roof piece. Attach front door, leaving slightly propped open; allow to set 30 minutes.
EXPERT TIP: You’re almost there, so don’t rush this step. Instead, take a minute to ensure your can or bottle supports are the right height before you pipe on the Royal Icing.
3. Using the photo at the beginning of this article as a guide, decorate outside with any remaining final touches. Lightly dust shingles with powdered sugar, if desired.
EXPERT TIP: For the perfect light and even dusting of “snow,” fill a mesh sieve with powdered sugar and hold high above your house. Then, gently shake.
How to Decorate Your Gingerbread House
Your house will have a solid foundation if built with the recipes and construction techniques above. Now it’s time for the fun part: decorating!
With a solid foundation built on the construction techniques and recipes outlined above, you can take the decorating in any direction you want. After all, it’s an art, not a science, so let your imagination guide you, enlist a team of decorators or take inspiration from the themes below.
Decorating Tips
- As noted above, it’s always easier to decorate your house before assembly. Remember to allow time for decorations to set before attempting to assemble the house.
- If you don’t have the time to cut out and bake shingles or want to reserve those scraps for snacking—hey, we’re not judging!—NILLA wafers or Oreo cookies make great substitutes.
- Royal Icing is an extremely stiff frosting, which is why it’s the perfect “glue” for holding together your house.
- A decorator’s bag, or piping bag, is nice to have when assembling your house. Bags, writing tips and squeeze bottles are all widely available at craft stores, especially at Christmastime. If you don’t have a decorator’s bag, fashion your own from a resealable plastic bag. All the details for pulling it off are ready and waiting for you in our cookie decorating guide.
Choose Your Theme
Before you shop for decorations, decide on a decorating theme like the ones below.
Winter Gingerbread House
For a classic gingerbread house—the kind that would tempt Hansel and Gretel—raid the candy store! Old-fashioned gumdrops, round peppermint candies, red cinnamon candies and M&M’s® are must haves.
- Roof: Pipe a scalloped pattern onto the roof for shingles and add a colorful M&M’s® candy inside each shingle. Continue the rainbow-color theme by lining the peak of the roof and eaves with a line of gumdrops.
- Windows: Pipe on with frosting and add shutters made from sticks of gum, licorice or any other candy that fits.
- Walls: Pipe a string of lights onto the house with M&M’s® candies for bulbs.
- Door: Outline with licorice rope and accent with piped-on icing flourishes. Gumdrop shrubs look nice next to the door, especially when lightly coated with icing snow.
- Walkway: Coarsely crushed candy canes make colorful gravel.
- Landscaping: A snowman made of marshmallows is a fun finishing touch.
Candy Cane Lane House
For a cheerful color theme inspired by the season’s best candy, you’ll want peppermint sticks, round peppermint candies and of course, candy canes of all sizes.
- Roof: Pipe a diamond pattern on roof for shingles and dot each “x” with a red cinnamon candy to keep to your color theme. At the roof’s peak, add a thick line of icing and decorate with round peppermint candies.
- Windows: Piped on windows really pop when they’re adorned with peppermint sticks shutters.
- Walls: Instead of a wreath, add a sweet accent by “gluing” the hooks and ends of two mini candy canes so they meet and form a heart. Anchor each corner of your house with a peppermint stick.
- Door: Paste on a wafer cookie inside a doorframe made of peppermint sticks.
- Walkway: Round peppermint candies make perfect pavers here. Glue them down in an offset pattern.
- Landscaping: Add a peppermint stick light pole anchored in a gumdrop base.
Alpine Lodge
For a little mountain lodge constructed of logs and buried in snow, you’ll need pretzel rods, pretzel snaps, gumdrops, graham crackers and mini candy canes.
- Roof: Add a thick layer of icing and top with finely shredded coconut. Along the eaves, pipe a row of icicles.
- Walls: Cover walls with pretzel rods sandwiched together with thick lines of royal icing for a log cabin look.
- Windows: Snap pretzels continue the theme as perfect, easy-to-attach windows. Make them stand out by piping on window frames and accenting with gumdrop window boxes.
- Door: A graham cracker door looks cute inside a piped frame accented with licorice ropes or candy canes.
- Walkway: Flood the “lawn” outside your lodge with frosting and add in some gingerbread rounds as pavers. Lay them in before the icing is set, so they look buried in snow.
- Landscaping: Pine tree cutouts are only natural here. Cut them out of your leftover dough using tree cutters of various sizes. A sled would be another nice touch. Construct one using two mini candy canes for runners and a graham cracker for the top.
Questions? Comments? Leave us a note below. Also, we’d love to see how your baked abode turns out, share a photo with us on Instagram and don’t forget to use #callmeBettyCrocker!
(function() {
document.addEventListener('DOMContentLoaded', function() {
var componentMetadata = JSON.parse('\x7b\x22componentName\x22\x3a\x22NewsletterCTA_b9911a56-3a0d-4b1c-8521-df6c10ce048a\x22,\x22deferOptions\x22\x3a\x7b\x22deferComponent\x22\x3atrue,\x22deferType\x22\x3a\x22OnDemand\x22,\x22deferId\x22\x3a\x22r1aa7c07d6469433eb94c4827192a3e23\x22,\x22deferredContainerId\x22\x3a\x22\x2fprimaryColumn\x2finteropInlineNewsletterCta\x22,\x22deferredContainerView\x22\x3a\x22InteropDeferWrapper\x22\x7d,\x22viewName\x22\x3a\x22NewsletterCTA\x22\x7d');
var configuration = {"unsubscribedNewsletters":[{"listId":"1e34a555-89d1-45f0-8f07-b3ae6b01c03c","thumbnailImageUrl":"/-/media/GMI/Core-Sites/BC/Images/Shared/myaccount/newsletters/BC_Thumb157x157.png?sc_lang=en","previewUrl":"https://morpheus3.idpk.net/email_sends/9111/preview","name":"Betty\u0027s Email","isPromo":false}],"settings":{"anonymousCopy":"Ready to Be Inspired?","anonymousDescriptionCopy":"We know you’ll love our daily tips, trends and tasty recipes sent right to your inbox.","anonymousThankYouCopy":"\u003cp\u003eThanks! Your first email is on its way.\u003c/p\u003e\n","anonymousThankYouDescriptionCopy":"\u003cp\u003e\u003cspan\u003eNow that you\u0026rsquo;re signed up, create an account on BettyCrocker.com to save your favorite recipes, learn more about special promotions and get inspired through Betty\u0026rsquo;s expert tips.\u003c/span\u003e\u003c/p\u003e","anonymousButtonText":"Sign up now","anonymousEmailInvalidErrorText":"Please enter a valid email address.","anonymousSubscribeErrorText":"We encountered an error while signing you up. Please try again.","anonymousEmailAddressPlaceholderText":"Enter your email address","anonymousEmailAddressLabel":"Email Address","anonymousLegalCopy":"By signing up, you accept our\u0026nbsp;\u003ca rel=\u0022noopener noreferrer\u0022 href=\u0022https://www.generalmills.com/privacy-security/us-english-privacy-policy\u0022 target=\u0022_blank\u0022\u003e\u003cspan style=\u0022text-decoration: underline;\u0022\u003ePrivacy Policy\u003c/span\u003e\u003c/a\u003e\u0026nbsp;and agree that your information may be used across our\u0026nbsp;\u003ca rel=\u0022noopener noreferrer\u0022 href=\u0022https://www.generalmills.com/food-we-make/brands\u0022 target=\u0022_blank\u0022\u003e\u003cspan style=\u0022text-decoration: underline;\u0022\u003efamily of brands\u003c/span\u003e.\u003c/a\u003e","requiredFieldText":"","standardSmallImageUrl":"/-/media/GMI/Core-Sites/BC/Images/BC/seasonal/2021_Christmas/ncta_bg.png","standardLargeImageUrl":"/-/media/GMI/Core-Sites/BC/Images/BC/seasonal/2021_Christmas/ncta_bg.png","backgroundColor":"#333333","accentColor":"","registrationUrl":"/register/reg-fp?RegAction=SUBSCRIBERUPGRADE\u0026esrc=11275\u0026returnUrl=%2fhow-to%2fhow-to-make-a-gingerbread-house","registrationLinkText":"Join free!","enableExpandedFields":false,"hideForSessionCookieExpiration":0,"ctaType":"StandardAnonymous","location":"Inline","userState":"Anonymous","sourceCodeOverride":0}};
var moduleName = 'newsletterCta';
var isVueModule = true;
GeneralMills.PandoSites.RegisterControlInstance(moduleName, configuration, componentMetadata, isVueModule)
});
})();
(function() {
document.addEventListener('DOMContentLoaded', function() {
var componentMetadata = JSON.parse('\x7b\x22componentName\x22\x3a\x22ConsumerGeneratedContent_8bf4cea6-ac65-4bdc-9d86-d775ac6abb47\x22,\x22deferOptions\x22\x3a\x7b\x22deferComponent\x22\x3atrue,\x22deferType\x22\x3a\x22OnDemand\x22,\x22deferId\x22\x3a\x22rad9badb72a404effa687fa5aeb0b2663\x22,\x22deferredContainerId\x22\x3a\x22\x2fratingReview\x2finteropRatingReview\x22,\x22deferredContainerView\x22\x3a\x22InteropDeferWrapper\x22\x7d,\x22viewName\x22\x3a\x22ConsumerGeneratedContent\x22\x7d');
var configuration = {"loaderScript":"https://apps.bazaarvoice.com/deployments/bettycrocker/main_site/production/en_US/bv.js","type":"QuestionAndAnswer","language":"en","includeRatings":false};
var moduleName = 'consumerGeneratedContent';
var isVueModule = true;
GeneralMills.PandoSites.RegisterControlInstance(moduleName, configuration, componentMetadata, isVueModule)
});
})();