(function() {
document.addEventListener('DOMContentLoaded', function() {
var componentMetadata = JSON.parse('\x7b\x22componentName\x22\x3a\x22ChannelLinks_8918a218-1030-4c2b-87de-605f1d7de656\x22,\x22deferOptions\x22\x3a\x7b\x22deferComponent\x22\x3afalse,\x22deferType\x22\x3a\x22None\x22,\x22deferId\x22\x3a\x22r488a8fa3f95b41e2be183ed6b7077f65\x22,\x22deferredContainerId\x22\x3a\x22\x2fchannelLinks\x22,\x22deferredContainerView\x22\x3anull\x7d,\x22viewName\x22\x3a\x22ChannelLinks\x22\x7d');
var configuration = {};
var moduleName = 'channelLinks';
var isVueModule = true;
GeneralMills.PandoSites.RegisterControlInstance(moduleName, configuration, componentMetadata, isVueModule)
});
})();
(function() {
document.addEventListener('DOMContentLoaded', function() {
var componentMetadata = JSON.parse('\x7b\x22componentName\x22\x3a\x22ActionToolbar_59e5fa31-dc57-46ea-93d1-265650a760f0\x22,\x22deferOptions\x22\x3a\x7b\x22deferComponent\x22\x3atrue,\x22deferType\x22\x3a\x22OnDemand\x22,\x22deferId\x22\x3a\x22reb4d2132842f4ba5b9515fee7951e407\x22,\x22deferredContainerId\x22\x3a\x22\x2ffloatingActionToolbar\x2ffloatingActionToolbar_interop\x22,\x22deferredContainerView\x22\x3a\x22InteropDeferWrapper\x22\x7d,\x22viewName\x22\x3a\x22ActionToolbar\x22\x7d');
var configuration = {"contentId":"f30ea4b4-d02e-44d2-a819-13916f95c387","toolbarSettings":{"id":"59e5fa31-dc57-46ea-93d1-265650a760f0","regAction":"FAVORITE","eSourceCode":11275,"namePassedToEvents":"ArticleStandardLongFormToolbar","buttons":[{"addFavoriteErrorMessage":"Sorry, something went wrong. Please save again.","removeFavoriteErrorMessage":"Error occurred while removing from favorites","regAction":"FAVORITE","eSourceCode":11275,"isCurrentUserAnonymous":false,"isFavoriteItem":false,"id":"16a29701-2b75-4d9a-aa9c-860376da50d7","allowedForAnonymousUsers":false,"type":"Favorite","displayName":"Save","namePassedToEvents":"Favorite","cssClassName":"atButtonFavorite","privacyOptOutMessage":"\u003cdiv class=\u0027privacyMessage\u0027\u003e\n\u003ch3\u003eThis feature is not available with your current cookie settings.\u003c/h3\u003e\n\u003cp\u003eYou can \u003ca href=\u0027#\u0027 data-show-preference-center=\u00271\u0027\u003eupdate your privacy settings\u003c/a\u003e to enable this content. Please enable “Functional Cookies” to use this feature.\u003c/p\u003e\n\u003c/div\u003e","showPrivacyOptOutMessage":false},{"providerName":"pinterest","providerNamePassedToEvents":"Pinterest","shareUrlFormat":"//pinterest.com/pin/create/link/?url={0}","id":"c18cf08e-e436-4cd0-a180-1bafb15369a6","allowedForAnonymousUsers":true,"type":"Social","displayName":"Pinterest","namePassedToEvents":"Pinterest","cssClassName":"atButtonPinterest","privacyOptOutMessage":"\u003cdiv class=\u0027privacyMessage\u0027\u003e\n\u003ch3\u003eThis feature is not available with your current cookie settings.\u003c/h3\u003e\n\u003cp\u003eYou can \u003ca href=\u0027#\u0027 data-show-preference-center=\u00271\u0027\u003eupdate your privacy settings\u003c/a\u003e to enable this content. Please enable “Functional Cookies” to use this feature.\u003c/p\u003e\n\u003c/div\u003e","showPrivacyOptOutMessage":false},{"templateId":"13bdd311-4300-4fb8-9d78-9cbaf98f5578","dialogHeading":"Email Article","emailCode":"BC_ContentEmail","dialogSettings":{"cancelButtonText":"Cancel","copyToSenderLabel":"Send a Copy to Myself","emailAddressesLabel":"* Email Address(es)","emailInstructionText":"Separate email addresses with commas","fromText":"From:","privacyPolicyText":"\u003cp\u003e\u0026copy;2024 General Mills, Inc. All Rights Reserved. This information will only be used to send an email to your friend(s) and will not be saved. Please read our \u003ca rel=\u0022noopener noreferrer\u0022 rel=\u0022noopener noreferrer\u0022 href=\u0022http://www.generalmills.com/company/privacy-policies/privacy-policy-us\u0022 target=\u0022_blank\u0022 shape=\u0022rect\u0022\u003ePrivacy Policy\u003c/a\u003e.\u003c/p\u003e","requiredFieldText":"* Required","sendButtonText":"Send","senderEmailAddressLabel":"* Your Email Address","senderFirstNameLabel":"* Your First Name","sendToText":"Send To:"},"id":"be9422a3-85a8-4c31-86f5-e171255bb89d","allowedForAnonymousUsers":true,"type":"Email","displayName":"Email","namePassedToEvents":"Email","cssClassName":"atButtonEmail","privacyOptOutMessage":"\u003cdiv class=\u0027privacyMessage\u0027\u003e\n\u003ch3\u003eThis feature is not available with your current cookie settings.\u003c/h3\u003e\n\u003cp\u003eYou can \u003ca href=\u0027#\u0027 data-show-preference-center=\u00271\u0027\u003eupdate your privacy settings\u003c/a\u003e to enable this content. Please enable “Functional Cookies” to use this feature.\u003c/p\u003e\n\u003c/div\u003e","showPrivacyOptOutMessage":false},{"providerName":"facebook","providerNamePassedToEvents":"Facebook","shareUrlFormat":"//facebook.com/sharer/sharer.php?u={0}","id":"6c3f442d-6ffe-460f-8360-b02b122d326c","allowedForAnonymousUsers":true,"type":"Social","displayName":"Facebook","namePassedToEvents":"Facebook","cssClassName":"atButtonFacebook","privacyOptOutMessage":"\u003cdiv class=\u0027privacyMessage\u0027\u003e\n\u003ch3\u003eThis feature is not available with your current cookie settings.\u003c/h3\u003e\n\u003cp\u003eYou can \u003ca href=\u0027#\u0027 data-show-preference-center=\u00271\u0027\u003eupdate your privacy settings\u003c/a\u003e to enable this content. Please enable “Functional Cookies” to use this feature.\u003c/p\u003e\n\u003c/div\u003e","showPrivacyOptOutMessage":false},{"layoutParameter":"p%3d1","id":"de022929-4416-4bc9-ab3c-ae5711d562bf","allowedForAnonymousUsers":true,"type":"Print","displayName":"Print","namePassedToEvents":"Print","cssClassName":"atButtonPrint","privacyOptOutMessage":"\u003cdiv class=\u0027privacyMessage\u0027\u003e\n\u003ch3\u003eThis feature is not available with your current cookie settings.\u003c/h3\u003e\n\u003cp\u003eYou can \u003ca href=\u0027#\u0027 data-show-preference-center=\u00271\u0027\u003eupdate your privacy settings\u003c/a\u003e to enable this content. Please enable “Functional Cookies” to use this feature.\u003c/p\u003e\n\u003c/div\u003e","showPrivacyOptOutMessage":false}],"isSticky":true},"userSettings":{"isCurrentUserAnonymous":true,"isFavoriteItem":false},"pageAttributes":{"url":"https%3a%2f%2fwww.bettycrocker.com%2fmenus-holidays-parties%2fmhplibrary%2fholidays%2fdiy-pumpkin-decorating%3fnicam4%3dSocialMedia%26nichn4%3dPinterest%26niseg4%3dBettyCrocker%26nicreatID4%3dPost%26crlt.pid%3dcamp.utaI6CMBEbvU","contentId":"f30ea4b4-d02e-44d2-a819-13916f95c387"},"recaptchaPublicKey":"6LfU_icUAAAAALSqSjRg5hqZwbPr1b8k-_80a_S_"};
var moduleName = 'actionToolbar';
var isVueModule = true;
GeneralMills.PandoSites.RegisterControlInstance(moduleName, configuration, componentMetadata, isVueModule)
});
})();
I am always happy to see fall arrive and love to decorate my house. There are many creative ways to decorate pumpkins to match your home decor. Combine material, yarn and metallic to create custom pumpkins selecting the colors that work with each room. There are many ways beyond the traditional carving to dress up your pumpkins.
Here are 13 pumpkin decorating ideas to inspire you. Most of them are simple to put together in a short time.
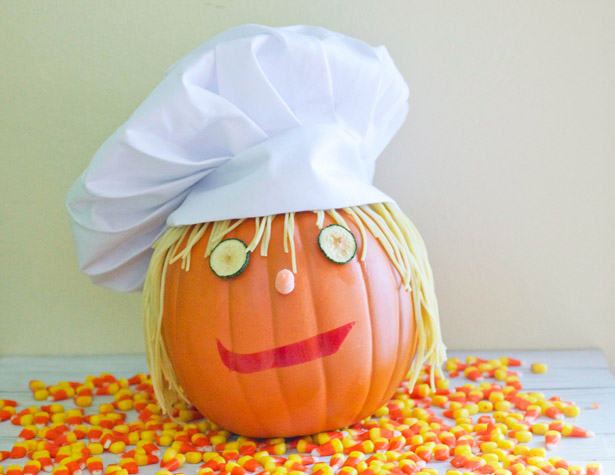
Kids will love using spaghetti noodles and vegetables to create this Food Chef Pumpkin. Cut a mouth out of a fruit roll ups before adding zucchini eyes and a carrot nose. Use scissors to style the hair.
Food Chef Pumpkin
- 1 pumpkin
- 1 chef hat
- 1 package spaghetti
- 2 -1/4” thick zucchini slices
- 1 fruit roll up
- 1 baby carrot
- 3 tooth picks
- Buttons
Cut the top off the pumpkin, set top aside. Clean out the inside, scraping out the seeds. Cook the spaghetti al dente, drain and lay out on a baking sheet to dry. Place spaghetti noodles on both sides and trim to desired length. Place shorter noodles across the top for bangs. Place top back on over the noodles. Place the top over the noodles.
Place toothpicks in to hold zucchini slices for eyes. Using another toothpick, insert into carrot and place on pumpkin as nose. Roll out fruit roll up and with a knife cut out a mouth. Place the mouth under the nose.

This combo is sitting in my living room. I love the warmth of the orange yarn against the vintage feel of the black and cream paper.
Vintage Paper with Bird Silhouette
- 1 white pumpkin
- 4 sheets 12x12 transparent paper
- Spray adhesive
- Mod podge
Sponge brush
- Vinyl silhouette (cut out your own or purchase one at a craft store)
Cut paper in strips 2-3’ wide. Spray pumpkin with adhesive. Place the strips of paper on the pumpkin starting at the edge of the stem down the side, using the sponge brush to smooth out any wrinkles. Let dry. Place the vinyl silhouette on the side of the pumpkin.
Yarn Pumpkins
- 1 pumpkin
- 1 orange yarn
- Spray adhesive
Spray half the pumpkin with adhesive and start wrapping the yarn around from bottom to top. Leave about a foot extra yarn and wrap around to create a little design. I did a little circle and then draped around a little “Trick or Treat” sign.
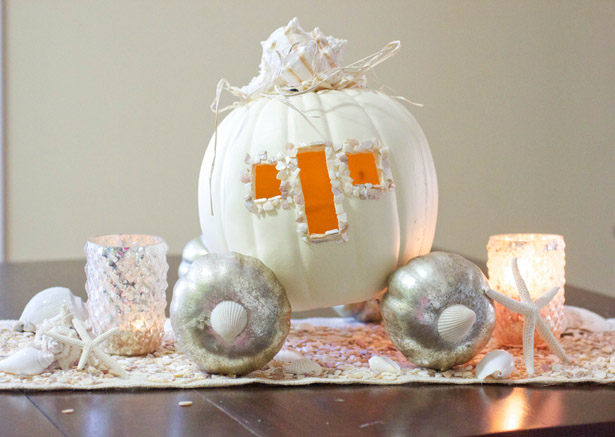
My niece loved the idea of creating a fairy tale carriage using seashells. Using a linen runner I sprinkled broken seashells to create the road. Create a centerpiece for a princess themed tea party for the girls or add a little magic to their bedroom.
Seashell Carriage Pumpkin
- 1 white pumpkin
- 4 small silver pumpkins
- Assorted shells
- Shell pieces
- Tacky glue
- 4 wooden skewers
For carriage: Cut out door and two windows. Edge with crushed shells. Glue with craft glue. Let dry.
For wheels: Poke small hole in top of 4 silver pumpkins and attach with a sturdy wooden skewer.
Top with a handful of straw and glue a large shell on top of the shell. Add additional shells if desired. Place a battery operated light inside. I added a few silver votive’s on the side for mood lighting. I also placed a few large starfish alongside the wheels.
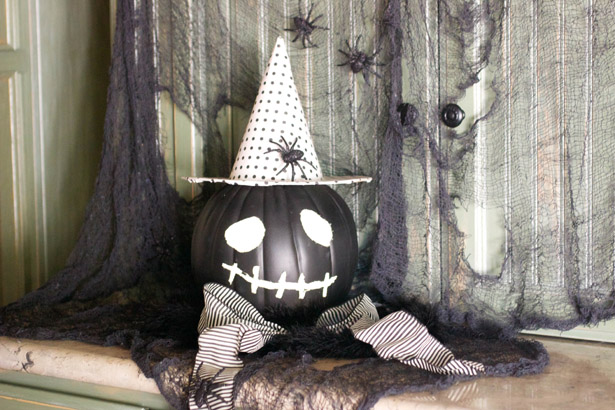
Create a fashionable witch using a boa and a black and white striped bow. The sparkly spiders crawl up the netting behind the pumpkin.
Black & White Witch
- 1 large black pumpkin
- 1 witches hat
- 2 sheets black and white polka dot paper
- 1 black boa
- 1 black and white striped bow
- Black netting
- Black spiders
- Craft glue
- Corrugated knife
- Blinking light
Cut desired face into front of black pumpkin. Decoupage paper onto witches hat. Place hat on top of pumpkin. Wrap boa around the neck and attach a bow in the front.
Hang netting in desired location and place pumpkin in front of the netting. Attach spiders to netting and on the hat. Place battery operated light inside the pumpkin.
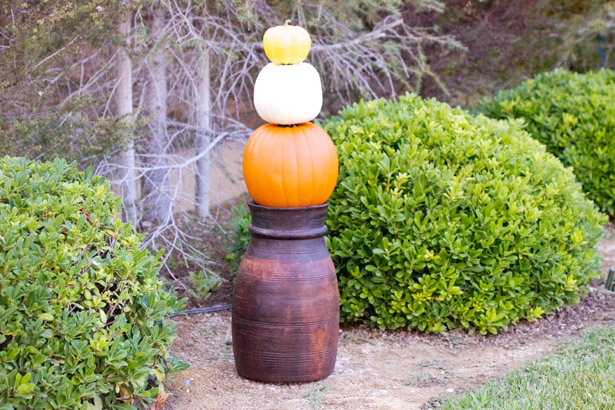
This simple stack of yellow, white and orange pumpkins recreates the colors of the candy corn.
Candy Corn Stack
- 1 small white pumpkin
- 1 medium white pumpkin
- 1 large orange pumpkin
- 1 container or candlestick
- Yellow spray paint
Spray paint small pumpkin yellow and dry. Use a serrated knife to cut out a hold in the bottom of the small and medium pumpkins. The hold should be the size of the stem of the pumpkin one size bigger. Stack pumpkins and place on desired holder.
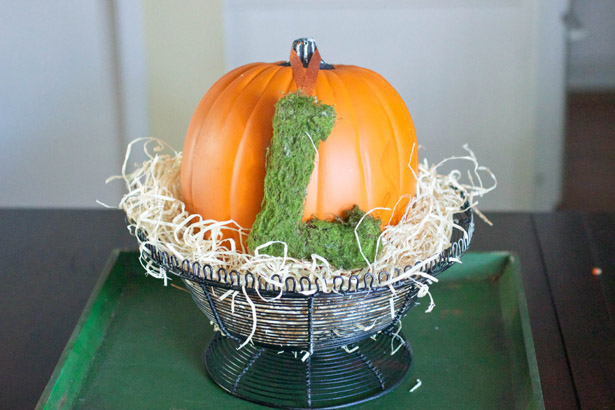
Customize a simple pumpkin with a moss-covered initial. Use a basket or container filled with straw to set the pumpkin in. I spray painted a basket black.
Moss Initial Pumpkin
- 1 large orange pumpkin
- 1 4” letter (cardboard or wood)
- Moss
- 1 foot orange glitter ribbon
- Hot glue gun or spray adhesive
- Staple gun
- Straw
Black basket
Using the hot glue gun wrap the letter with moss; let dry. Wrap the ribbon around the stem of the pumpkin to determine the correct length. Staple gun to the back of the wooden letter. Hang on the pumpkin. Fill basket with straw and place pumpkin on top.
This is the easiest way to dress up your pumpkins. Place masquerade masks on various size pumpkins. It doesn’t get easier than this. You can get fancy using masks that are animal print or feathered.
Silver and White Pumpkin
- 1 small or medium white pumpkin
- 1 container silver brads
Push 3 brads one inch apart down each pumpkin line.
I love these flower pumpkins. Instead of a floral arrangement glue gun your favorite flowers onto a pumpkin.
Daisy Pumpkin: Pick pumpkins with the largest stem so that it will still show after you glue on the flowers. Buy bunches of fake daisies to equal 30 daisies of similar size and remove the stem. Trim to ensure flowers are flat on the backside. Adhere to the pumpkin using a hot glue gun.
Mum Pumpkin: Pick pumpkins with the largest stem. Buy 7 bunches of mums of similar size and remove the stem. Trim to ensure flowers are flat on the backside. Adhere to the pumpkin using a hot glue gun.
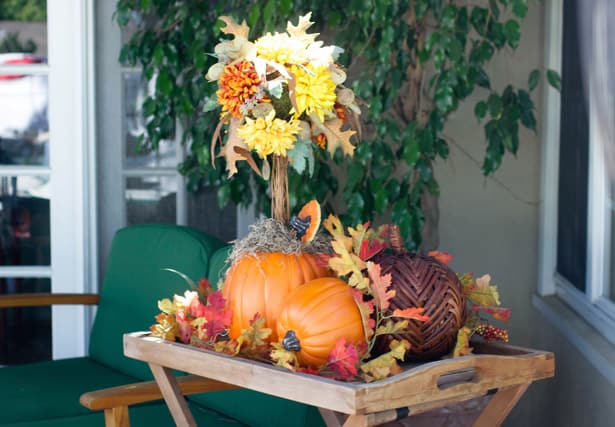
Topiary Pumpkin
- 1 large pumpkin, top cut off and insides removed
- 1 twig trunk
- Styrofoam
- 1 4 – 6” moss ball
- Pack of Spanish moss
- Assorted flowers, stems removed
Place Styrofoam inside the pumpkin and stick in the twig trunk. Fill with Spanish moss so that it is overflowing. Place the moss ball on top of the trunk. Make sure the flowers are clipped on the backside so they are flat. Adhere to moss ball using glue gun. Add the top coming up sideways from the Spanish moss.
Boo Stacked Pumpkins
This Glitter Topiary spelling out BOO is by Courtney Carmean. Visit her site, A Diamond In The Stuff, to learn how to create one of your home.
Ribbon-covered pumpkins added a splash of color to the outside entryway. Look for mini rolls of ribbon at your local craft store.
Ribbon Pumpkins
- 1 medium orange pumpkin
- 1 large black pumpkin
- 1 large white pumpkin
- Green rick rack
- Black and white checked ribbon
- 4 different variations of ribbon
- Tacky craft glue
Orange pumpkin – wrap green rick rack around twice and adhere with glue.
Black pumpkin – place black and white checked
White pumpkin – place 1 strip of each down the side starting at the edge of the stem. Repeat 3 times with the four ribbons. Adhere with tacky glue.
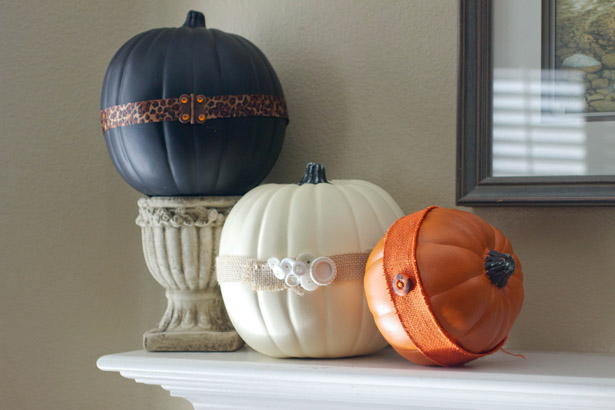
If you like simple but stylish decor, these linen and button pumpkins add warmth to table or fireplace.
Linen and Buttons Pumpkin
- 1 small orange pumpkin
- 1 large white pumpkin
- 1 large black pumpkin
- Orange linen ribbon
- Leopard ribbon
- 1 2” wide and long strip of linen colored burlap
- Assorted buttons and hardware
- 1 orange rhinestone
- 1 brown speckled button
- Assorted white buttons
- Hot glue gun
For the linen, I cut a strip of burlap and using a glue gun adhered the buttons to the strip.
Orange pumpkin – Wrap with linen ribbon and adhere with glue. Glue brown speckled button to the center and add a orange rhinestone in the center.
Black pumpkin – Wrap double-sided tape around where you want the ribbon. Place leopard ribbon on top of the tape and adhere in back with glue.
White pumpkin – Lay down a strip of line and arrange white buttons on top. Using the glue gun adhere buttons to the linen. Let cool. Wrap double sided tape around the middle. Lay linen ribbon on top of the tape and adhere in the back with glue.
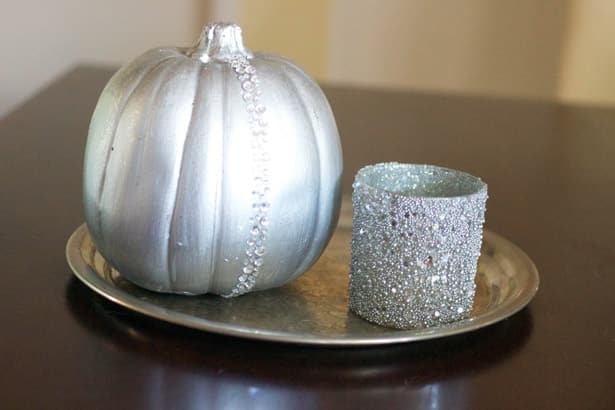
This is an elegant pumpkin perfect for a dinner party. You could place on top of a plate setting as a place card or sit on a silver tray for simple centerpiece. It looks cute topped on a thick candlestick holder.
Silver Sparkle Pumpkin
- 1 small white or black pumpkin
- 1 metallic silver paint
- Paint brush
- 1 strip rhinestone
Paint pumpkin with two coats of silver metallic paint. Let dry. Attach strip of rhinestones down one groove of the pumpkin from stem to underneath.
(function() {
document.addEventListener('DOMContentLoaded', function() {
var componentMetadata = JSON.parse('\x7b\x22componentName\x22\x3a\x22NewsletterCTA_b9911a56-3a0d-4b1c-8521-df6c10ce048a\x22,\x22deferOptions\x22\x3a\x7b\x22deferComponent\x22\x3atrue,\x22deferType\x22\x3a\x22OnDemand\x22,\x22deferId\x22\x3a\x22r85100f5df89544c0b5257e555e6f5a5b\x22,\x22deferredContainerId\x22\x3a\x22\x2fprimaryColumn\x2finteropInlineNewsletterCta\x22,\x22deferredContainerView\x22\x3a\x22InteropDeferWrapper\x22\x7d,\x22viewName\x22\x3a\x22NewsletterCTA\x22\x7d');
var configuration = {"unsubscribedNewsletters":[{"listId":"1e34a555-89d1-45f0-8f07-b3ae6b01c03c","thumbnailImageUrl":"/-/media/GMI/Core-Sites/BC/Images/Shared/myaccount/newsletters/BC_Thumb157x157.png?sc_lang=en","previewUrl":"https://morpheus3.idpk.net/email_sends/9111/preview","name":"Betty\u0027s Email","isPromo":false}],"settings":{"anonymousCopy":"Ready to Be Inspired?","anonymousDescriptionCopy":"We know you’ll love our daily tips, trends and tasty recipes sent right to your inbox.","anonymousThankYouCopy":"\u003cp\u003eThanks! Your first email is on its way.\u003c/p\u003e\n","anonymousThankYouDescriptionCopy":"\u003cp\u003e\u003cspan\u003eNow that you\u0026rsquo;re signed up, create an account on BettyCrocker.com to save your favorite recipes, learn more about special promotions and get inspired through Betty\u0026rsquo;s expert tips.\u003c/span\u003e\u003c/p\u003e","anonymousButtonText":"Sign up now","anonymousEmailInvalidErrorText":"Please enter a valid email address.","anonymousSubscribeErrorText":"We encountered an error while signing you up. Please try again.","anonymousEmailAddressPlaceholderText":"Enter your email address","anonymousEmailAddressLabel":"Email Address","anonymousLegalCopy":"By signing up, you accept our\u0026nbsp;\u003ca rel=\u0022noopener noreferrer\u0022 href=\u0022https://www.generalmills.com/privacy-security/us-english-privacy-policy\u0022 target=\u0022_blank\u0022\u003e\u003cspan style=\u0022text-decoration: underline;\u0022\u003ePrivacy Policy\u003c/span\u003e\u003c/a\u003e\u0026nbsp;and agree that your information may be used across our\u0026nbsp;\u003ca rel=\u0022noopener noreferrer\u0022 href=\u0022https://www.generalmills.com/food-we-make/brands\u0022 target=\u0022_blank\u0022\u003e\u003cspan style=\u0022text-decoration: underline;\u0022\u003efamily of brands\u003c/span\u003e.\u003c/a\u003e","requiredFieldText":"","standardSmallImageUrl":"/-/media/GMI/Core-Sites/BC/Images/BC/seasonal/2021_Christmas/ncta_bg.png","standardLargeImageUrl":"/-/media/GMI/Core-Sites/BC/Images/BC/seasonal/2021_Christmas/ncta_bg.png","backgroundColor":"#333333","accentColor":"","registrationUrl":"/register/reg-fp?RegAction=SUBSCRIBERUPGRADE\u0026esrc=11275\u0026returnUrl=%2fmenus-holidays-parties%2fmhplibrary%2fholidays%2fdiy-pumpkin-decorating%3fnicam4%3dSocialMedia%26nichn4%3dPinterest%26niseg4%3dBettyCrocker%26nicreatID4%3dPost%26crlt.pid%3dcamp.utaI6CMBEbvU","registrationLinkText":"Join free!","enableExpandedFields":false,"hideForSessionCookieExpiration":0,"ctaType":"StandardAnonymous","location":"Inline","userState":"Anonymous","sourceCodeOverride":0}};
var moduleName = 'newsletterCta';
var isVueModule = true;
GeneralMills.PandoSites.RegisterControlInstance(moduleName, configuration, componentMetadata, isVueModule)
});
})();
(function() {
document.addEventListener('DOMContentLoaded', function() {
var componentMetadata = JSON.parse('\x7b\x22componentName\x22\x3a\x22ConsumerGeneratedContent_f30ea4b4-d02e-44d2-a819-13916f95c387\x22,\x22deferOptions\x22\x3a\x7b\x22deferComponent\x22\x3atrue,\x22deferType\x22\x3a\x22OnDemand\x22,\x22deferId\x22\x3a\x22r9685375e6c59470b83ca6a4bf905947e\x22,\x22deferredContainerId\x22\x3a\x22\x2fratingReview\x2finteropRatingReview\x22,\x22deferredContainerView\x22\x3a\x22InteropDeferWrapper\x22\x7d,\x22viewName\x22\x3a\x22ConsumerGeneratedContent\x22\x7d');
var configuration = {"loaderScript":"https://apps.bazaarvoice.com/deployments/bettycrocker/main_site/production/en_US/bv.js","type":"QuestionAndAnswer","language":"en","includeRatings":false};
var moduleName = 'consumerGeneratedContent';
var isVueModule = true;
GeneralMills.PandoSites.RegisterControlInstance(moduleName, configuration, componentMetadata, isVueModule)
});
})();