(function() {
document.addEventListener('DOMContentLoaded', function() {
var componentMetadata = JSON.parse('\x7b\x22componentName\x22\x3a\x22ChannelLinks_8918a218-1030-4c2b-87de-605f1d7de656\x22,\x22deferOptions\x22\x3a\x7b\x22deferComponent\x22\x3afalse,\x22deferType\x22\x3a\x22None\x22,\x22deferId\x22\x3a\x22r4d71482148fb459a9e53bd135aaa873e\x22,\x22deferredContainerId\x22\x3a\x22\x2fchannelLinks\x22,\x22deferredContainerView\x22\x3anull\x7d,\x22viewName\x22\x3a\x22ChannelLinks\x22\x7d');
var configuration = {};
var moduleName = 'channelLinks';
var isVueModule = true;
GeneralMills.PandoSites.RegisterControlInstance(moduleName, configuration, componentMetadata, isVueModule)
});
})();
(function() {
document.addEventListener('DOMContentLoaded', function() {
var componentMetadata = JSON.parse('\x7b\x22componentName\x22\x3a\x22ActionToolbar_59e5fa31-dc57-46ea-93d1-265650a760f0\x22,\x22deferOptions\x22\x3a\x7b\x22deferComponent\x22\x3atrue,\x22deferType\x22\x3a\x22OnDemand\x22,\x22deferId\x22\x3a\x22r5a80cccc86c940aaafc4d3362e729805\x22,\x22deferredContainerId\x22\x3a\x22\x2ffloatingActionToolbar\x2ffloatingActionToolbar_interop\x22,\x22deferredContainerView\x22\x3a\x22InteropDeferWrapper\x22\x7d,\x22viewName\x22\x3a\x22ActionToolbar\x22\x7d');
var configuration = {"contentId":"e3484608-ea09-4bdf-bb71-259a5728aa65","toolbarSettings":{"id":"59e5fa31-dc57-46ea-93d1-265650a760f0","regAction":"FAVORITE","eSourceCode":11275,"namePassedToEvents":"ArticleStandardLongFormToolbar","buttons":[{"addFavoriteErrorMessage":"Sorry, something went wrong. Please save again.","removeFavoriteErrorMessage":"Error occurred while removing from favorites","regAction":"FAVORITE","eSourceCode":11275,"isCurrentUserAnonymous":false,"isFavoriteItem":false,"id":"16a29701-2b75-4d9a-aa9c-860376da50d7","allowedForAnonymousUsers":false,"type":"Favorite","displayName":"Save","namePassedToEvents":"Favorite","cssClassName":"atButtonFavorite","privacyOptOutMessage":"\u003cdiv class=\u0027privacyMessage\u0027\u003e\n\u003ch3\u003eThis feature is not available with your current cookie settings.\u003c/h3\u003e\n\u003cp\u003eYou can \u003ca href=\u0027#\u0027 data-show-preference-center=\u00271\u0027\u003eupdate your privacy settings\u003c/a\u003e to enable this content. Please enable “Functional Cookies” to use this feature.\u003c/p\u003e\n\u003c/div\u003e","showPrivacyOptOutMessage":false},{"providerName":"pinterest","providerNamePassedToEvents":"Pinterest","shareUrlFormat":"//pinterest.com/pin/create/link/?url={0}","id":"c18cf08e-e436-4cd0-a180-1bafb15369a6","allowedForAnonymousUsers":true,"type":"Social","displayName":"Pinterest","namePassedToEvents":"Pinterest","cssClassName":"atButtonPinterest","privacyOptOutMessage":"\u003cdiv class=\u0027privacyMessage\u0027\u003e\n\u003ch3\u003eThis feature is not available with your current cookie settings.\u003c/h3\u003e\n\u003cp\u003eYou can \u003ca href=\u0027#\u0027 data-show-preference-center=\u00271\u0027\u003eupdate your privacy settings\u003c/a\u003e to enable this content. Please enable “Functional Cookies” to use this feature.\u003c/p\u003e\n\u003c/div\u003e","showPrivacyOptOutMessage":false},{"templateId":"13bdd311-4300-4fb8-9d78-9cbaf98f5578","dialogHeading":"Email Article","emailCode":"BC_ContentEmail","dialogSettings":{"cancelButtonText":"Cancel","copyToSenderLabel":"Send a Copy to Myself","emailAddressesLabel":"* Email Address(es)","emailInstructionText":"Separate email addresses with commas","fromText":"From:","privacyPolicyText":"\u003cp\u003e\u0026copy;2024 General Mills, Inc. All Rights Reserved. This information will only be used to send an email to your friend(s) and will not be saved. Please read our \u003ca rel=\u0022noopener noreferrer\u0022 rel=\u0022noopener noreferrer\u0022 href=\u0022http://www.generalmills.com/company/privacy-policies/privacy-policy-us\u0022 target=\u0022_blank\u0022 shape=\u0022rect\u0022\u003ePrivacy Policy\u003c/a\u003e.\u003c/p\u003e","requiredFieldText":"* Required","sendButtonText":"Send","senderEmailAddressLabel":"* Your Email Address","senderFirstNameLabel":"* Your First Name","sendToText":"Send To:"},"id":"be9422a3-85a8-4c31-86f5-e171255bb89d","allowedForAnonymousUsers":true,"type":"Email","displayName":"Email","namePassedToEvents":"Email","cssClassName":"atButtonEmail","privacyOptOutMessage":"\u003cdiv class=\u0027privacyMessage\u0027\u003e\n\u003ch3\u003eThis feature is not available with your current cookie settings.\u003c/h3\u003e\n\u003cp\u003eYou can \u003ca href=\u0027#\u0027 data-show-preference-center=\u00271\u0027\u003eupdate your privacy settings\u003c/a\u003e to enable this content. Please enable “Functional Cookies” to use this feature.\u003c/p\u003e\n\u003c/div\u003e","showPrivacyOptOutMessage":false},{"providerName":"facebook","providerNamePassedToEvents":"Facebook","shareUrlFormat":"//facebook.com/sharer/sharer.php?u={0}","id":"6c3f442d-6ffe-460f-8360-b02b122d326c","allowedForAnonymousUsers":true,"type":"Social","displayName":"Facebook","namePassedToEvents":"Facebook","cssClassName":"atButtonFacebook","privacyOptOutMessage":"\u003cdiv class=\u0027privacyMessage\u0027\u003e\n\u003ch3\u003eThis feature is not available with your current cookie settings.\u003c/h3\u003e\n\u003cp\u003eYou can \u003ca href=\u0027#\u0027 data-show-preference-center=\u00271\u0027\u003eupdate your privacy settings\u003c/a\u003e to enable this content. Please enable “Functional Cookies” to use this feature.\u003c/p\u003e\n\u003c/div\u003e","showPrivacyOptOutMessage":false},{"layoutParameter":"p%3d1","id":"de022929-4416-4bc9-ab3c-ae5711d562bf","allowedForAnonymousUsers":true,"type":"Print","displayName":"Print","namePassedToEvents":"Print","cssClassName":"atButtonPrint","privacyOptOutMessage":"\u003cdiv class=\u0027privacyMessage\u0027\u003e\n\u003ch3\u003eThis feature is not available with your current cookie settings.\u003c/h3\u003e\n\u003cp\u003eYou can \u003ca href=\u0027#\u0027 data-show-preference-center=\u00271\u0027\u003eupdate your privacy settings\u003c/a\u003e to enable this content. Please enable “Functional Cookies” to use this feature.\u003c/p\u003e\n\u003c/div\u003e","showPrivacyOptOutMessage":false}],"isSticky":true},"userSettings":{"isCurrentUserAnonymous":true,"isFavoriteItem":false},"pageAttributes":{"url":"https%3a%2f%2fwww.bettycrocker.com%2fhow-to%2ftipslibrary%2fbaking-tips%2fcookie-baking-basics","contentId":"e3484608-ea09-4bdf-bb71-259a5728aa65"},"recaptchaPublicKey":"6LfU_icUAAAAALSqSjRg5hqZwbPr1b8k-_80a_S_"};
var moduleName = 'actionToolbar';
var isVueModule = true;
GeneralMills.PandoSites.RegisterControlInstance(moduleName, configuration, componentMetadata, isVueModule)
});
})();
Spoiler: The secret to making cookies is actually not a secret at all. Perfect cookies are the result of good technique, which you can learn from Carrie Franzen of the Betty Crocker Test Kitchens! (Carrie’s the pastry chef and recipe developer responsible for creating our Christmas cookie recipes and many other irresistible desserts).
In this article, we’ll finally explain why it’s important to spoon your flour into the measuring cup, why softening your butter really does make a difference and the reasons we think cookie scoops and cooling racks are worthwhile investments!
Before You Begin
Most any baking project will be more seamless if you take these steps before beginning.
- Read your recipe at least once, to ensure you understand each step.
- Gather all your ingredients.
- Collect your tools, so everything is within arm’s reach.
- Preheat the oven.
- Measure out your ingredients—or “mise en place,” which translates from French to “putting everything in place,” and is a step chefs and bakers take to make putting together a recipe quicker and smoother.
Want to dig into more details about the tools and cookie baking ingredients the Betty Crocker Test Kitchen’s recommend? We’ve collected all their tips and tricks for your perusal.
Measure Accurately—This is the Foundation of Your Recipe
Too little flour can make a cookie flat and too much flour can make a cookie hard or crumbly, so learning to measure accurately is one of the keys to successful baking. Here’s how to measure a few key cookie ingredients.
- How to measure flour: Stir the flour, spoon it into your measuring cup until heaping, sweep the excess off the top with the flat edge of a butter knife.
- How to measure sugar: Granulated (white) sugar is measured just like flour: Spoon it into the cup until heaping, then sweep off excess with the flat edge of a butter knife. Brown sugar is packed firmly into the cup with the back of a spoon.
- How to measure liquid ingredients: Fill liquid measuring cup on a steady surface and read measurement at eye level.
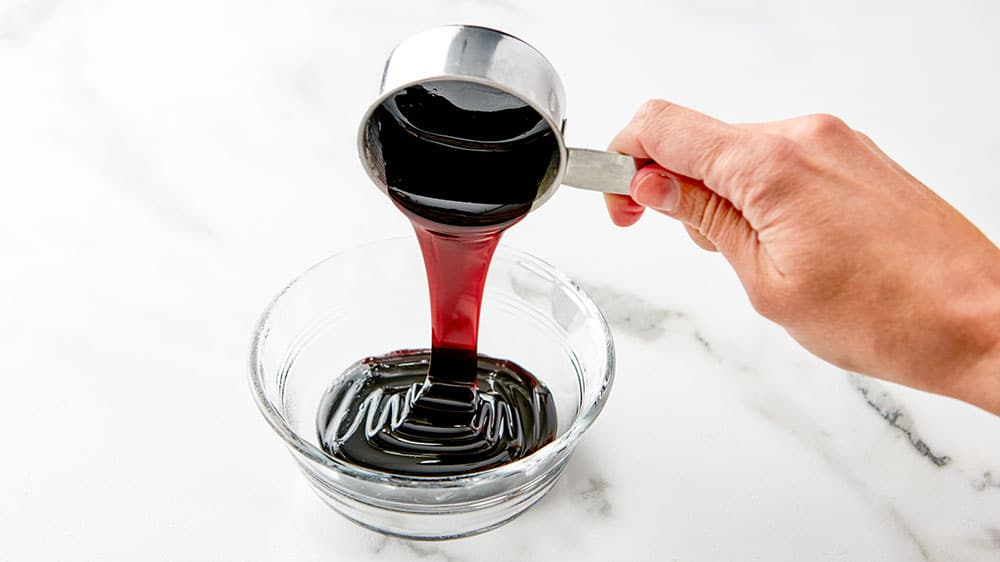
- How to measure sticky ingredients: When measuring molasses, honey, corn syrup or other similar ingredients, coat the inside of your measuring cup with cooking spray or lightly wipe with vegetable oil. This will help the sticky ingredient to slide right out.
- How to measure small amounts of ingredients: Measure small quantities of vanilla extract, salt, baking soda, etc. with measuring spoons. For dry ingredients, dip a measuring spoon until heaping and sweep excess off the top with the flat edge of a butter knife—just like you measure flour and sugar. For liquid ingredients, fill measuring spoon to rim.
As written above, Carrie recommends measuring out all of your ingredients—“mise en place”—before you start mixing them together. Many cookie recipes call for whisking together the dry ingredients, like flour, baking soda or baking powder and salt, in a separate bowl and adding them all at once to your dough (rather than adding dry ingredients separately), which brings us to our next step.
Mix Ingredients in the Right Order for Well-Blended Dough
Many cookie recipes call for the creaming method: mixing butter and sugar, before adding other ingredients. Creaming is beating butter and sugar until a lighter consistency is achieved. As you beat, air bubbles form. These air bubbles make it easier to integrate the dry ingredients and ultimately result in cookies with nice texture and shape. Here’s how it’s done in practice.
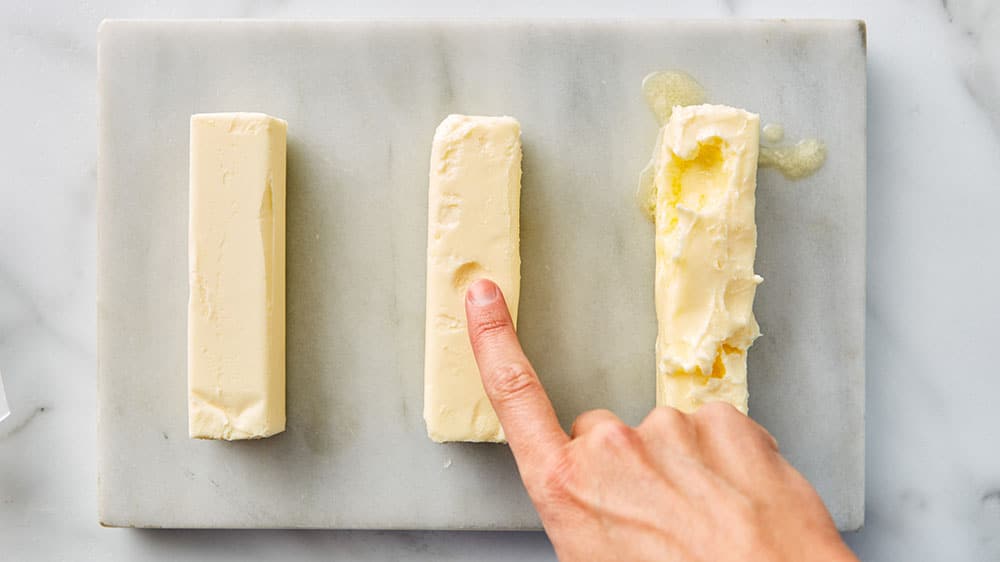
1. Allow butter to properly soften: Cut into small pieces and let sit at room temperature about 30 minutes. You can tell it’s properly softened when your finger leaves an indent. A faster method is to microwave butter in 5 second intervals at 50% power turning the butter frequently so butter is softened but not melted. Be careful not microwave the butter too long or you will have melted butter.
2. Beat or cream the softened butter and sugar(s) until light and fluffy. Add the softened butter to the bowl and begin to beat a little to start softening the butter (this helps prevent lumps in the dough later). Add sugar(s) and keep beating at medium speed until the mixture is fluffy and lighter in color. Be sure to scrape side of bowl occasionally, so all ingredients get incorporated. Mix until you don’t see the sugar but can still feel the graininess in the butter-sugar mixture.
3. Beat in the egg until well mixed. Beat in any flavoring called for—vanilla extract is the most common.
4. Stir in the dry ingredients, just until blended. The flour and other dry ingredients are almost always stirred in by hand to avoid over mixing the dough, which can result in tough cookies.
5. Add stir-ins, such as chocolate chips and nuts, and mix by hand until incorporated.
This method is used in our Ultimate Chocolate Chip Cookies recipe and other “drop” cookie recipes—think cookies that are scooped and “dropped” onto a cookie sheet, rather than rolled flat or sliced from a log.
Shape Dough Into Cookies of the Same Size for Even Baking
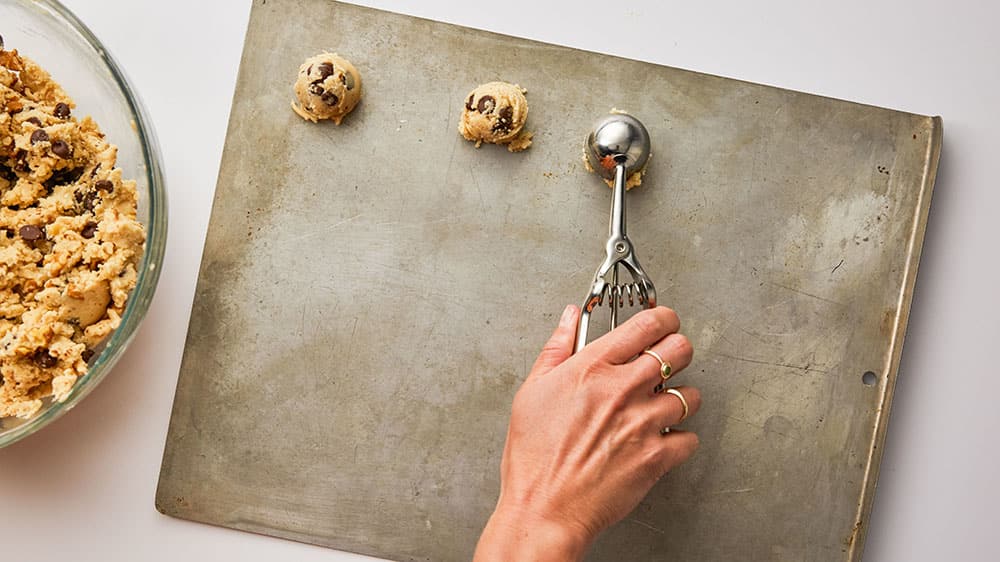
Since cookies all bake on the same sheet, it’s important that each cookie is about the same size, so they all bake up in the same amount of time. Always leave enough room for cookies to spread on the sheet—about 2 inches is a good rule of thumb. Generally, you should be able to fit about a dozen cookies on a sheet, without touching each other. Here’s are two easy way to shape cookies into uniform sizes.
- Method 1: Use a cookie scoop. We can’t say enough good about these relatively inexpensive tools, which look like mini, spring-loaded ice cream scoops. They make short work of portioning dough into evenly-sized and shaped cookies.
- Method 2: If you don’t have a cookie scoop, use two spoons: one to scoop and the other to push the dough onto the cookie sheet.
Of course, not all cookies are dropped onto a sheet. If you want to master rolled cookies—in which dough is rolled into a sheet and cookie cutters are used which dough is rolled into a flat sheet with cutters, check out How to Make Sugar Cookies.
Bake to the Goldilocks Zone
The margin of error is short on cookies. They can go from perfectly baked to burnt in a minute or two, but with these tips you can master baking cookies to their perfect doneness.
- Bake cookies one sheet at a time on the middle oven rack for best results. This allows for even distribution of heat, which results in even baking and browning of cookies
- If you are unsure of a cookie recipe, it’s a good idea to bake just one cookie as directed in the recipe and see how it performs. This will allow you to make adjustments needed before baking off an entire batch of so-so cookies. For fixes to common baking mistakes, check out our cookie troubleshooting guide.
- Use completely cooled cookie sheets. Cookies will spread too much if placed and baked on a warm or hot cookie sheet. To cool your cookie sheet, allow it to cool 5 to 10 minutes after removing from the oven. Then, run under cold water and dry completely before baking the next batch.
- Always set your timer to the minimum bake time listed in your recipe. If cookies do not appear done at that time, add 1 or 2 minutes before checking again.
- Look to the recipe for doneness guidelines. Color is generally a good indicator, as is set edges.
- Finally, if you don’t already own one, consider purchasing an oven thermometer. Most oven temperature gauges are 25 to 50 degrees off, so save your baked goods with an inexpensive in-oven thermometer.
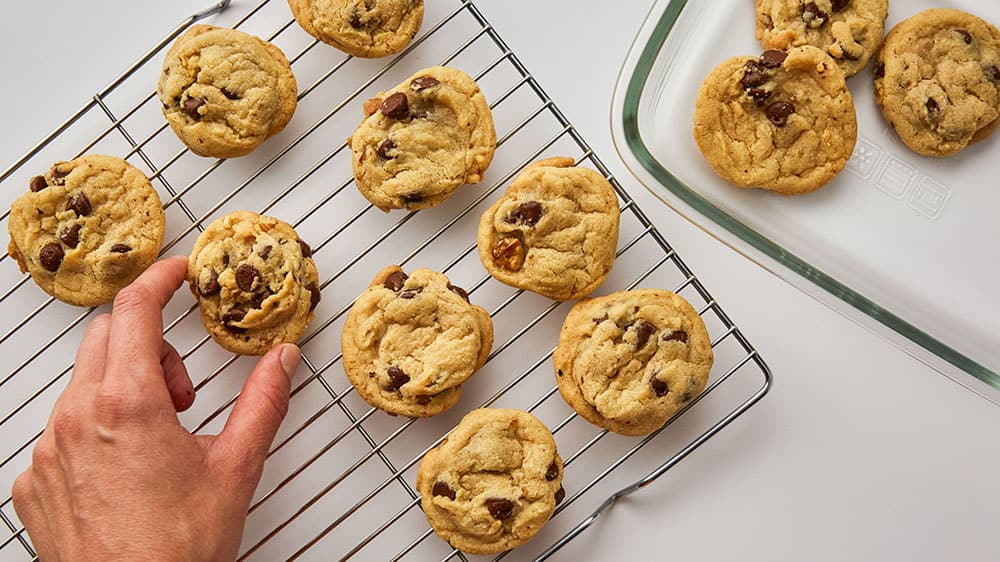
Cool as Mindfully as You Bake
Cookies don’t immediately stop baking once you remove them from the oven. As long as they’re on the hot pan, they will continue baking, which is why it’s important to pay attention to your cooling process. Here’s how to cool properly.
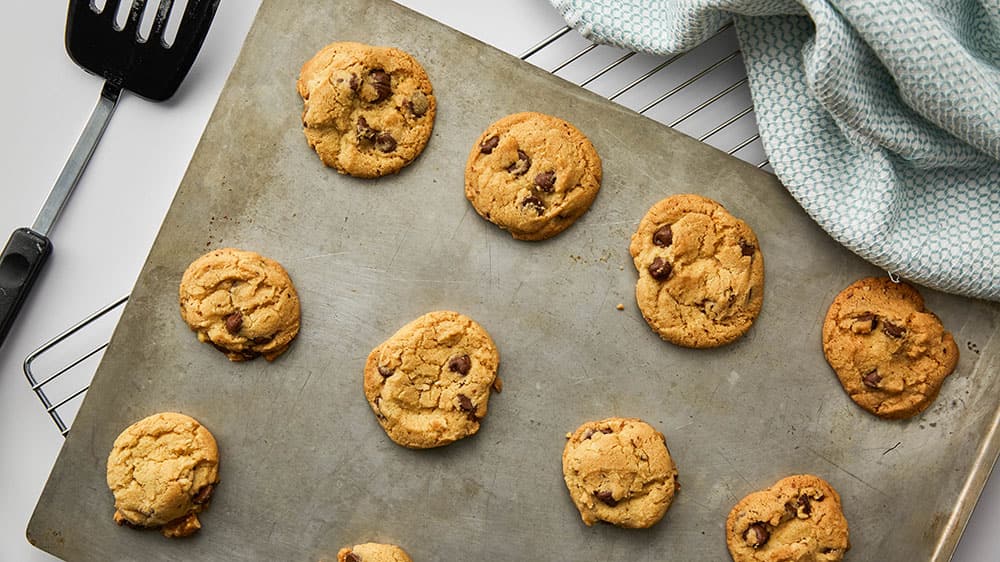
1. Once you remove the cookie sheet from the oven, let the cookies set on the pan for the time specified in your recipe. As the cookies sit on the cookie sheet, they firm up a bit, which makes them easier to move. But don’t let them sit for too longer or they might end up darker and crispier than you intended.
2. Use a flat, thin spatula to move cookies from the cookie sheet to a cooling rack. Placing cookies on a cooling rack allows air to circulate all around them, so they cool completely. If you don’t have a cooling rack, place cookies on a piece of parchment paper.
Store Properly to Keep Cookies Fresh
While nothing beats a cookie that’s still warm from the oven, your cookies can still taste delicious the next day, so long as you store them properly. Here’s how to keep fresh-baked cookies tasting great.
- Always, allow cookies to cool completely before storing. Otherwise, they will steam and get soggy.
- Most cookies can be stored in an airtight container at room temperature for up to 3 days.
- Cookies that are frosted or have a cream filling should be stored in the refrigerator.
- Frosted cookies should be allowed to set completely. Then stored in an airtight container with waxed paper separating layers.
How to Freeze Baked Cookies
Most baked cookies can be stored in airtight containers and frozen for up to 6 months—don’t forget to label them. Layer delicate or frosted cookies between sheets of waxed paper. Meringue, custard and cream-filled cookies do no freeze well. Thaw cookies in their container at room temperature for 1 to 2 hours. When thawing crispy cookies, remove from their container.
How to Store Cookie Dough
Cookie dough can be refrigerated or frozen for baking later. Store dough in a tightly covered container in the refrigerator for 2 to 4 days or freeze for up to 2 months.
More detailed information about how to freeze cookie dough and baked cookies.
Now that you know why your recipe calls for softened butter, how to measure properly and all the other techniques that go into making perfect cookies—you’re ready for any cookie recipe. Tell us which one you’ll bake first or ask us additional cookie baking questions in the comments section below. We always love hearing from our home cooks.
Ready for More Cookie Making Tips?
(function() {
document.addEventListener('DOMContentLoaded', function() {
var componentMetadata = JSON.parse('\x7b\x22componentName\x22\x3a\x22NewsletterCTA_b9911a56-3a0d-4b1c-8521-df6c10ce048a\x22,\x22deferOptions\x22\x3a\x7b\x22deferComponent\x22\x3atrue,\x22deferType\x22\x3a\x22OnDemand\x22,\x22deferId\x22\x3a\x22rcce72542ec33498c8734da33500d8f9a\x22,\x22deferredContainerId\x22\x3a\x22\x2fprimaryColumn\x2finteropInlineNewsletterCta\x22,\x22deferredContainerView\x22\x3a\x22InteropDeferWrapper\x22\x7d,\x22viewName\x22\x3a\x22NewsletterCTA\x22\x7d');
var configuration = {"unsubscribedNewsletters":[{"listId":"1e34a555-89d1-45f0-8f07-b3ae6b01c03c","thumbnailImageUrl":"/-/media/GMI/Core-Sites/BC/Images/Shared/myaccount/newsletters/BC_Thumb157x157.png?sc_lang=en","previewUrl":"https://morpheus3.idpk.net/email_sends/9111/preview","name":"Betty\u0027s Email","isPromo":false}],"settings":{"anonymousCopy":"Ready to Be Inspired?","anonymousDescriptionCopy":"We know you’ll love our daily tips, trends and tasty recipes sent right to your inbox.","anonymousThankYouCopy":"\u003cp\u003eThanks! Your first email is on its way.\u003c/p\u003e\n","anonymousThankYouDescriptionCopy":"\u003cp\u003e\u003cspan\u003eNow that you\u0026rsquo;re signed up, create an account on BettyCrocker.com to save your favorite recipes, learn more about special promotions and get inspired through Betty\u0026rsquo;s expert tips.\u003c/span\u003e\u003c/p\u003e","anonymousButtonText":"Sign up now","anonymousEmailInvalidErrorText":"Please enter a valid email address.","anonymousSubscribeErrorText":"We encountered an error while signing you up. Please try again.","anonymousEmailAddressPlaceholderText":"Enter your email address","anonymousEmailAddressLabel":"Email Address","anonymousLegalCopy":"By signing up, you accept our\u0026nbsp;\u003ca rel=\u0022noopener noreferrer\u0022 href=\u0022https://www.generalmills.com/privacy-security/us-english-privacy-policy\u0022 target=\u0022_blank\u0022\u003e\u003cspan style=\u0022text-decoration: underline;\u0022\u003ePrivacy Policy\u003c/span\u003e\u003c/a\u003e\u0026nbsp;and agree that your information may be used across our\u0026nbsp;\u003ca rel=\u0022noopener noreferrer\u0022 href=\u0022https://www.generalmills.com/food-we-make/brands\u0022 target=\u0022_blank\u0022\u003e\u003cspan style=\u0022text-decoration: underline;\u0022\u003efamily of brands\u003c/span\u003e.\u003c/a\u003e","requiredFieldText":"","standardSmallImageUrl":"/-/media/GMI/Core-Sites/BC/Images/BC/seasonal/2021_Christmas/ncta_bg.png","standardLargeImageUrl":"/-/media/GMI/Core-Sites/BC/Images/BC/seasonal/2021_Christmas/ncta_bg.png","backgroundColor":"#333333","accentColor":"","registrationUrl":"/register/reg-fp?RegAction=SUBSCRIBERUPGRADE\u0026esrc=11275\u0026returnUrl=%2fhow-to%2ftipslibrary%2fbaking-tips%2fcookie-baking-basics","registrationLinkText":"Join free!","enableExpandedFields":false,"hideForSessionCookieExpiration":0,"ctaType":"StandardAnonymous","location":"Inline","userState":"Anonymous","sourceCodeOverride":0}};
var moduleName = 'newsletterCta';
var isVueModule = true;
GeneralMills.PandoSites.RegisterControlInstance(moduleName, configuration, componentMetadata, isVueModule)
});
})();
(function() {
document.addEventListener('DOMContentLoaded', function() {
var componentMetadata = JSON.parse('\x7b\x22componentName\x22\x3a\x22ConsumerGeneratedContent_e3484608-ea09-4bdf-bb71-259a5728aa65\x22,\x22deferOptions\x22\x3a\x7b\x22deferComponent\x22\x3atrue,\x22deferType\x22\x3a\x22OnDemand\x22,\x22deferId\x22\x3a\x22r32c79459c9cf48dca5393037c36bd17a\x22,\x22deferredContainerId\x22\x3a\x22\x2fratingReview\x2finteropRatingReview\x22,\x22deferredContainerView\x22\x3a\x22InteropDeferWrapper\x22\x7d,\x22viewName\x22\x3a\x22ConsumerGeneratedContent\x22\x7d');
var configuration = {"loaderScript":"https://apps.bazaarvoice.com/deployments/bettycrocker/main_site/production/en_US/bv.js","type":"QuestionAndAnswer","language":"en","includeRatings":false};
var moduleName = 'consumerGeneratedContent';
var isVueModule = true;
GeneralMills.PandoSites.RegisterControlInstance(moduleName, configuration, componentMetadata, isVueModule)
});
})();