(function() {
document.addEventListener('DOMContentLoaded', function() {
var componentMetadata = JSON.parse('\x7b\x22componentName\x22\x3a\x22ChannelLinks_8918a218-1030-4c2b-87de-605f1d7de656\x22,\x22deferOptions\x22\x3a\x7b\x22deferComponent\x22\x3afalse,\x22deferType\x22\x3a\x22None\x22,\x22deferId\x22\x3a\x22rd26530828fed4e538a1c377019a631a3\x22,\x22deferredContainerId\x22\x3a\x22\x2fchannelLinks\x22,\x22deferredContainerView\x22\x3anull\x7d,\x22viewName\x22\x3a\x22ChannelLinks\x22\x7d');
var configuration = {};
var moduleName = 'channelLinks';
var isVueModule = true;
GeneralMills.PandoSites.RegisterControlInstance(moduleName, configuration, componentMetadata, isVueModule)
});
})();
(function() {
document.addEventListener('DOMContentLoaded', function() {
var componentMetadata = JSON.parse('\x7b\x22componentName\x22\x3a\x22ActionToolbar_59e5fa31-dc57-46ea-93d1-265650a760f0\x22,\x22deferOptions\x22\x3a\x7b\x22deferComponent\x22\x3atrue,\x22deferType\x22\x3a\x22OnDemand\x22,\x22deferId\x22\x3a\x22ra0fea519a9b247d9a80fbd970b6782e1\x22,\x22deferredContainerId\x22\x3a\x22\x2ffloatingActionToolbar\x2ffloatingActionToolbar_interop\x22,\x22deferredContainerView\x22\x3a\x22InteropDeferWrapper\x22\x7d,\x22viewName\x22\x3a\x22ActionToolbar\x22\x7d');
var configuration = {"contentId":"6e7dc80f-62df-4b16-9906-4908b07c256d","toolbarSettings":{"id":"59e5fa31-dc57-46ea-93d1-265650a760f0","regAction":"FAVORITE","eSourceCode":11275,"namePassedToEvents":"ArticleStandardLongFormToolbar","buttons":[{"addFavoriteErrorMessage":"Sorry, something went wrong. Please save again.","removeFavoriteErrorMessage":"Error occurred while removing from favorites","regAction":"FAVORITE","eSourceCode":11275,"isCurrentUserAnonymous":false,"isFavoriteItem":false,"id":"16a29701-2b75-4d9a-aa9c-860376da50d7","allowedForAnonymousUsers":false,"type":"Favorite","displayName":"Save","namePassedToEvents":"Favorite","cssClassName":"atButtonFavorite","privacyOptOutMessage":"\u003cdiv class=\u0027privacyMessage\u0027\u003e\n\u003ch3\u003eThis feature is not available with your current cookie settings.\u003c/h3\u003e\n\u003cp\u003eYou can \u003ca href=\u0027#\u0027 data-show-preference-center=\u00271\u0027\u003eupdate your privacy settings\u003c/a\u003e to enable this content. Please enable “Functional Cookies” to use this feature.\u003c/p\u003e\n\u003c/div\u003e","showPrivacyOptOutMessage":false},{"providerName":"pinterest","providerNamePassedToEvents":"Pinterest","shareUrlFormat":"//pinterest.com/pin/create/link/?url={0}","id":"c18cf08e-e436-4cd0-a180-1bafb15369a6","allowedForAnonymousUsers":true,"type":"Social","displayName":"Pinterest","namePassedToEvents":"Pinterest","cssClassName":"atButtonPinterest","privacyOptOutMessage":"\u003cdiv class=\u0027privacyMessage\u0027\u003e\n\u003ch3\u003eThis feature is not available with your current cookie settings.\u003c/h3\u003e\n\u003cp\u003eYou can \u003ca href=\u0027#\u0027 data-show-preference-center=\u00271\u0027\u003eupdate your privacy settings\u003c/a\u003e to enable this content. Please enable “Functional Cookies” to use this feature.\u003c/p\u003e\n\u003c/div\u003e","showPrivacyOptOutMessage":false},{"templateId":"13bdd311-4300-4fb8-9d78-9cbaf98f5578","dialogHeading":"Email Article","emailCode":"BC_ContentEmail","dialogSettings":{"cancelButtonText":"Cancel","copyToSenderLabel":"Send a Copy to Myself","emailAddressesLabel":"* Email Address(es)","emailInstructionText":"Separate email addresses with commas","fromText":"From:","privacyPolicyText":"\u003cp\u003e\u0026copy;2024 General Mills, Inc. All Rights Reserved. This information will only be used to send an email to your friend(s) and will not be saved. Please read our \u003ca rel=\u0022noopener noreferrer\u0022 rel=\u0022noopener noreferrer\u0022 href=\u0022http://www.generalmills.com/company/privacy-policies/privacy-policy-us\u0022 target=\u0022_blank\u0022 shape=\u0022rect\u0022\u003ePrivacy Policy\u003c/a\u003e.\u003c/p\u003e","requiredFieldText":"* Required","sendButtonText":"Send","senderEmailAddressLabel":"* Your Email Address","senderFirstNameLabel":"* Your First Name","sendToText":"Send To:"},"id":"be9422a3-85a8-4c31-86f5-e171255bb89d","allowedForAnonymousUsers":true,"type":"Email","displayName":"Email","namePassedToEvents":"Email","cssClassName":"atButtonEmail","privacyOptOutMessage":"\u003cdiv class=\u0027privacyMessage\u0027\u003e\n\u003ch3\u003eThis feature is not available with your current cookie settings.\u003c/h3\u003e\n\u003cp\u003eYou can \u003ca href=\u0027#\u0027 data-show-preference-center=\u00271\u0027\u003eupdate your privacy settings\u003c/a\u003e to enable this content. Please enable “Functional Cookies” to use this feature.\u003c/p\u003e\n\u003c/div\u003e","showPrivacyOptOutMessage":false},{"providerName":"facebook","providerNamePassedToEvents":"Facebook","shareUrlFormat":"//facebook.com/sharer/sharer.php?u={0}","id":"6c3f442d-6ffe-460f-8360-b02b122d326c","allowedForAnonymousUsers":true,"type":"Social","displayName":"Facebook","namePassedToEvents":"Facebook","cssClassName":"atButtonFacebook","privacyOptOutMessage":"\u003cdiv class=\u0027privacyMessage\u0027\u003e\n\u003ch3\u003eThis feature is not available with your current cookie settings.\u003c/h3\u003e\n\u003cp\u003eYou can \u003ca href=\u0027#\u0027 data-show-preference-center=\u00271\u0027\u003eupdate your privacy settings\u003c/a\u003e to enable this content. Please enable “Functional Cookies” to use this feature.\u003c/p\u003e\n\u003c/div\u003e","showPrivacyOptOutMessage":false},{"layoutParameter":"p%3d1","id":"de022929-4416-4bc9-ab3c-ae5711d562bf","allowedForAnonymousUsers":true,"type":"Print","displayName":"Print","namePassedToEvents":"Print","cssClassName":"atButtonPrint","privacyOptOutMessage":"\u003cdiv class=\u0027privacyMessage\u0027\u003e\n\u003ch3\u003eThis feature is not available with your current cookie settings.\u003c/h3\u003e\n\u003cp\u003eYou can \u003ca href=\u0027#\u0027 data-show-preference-center=\u00271\u0027\u003eupdate your privacy settings\u003c/a\u003e to enable this content. Please enable “Functional Cookies” to use this feature.\u003c/p\u003e\n\u003c/div\u003e","showPrivacyOptOutMessage":false}],"isSticky":true},"userSettings":{"isCurrentUserAnonymous":true,"isFavoriteItem":false},"pageAttributes":{"url":"https%3a%2f%2fwww.bettycrocker.com%2fhow-to%2ftipslibrary%2fbaking-tips%2fHow-to-Frost-a-Cake-Ombre-Style","contentId":"6e7dc80f-62df-4b16-9906-4908b07c256d"},"recaptchaPublicKey":"6LfU_icUAAAAALSqSjRg5hqZwbPr1b8k-_80a_S_"};
var moduleName = 'actionToolbar';
var isVueModule = true;
GeneralMills.PandoSites.RegisterControlInstance(moduleName, configuration, componentMetadata, isVueModule)
});
})();
A few months ago, I discovered one of the most beautiful cakes I had ever seen. It was frosted all in one color, but the color faded towards the top of the cake. I thought it was elegant and couldn’t wait to make one of those gorgeous ombre cakes on my own.
At first, I thought an ombre cake might be a nightmare to complete at home. It looked so complicated. But I found out after making it that it’s really quite simple.
To make an amazing ombre cake that really shows off the different colors, it’s best to make a tall cake. So I made 2 boxes of Betty Crocker® SuperMoist® vanilla cake in two deep 8-inch cake pans. I leveled the cakes, cut each in half and carefully stacked them, spreading white buttercream frosting between the layers.
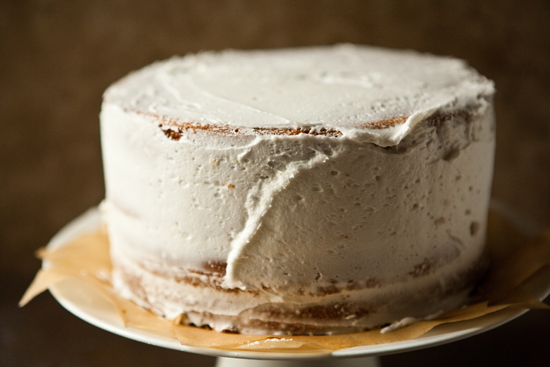
Then I applied a crumb coating to the cake. A crumb coating is when you frost your cake with a thin layer of frosting, not worrying about what it looks like. This step is essential because it will seal in crumbs so they won’t show when you apply the final layer of frosting.
After the crumb coat is done, divide the frosting into three bowls. I put 1 cup of icing in three little bowls and 2 cups of icing in the fourth bowl. All of the smaller amounts of icing were the darker shades of blue, and the 2 cups of icing was the lightest. To tint the frosting, use Betty Crocker classic gel food color in blue.
I didn’t use one, but a turntable would be very helpful when frosting this cake.
Then frost with the next shade of blue, spreading it right above the dark blue frosting.
Same thing goes for the next shade of blue frosting. Spread it on the upper third of the cake.
Lastly, spread the lightest shade of blue buttercream on the top of the cake.
Use a spatula to spread it as evenly as possible.
For the finishing touch, I used a frosting comb. (These are available at any craft store, but you could also just use your spatula for a smooth look.)
Take a first sweep around the cake.
I saw there were some gaps in my frosting, so I used my fingers to add a little more to those spots.
Take a few more sweeps around the cake until you are happy with the pattern. I also used the comb on the top of the cake to make a circular pattern.
Clean up the excess frosting on the cake plate with a damp paper towel.
This cake would be beautiful in any color. Next time I’m going to make a pink ombre cake filled with fresh strawberry jam. Yum!
(function() {
document.addEventListener('DOMContentLoaded', function() {
var componentMetadata = JSON.parse('\x7b\x22componentName\x22\x3a\x22NewsletterCTA_b9911a56-3a0d-4b1c-8521-df6c10ce048a\x22,\x22deferOptions\x22\x3a\x7b\x22deferComponent\x22\x3atrue,\x22deferType\x22\x3a\x22OnDemand\x22,\x22deferId\x22\x3a\x22r08af9994a1ca484b9b0ee6cb55c3dea2\x22,\x22deferredContainerId\x22\x3a\x22\x2fprimaryColumn\x2finteropInlineNewsletterCta\x22,\x22deferredContainerView\x22\x3a\x22InteropDeferWrapper\x22\x7d,\x22viewName\x22\x3a\x22NewsletterCTA\x22\x7d');
var configuration = {"unsubscribedNewsletters":[{"listId":"1e34a555-89d1-45f0-8f07-b3ae6b01c03c","thumbnailImageUrl":"/-/media/GMI/Core-Sites/BC/Images/Shared/myaccount/newsletters/BC_Thumb157x157.png?sc_lang=en","previewUrl":"https://morpheus3.idpk.net/email_sends/9111/preview","name":"Betty\u0027s Email","isPromo":false}],"settings":{"anonymousCopy":"Ready to Be Inspired?","anonymousDescriptionCopy":"We know you’ll love our daily tips, trends and tasty recipes sent right to your inbox.","anonymousThankYouCopy":"\u003cp\u003eThanks! Your first email is on its way.\u003c/p\u003e\n","anonymousThankYouDescriptionCopy":"\u003cp\u003e\u003cspan\u003eNow that you\u0026rsquo;re signed up, create an account on BettyCrocker.com to save your favorite recipes, learn more about special promotions and get inspired through Betty\u0026rsquo;s expert tips.\u003c/span\u003e\u003c/p\u003e","anonymousButtonText":"Sign up now","anonymousEmailInvalidErrorText":"Please enter a valid email address.","anonymousSubscribeErrorText":"We encountered an error while signing you up. Please try again.","anonymousEmailAddressPlaceholderText":"Enter your email address","anonymousEmailAddressLabel":"Email Address","anonymousLegalCopy":"By signing up, you accept our\u0026nbsp;\u003ca rel=\u0022noopener noreferrer\u0022 href=\u0022https://www.generalmills.com/privacy-security/us-english-privacy-policy\u0022 target=\u0022_blank\u0022\u003e\u003cspan style=\u0022text-decoration: underline;\u0022\u003ePrivacy Policy\u003c/span\u003e\u003c/a\u003e\u0026nbsp;and agree that your information may be used across our\u0026nbsp;\u003ca rel=\u0022noopener noreferrer\u0022 href=\u0022https://www.generalmills.com/food-we-make/brands\u0022 target=\u0022_blank\u0022\u003e\u003cspan style=\u0022text-decoration: underline;\u0022\u003efamily of brands\u003c/span\u003e.\u003c/a\u003e","requiredFieldText":"","standardSmallImageUrl":"/-/media/GMI/Core-Sites/BC/Images/BC/seasonal/2021_Christmas/ncta_bg.png","standardLargeImageUrl":"/-/media/GMI/Core-Sites/BC/Images/BC/seasonal/2021_Christmas/ncta_bg.png","backgroundColor":"#333333","accentColor":"","registrationUrl":"/register/reg-fp?RegAction=SUBSCRIBERUPGRADE\u0026esrc=11275\u0026returnUrl=%2fhow-to%2ftipslibrary%2fbaking-tips%2fHow-to-Frost-a-Cake-Ombre-Style","registrationLinkText":"Join free!","enableExpandedFields":false,"hideForSessionCookieExpiration":0,"ctaType":"StandardAnonymous","location":"Inline","userState":"Anonymous","sourceCodeOverride":0}};
var moduleName = 'newsletterCta';
var isVueModule = true;
GeneralMills.PandoSites.RegisterControlInstance(moduleName, configuration, componentMetadata, isVueModule)
});
})();
(function() {
document.addEventListener('DOMContentLoaded', function() {
var componentMetadata = JSON.parse('\x7b\x22componentName\x22\x3a\x22ConsumerGeneratedContent_6e7dc80f-62df-4b16-9906-4908b07c256d\x22,\x22deferOptions\x22\x3a\x7b\x22deferComponent\x22\x3atrue,\x22deferType\x22\x3a\x22OnDemand\x22,\x22deferId\x22\x3a\x22r5b37543f7e5248c2b65a72af4a18f9dc\x22,\x22deferredContainerId\x22\x3a\x22\x2fratingReview\x2finteropRatingReview\x22,\x22deferredContainerView\x22\x3a\x22InteropDeferWrapper\x22\x7d,\x22viewName\x22\x3a\x22ConsumerGeneratedContent\x22\x7d');
var configuration = {"loaderScript":"https://apps.bazaarvoice.com/deployments/bettycrocker/main_site/production/en_US/bv.js","type":"QuestionAndAnswer","language":"en","includeRatings":false};
var moduleName = 'consumerGeneratedContent';
var isVueModule = true;
GeneralMills.PandoSites.RegisterControlInstance(moduleName, configuration, componentMetadata, isVueModule)
});
})();